Categories: Novice electricians, Electrician at home
Number of views: 265,623
Comments on the article: 9

How to install a power outlet. Detailed photo instructions for installing outlets


Before installing the outlet, you must turn off the circuit breaker in the electrical panel in the apartment or on the stairwell. In this case, you must make sure that it has worked and there is no voltage in the outlet. You can check this using a screwdriver indicator or a multimeter (see - How to use a multimeter).

To install the sockets, we need the following tools: level, knife, pencil, screwdriver, pliers, wire cutters.

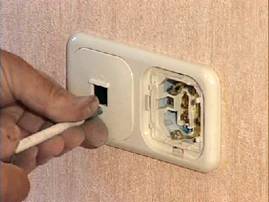
Consider installation of a double outlet, where in one part it will be electric, and in the other a telephone jack.

For ease of installation, the wires should protrude from the box by 50 - 80 millimeters. For strict horizontal installation of the outlet, using the level, mark on the sides of the place of internal mounting of the outlet. Having pulled out the wires, carefully clean their ends from the factory insulation. The bare ends of the wires, preferably not longer than 10 millimeters.
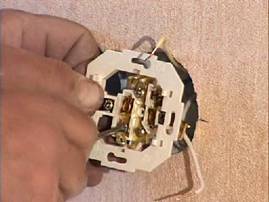
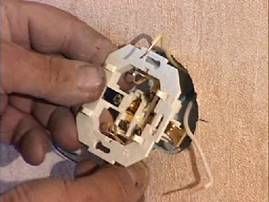
Detailed photo instructions for installing outlets
  alt

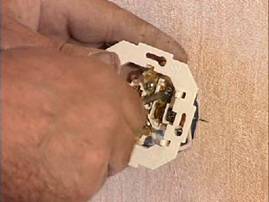
Modern wiring has three wires and is called a three-wire, one of the three wires is grounding, the other phase and the third neutral wire. The indoor unit of the outlet is equipped with three terminals, to which these three cores are connected.
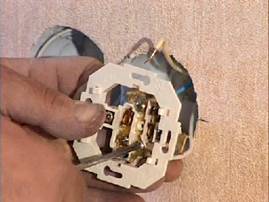
alt
  alt

Checking that the wires are not intertwined under the outlet, we begin the installation, according to our markup. On the front side of the indoor unit, there are mounting screws. Alternately screwing these screws with a screwdriver, we begin to part the outer tabs mounted on the outlet.
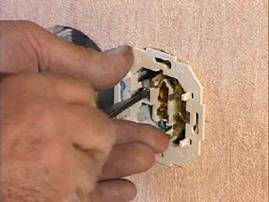
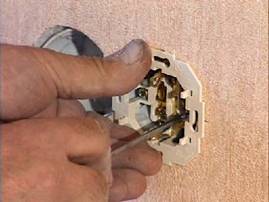
How to install a power outlet
  alt

The paws diverge and abut either against a concrete wall or into a plastic walled-in insert, as in our case, and firmly fix the internal block of the outlet. Turning the screws one after the other allows for a smooth installation of the socket.
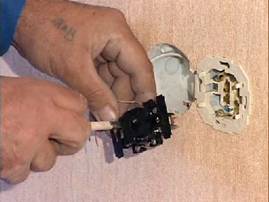
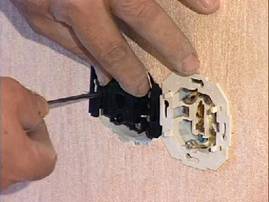
How to install a power outlet
  alt

To install a telephone jack, you also need to strip the wires from the factory insulation and connect them to the three connectors of the telephone box itself, according to the notation printed on the front surface of the indoor unit. After connecting the wires, carefully fix the unit in the wall, according to our marking.

See more about this here: How to install and connect a telephone jack
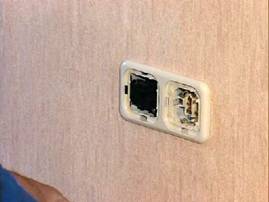
How to install a power outlet
alt

Combining both sockets will help us with a protective double edging and front panels.

In modern double or single blocks, the protective edging is latched onto the inner box, and the front panels are fastened with screws that are screwed into the inner block as well.
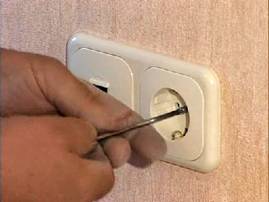
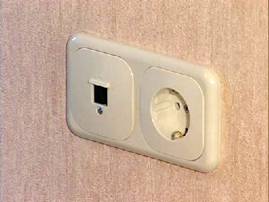
How to install a power outlet
  alt

Thus, the entire structure of the outlet is held by the very paws that we tightened alternately. The trouble with all new settlers is the fact that, unlike the switch, a rather powerful force is applied to the outlet when pulling the plug from the outlet. And if the paws do not hold the internal unit of the socket well, then after a certain not so long time, the socket comes out of the wall, following the electric plug pulled out. Trouble is treated in one way.


If you install the outlet in a concrete wall and the mounting plastic insert is not installed in it, then do the following:

With some kind of tool, I advise with a chisel (of course it is a pity, but you can grind it later) or a chisel, make small indentations in the wall where the paws will rest. Then, when tightening them, they will fall into these recesses and securely fix the internal unit of the outlet in the wall.

If there is a plastic mounting insert in the wall, then in those places where the legs will rest on it, you need to use the same chisel to make cuts in plastic, that is, almost the same recesses. Recently, mounting inserts, thank God, began to be made inside corrugated and in them the legs have something to cling to.

That's all. Socket installed!

We advise you to read: Features of mounting sockets and switches on various surfacesArmature for mounting sockets and switches. And another useful article on this topic -How to install a block of electrical switches with a socket

See also at i.electricianexp.com:

  • How to replace an external outlet with an internal
  • How to remove a wall outlet and disassemble it
  • Armature for mounting sockets and switches
  • How to place outlets in living rooms
  • Installation boxes for sockets

  •  
     
    Comments:

    # 1 wrote: Daria | [quote]


    class) today I installed the outlet myself, thanks to you :)) I'm now an electrician of the first level :)) thanks!

     
    Comments:

    # 2 wrote: Oleg | [quote]


    On the socket shown in the photo, in addition to the legs, there are 4 more curly cuts for additional fixing with screws. In order to use them, it is necessary that there are corresponding screw holes on the socket. usually 0, 2 or 4. The more the better. In addition, you can find outlets with additional holes in the frame at the corners, for which you can additionally press against the dowels. A great option if the undergrowth without ext. holes for curly cuts, but to drill under the dowels, of course, you must be extremely careful not to get into the wire ...

     
    Comments:

    # 3 wrote: | [quote]


    The impression was that the article was written by an apprentice electrician :). If you are already writing for dummies, then please, write down, at least slightly, the marking of the wires, and, in the meanwhile, indicate where to connect the ground wire;). It is desirable with a fot close-up. So that people do not fantasize.

     
    Comments:

    # 4 wrote: [quote]


    uletniy - on every forum there should be such a ram with a self-poverty, writhing from itself the all-knowing god.

    Quote: uletniy
    To little people not fantasized.

     
    Comments:

    # 5 wrote: Novel | [quote]


    uletniy is right!

    Quote:

    "Modern wiring has three wires and is called a three-wire, one of the three wires is grounding, the other is the phase and the third is the neutral wire. The indoor unit of the outlet is equipped with three terminals to which these three wires are connected." Explanation required:

    Yellow-green is always protective ground, blue / cyan is working zero, the remaining is phase. I know an example of electric shock from a refrigerator connected to a socket made by an electrician of the first level. The brown wire was connected to the grounding contact, the refrigerator worked fine. Although I know cases when Tajiks electricians-tilers-plasterers-painters used yellow-green as a phase. Use devices and visual control of connections.

     
    Comments:

    # 6 wrote: Ruslan | [quote]


    It happens that the paws are not pulled out - in these cases, you can use pieces of linoleum.

     
    Comments:

    # 7 wrote: Igor | [quote]


    I'll tell you how to safely make a euro from a Soviet outlet. I am writing based on a similar publication that I saw on one site. From the read, the hair stood on end, if you follow all the instructions of that author, an electric shock is provided. Each person was faced with a situation where, for example, you bring home a brand new foreign TV, and its plug does not fit the outlet. You need a euro socket, and in front of you is a good old Soviet one. What to do? It would be nice to replace it with the euro, in any store of electrical goods a wide range and favorable prices. Only this is in the store, you still have to go there, but you need a socket now ... You can use a special adapter that is worn on the plug of an electrical appliance and inserted into our Soviet socket. The good thing is that the adapter is not tied to the place and can be used on outlets throughout the house, but what if you have several electrical appliances for the euro and only one adapter? Again, you need to go to the store. We need a simple and quick solution, and it is ... In order to connect your brand new TV to the network, just remove the cover from the outlet. After this tricky manipulation of the euro, the plug can already be connected.The disadvantage of this solution is that live parts remain open and there is a high risk of accidental contact with them or a short circuit, which can lead to electrical injury and damage to household appliances. It will be best to remove the cover from our Soviet outlet and use a drill to make the holes wider, and then assemble everything back. Well, there when there will be inspiration, you can already replace the socket with a euro. Always remember the main thing about observing safety measures! Disconnect the plugs, check the absence of voltage. If you do not understand electricity, then it is better not to meddle and entrust this matter to specialists!

     
    Comments:

    # 8 wrote: | [quote]


    Igor! "It would be best to remove the cover from our Soviet outlet and make the holes wider with a drill." About 18 years ago, the same need arose. The diameter of the plug of the Soviet plug is 4mm, and for the euro - 5mm. My double socket to prevent pulling out of the concrete wall was walled up with alabaster. He removed the socket cover and inserted the euro plug several times into the socket contacts, so that the plug more or less worked well and there was not much effort when pulling it out. The material of the lid of a white outlet, somewhat similar in properties to carbolite, does not burn, but crumbles. He expanded the holes with a 5.2 mm diameter drill with a hand drill at low speeds gradually on both sides so that chips would not form at the output of the drill. For all this time, the socket served for the euro plug of the power cord of the vacuum cleaner and iron with euro plugs each; and nothing blurred and didn’t burst from the wall. Now in the outlet stores in Aalom, I don’t like the Euro sockets for hidden wiring and protruding from the wall, I prefer two-pin universal sockets. In non-new homes, grounding is absent as such, so that an electric kettle or vacuum cleaner can work normally without a third grounding wire. Grounding (like a bus) is actually done in a private house or on the 1st floor of a multi-storey building.

     
    Comments:

    # 9 wrote: | [quote]


    So easily, no sockets or switches were set. Most often there is hemorrhage. In old (and new too) curved walls, corners, seats, glasses with broken or uneven corners. As a result, the paws are not fixed securely or because of the uneven surface of the wall, the outlet rises crookedly not flush with the wall. And here it’s not the electrician’s job but the plasterers.