Measuring temperature and humidity on Arduino - a selection of ways
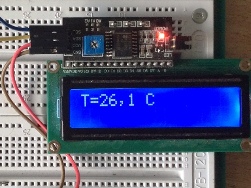 To create a home weather station or thermometer, you need to learn how to pair the Arduino board and a device for measuring temperature and humidity. Temperature measurement can be dealt with using a thermistor or a digital sensor DS18B20, but for measuring humidity use more complex devices - sensors DHT11 or DHT22. In this article, we’ll show you how to measure temperature and humidity using the Arduino and these sensors.
The easiest way to determine the temperature is to use a thermistor. This is a type of resistor whose resistance depends on the ambient temperature. There are thermistors with a positive and negative temperature coefficient of resistance - PTC (also called posistors) and NTC-thermistors, respectively. In the graph below you see the temperature dependence of resistance. The dashed line shows the dependence ...
What are Nextion displays and how to work with them?
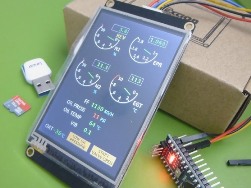 For the implementation of any projects, whether it is a smart home, industrial automation, a device for outputting computer systems, or a simple clock, you will need an output device. A simple option is seven-segment LED indicators. But such an implementation would be inconvenient to use. To make the system modern and convenient, you need to use full-fledged LCD displays. In this article, we will talk about Nextion displays, what it is, how, and why they can be used.
The manufacturer positions the Nextion touch displays as HMI - Human-machine interface, which in Russian sounds like a "Human-machine interface." This is the name of any device with the help of which human-machine interactions take place: parameter monitoring, control of actuators, data entry, etc. In practice, this is not just a display, but a device with a 32-bit ARM microcontroller on board, which "can" not only display data ...
About microcontrollers for beginners - creation history, main types and differences
 Microcontrollers are an integral part of the life of a modern person. They are used from children's toys to process control systems. Thanks to the use of microcontrollers, engineers managed to achieve greater manufacturing speed and product quality in almost all areas of production. This material is an overview of key dates in the history of microcontrollers. This is not a technical guide, many subtleties and points are missing.
To understand the reasons for the appearance and development of microprocessor technology, take a look at the characteristics and features of the first computers. ENIAC - the first computer, 1946. Weight - 30 tons, occupied the whole room or 85 cubic meters of volume in space. Large heat dissipation, power consumption, constant malfunctions due to electronic lamp connectors. Oxides led to the disappearance of contacts and lamps lost contactlost contact with the board ...
RTC Real-Time Clock Chips - Purpose, Types and Examples of Use
 To perform any tasks related to automation, you often need to count certain time intervals. Sometimes this is done by counting a certain number of periods of the clock or machine cycles. However, although they follow at a given frequency and most often depend on the quartz resonator, when performing operations in real time, and especially if they are tied to the time of day, they shift in time. To solve this problem, use real-time clock or RTC chips.
RTC (real time clock, Russian real-time clock) is a type of microcircuit intended for counting time in “real” units (seconds, minutes, hours, etc.). They are dependent on a power source, which can be either external, in the form of a replaceable battery or a lithium battery, or integrated into the microcircuit housing.Clock signals for time reporting can be obtained from an external quartz resonator ...
What are the displays for Arduino and how to connect them
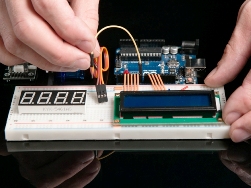 Microcontrollers allow you to make any automation and monitoring system. But for the interaction of technology and man, we need both input devices - various buttons, levers, potentiometers, and output devices - light indicators (bulbs), various sound signaling devices (tweeters), and finally displays. In this article, we will look at character displays for Arduino, how to connect them and make them work.
Displays can be divided into segment (such as a digital clock), alphanumeric and graphic. Segmented are used to indicate simple quantities, for example: temperature, time, number of revolutions. Such are used in calculators and on budget household appliances to this day. Information is displayed by highlighting certain characters. They can be both liquid crystal and LED. Alphanumeric displays can be found on the old technology ...
How to connect incremental encoder to Arduino
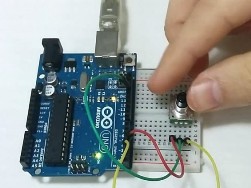 Often in devices on microcontrollers you need to organize the management of menu items or implement some adjustments. There are many ways: use buttons, variable resistors, or encoders. The incremental encoder allows you to control something by means of the endless rotation of the handle. In this article, we will look at how to make the incremental encoder and Arduino work.
The incremental encoder, like any other type of encoder, is a device with a rotating handle. Distantly, it resembles a potentiometer. The main difference from the potentiometer is that the encoder handle rotates 360 degrees. He has no extreme provisions. Encoders come in many types. Incremental differs in that with its help it is impossible to know the position of the handle, but only the fact of rotation in some direction - to the left or to the right. By the number of signal pulses, you can already calculate at what angle it turned ...
PIC microcontrollers for beginners
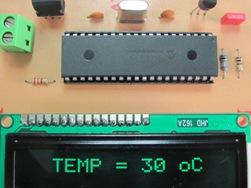 In the modern market there are a number of families and series of microcontrollers from different manufacturers, among them AVR, STM32 and PIC can be distinguished. Each of the families has found its own scope. In this article I will tell beginners about PIC microcontrollers, namely, what it is and what you need to know to get started with them.
PIC is the name of a series of microcontrollers manufactured by Microchip Technology Inc (USA). The name PIC comes from the Peripheral Interface Controller. PIC microcontrollers have a RISC architecture. RISC - an abbreviated set of instructions, is also used in processors for mobile devices.In 2016, Microchip bought Atmel, a manufacturer of AVR controllers. Therefore, the official website presents microcontrollers of the family and PIC and AVR.Among 8-bit PIC microcontrollers, it consists of 3 familieswhich differ in bit depth and a set of commands...
Methods for reading and managing Arduino I / O ports
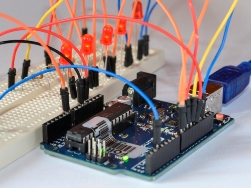 To interact with the outside world, you need to configure the outputs of the microcontroller to receive or transmit a signal. As a result, each pin will work in the input and output mode. There are two ways to do this on every Arduino board you love, exactly how you learn from this article.
Everyone knows that Arduino is programmed in C ++ with some adaptation and simplifications for beginners. It is called Wiring. Initially, all arduino ports are defined as inputs, and there is no need to specify this in the code. There are three modes in which the port can operate: INPUT - input, in this mode, data is read from sensors, the status of buttons, analog and digital signals. The port is located in the so-called high-impedance state, in simple words - the input has high resistance.OUTPUT - output, depending on the command prescribed in the code, the port takes a value of one or zero.The output becomes a controlled source. ...