Categories: Sharing experience, Electrician Secrets, Electrician at home
Number of views: 383273
Comments on the article: 24

Tips of an experienced electrician - replacing and installing electrical wiring in an apartment


Tips of an experienced electrician - replacing and installing electrical wiring in an apartment

In this article we will analyze in detail all the subtleties of the process of the device in the apartment of the new wiring. This work can be successfully carried out independently. Indeed, in commercial organizations, for example, Gorkomservice, the prices for installing electrical wiring in an apartment bite. And an average of about 650 rubles per square meter of total area.

Cable brand selection

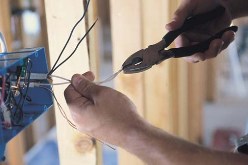
1. Each core of the wire must be rigid (single core), because all sockets and switch are designed for installation with a hard wire.
2. The choice of brand of occasion. Three types of wire are mainly used: NYM, VVG, PUNP.
NYM cable is a cable with copper single-wire conductors with reliable triple insulation.
The first layer is PVC, the second layer is a rubber sheath, the third is each copper core in PVC. But this wire is not without flaws. It is not recommended to be placed in raw concrete and carried out outdoors, it has a large diameter and is quite expensive.
But, if you do wiring in the apartment and want something more reliable, then take, of course NYM.

VVG cable - a cable with copper single-core conductive conductors, with insulation from PVC plastic - value for money. It has double insulation: common PVC and each core in PVC.

VVG can be laid anywhere: both on the street and in concrete. Isolation is slightly worse than NYM, but better than PUNP.
If you do not need extra expenses, we select the simplest and most commonly used PUNP wire for domestic purposes. It has double insulation: 1st PVC common; 2 each lived in PVC. His insulation is thinner than that of NYM and VVG, but also not bad. If we take the PUNP of the Moscow plant, then its insulation will be thicker than that of other manufacturers.
Now we select the cross section of the wire, and the number of cores. According to the existing standard, the wire must be three-wire. The usual color combination of wire strands: zero - blue, phase - white, earth - yellow-green. The wire cross section for outlets is 2.5 mm2, for lighting - 1.5 mm2, and for an electric stove - 4 mm2.

See more about this here:Which wire is best for house wiring

Circuit Breaker Selection

Consider selection of circuit breakers three manufacturers - ABB, LEGRAND and DEC.

In ABB machines, all conductors inside and clamps outside are copper, which improves contact with the wire and reduces heat. The circuit breaker trips when the network is overloaded several milliseconds faster than the DEC.

In LEGRAND automation, the conductors inside and the clamping contacts outside are copper-plated. They are also of good quality and are on a par with ABB.

In DEK electric machines, metal clamping contacts. They work fine, provided that they are native. The shutdown is a bit slower than ABB and LEGRAND.

Electricity in the apartment must be reliable. The security of your home depends on it. Any automation must be taken in special stores, such as: "ELECTRICAL INSTALLATION", "CABLE-WIRE", etc., where they can confirm the quality of the product. This will eliminate the fake. Automation in the market can cost more and be of dubious quality.

All wiring in 8 minutes:

Purchase of material for electrical installation of an apartment

1. This is a drawing on the plan of the apartment of places where sockets, switches, lamps, a TV, a telephone, a dishwasher, etc. will be installed In short, everything related to electrics.

2. We consider the number of individual power lines. For example: a two-room apartment is a stove, a washing machine, kitchen sockets 1, kitchen sockets 2, first room sockets, second room sockets, water heater, light. A total of 8 separate power lines. From this number of lines, we consider the footage of the electric wire and the number of automatic machines.

If the apartment is small, 60 sq.m., then the approximate amount of electric wire is as follows -
electric stove - 15-20 meters VVG - 3 * 4mm2,
sockets - 100 meters VVG- 3 * 2.5 mm2,
light - 100 meters VVG - 3 * 1.5 mm2.

From the calculation of 8 groups, we buy automation. To the light - 16 A, to the stove - 32 A, to the water heater (storage) - 16 A, to all other sockets 25 A.


Plus, an introductory two-pole automatic machine at 50 A and a common RCD at 63A and 30 μa leakage current. You can put differential machines or RCDs in groups, but this is a more expensive option).
We also need to -
television wire RG-6 - 50 meters,
telephone wire (preferably 4-wire) - 40 meters,
electric sockets - 40 pcs. (plastic with mounting points on four sides),
screws 35 mm - 0.5 kg,
dowels - 200 pcs. (for fixing wires) ,,
soldered electrical boxes - 6 pcs. (for branching wires),
corrugated pipe - 100 meters (conduct wires in it if they go under a plasterboard ceiling or under a floor screed.),
alabaster - 20 kg (for the smearing of rosette and partial putty coating),
electrical tape - 6 pcs.

How to arrange sockets and switches

Usually sockets are located at a height of 25 cm from the floor (middle of the socket). Switches - 80-90 cm from the floor. Kitchen outlets are located on a tile apron, at a height of 1 m from the floor ..

Outlets in the bathroom must be waterproof and located at least 1 m from the floor, which is dictated by safety requirements.

The places of sockets and switches and their number are determined from the convenience - does not block the furniture, platbands and baseboards do not interfere with installation, the wire from the appliance reaches the outlet, each appliance has its own outlet (it is better to do without a tee so safer).

Shtroblenie walls and flows in concrete and brick apartments under the hidden wiring

Strobing is hard, noisy and dusty work. Especially if you are chipping concrete. It is necessary to ditch not only the grooves for the wires, but also the recesses for the sockets and the niche for the shield. Therefore, before strobing, carefully consider the direction of the strob in order to reduce their length as much as possible, but at the same time do not forget that all strobes should go strictly at right angles. This is both professional and beautiful, and the most important thing is to see where and where the wire sticking out of the wall comes from (less likely to interrupt or drill it).

To save money, if we have sockets on one wall on both sides, we make a plug on one side of the wall, and drill a hole for the other side. As a result, we only got one strobe on two sides of the wall. We also come with the upper light for chandeliers, etc.

In order to gouge the walls you need a hammer drill, the power of which depends on the strength of the walls, and a grinder with a diamond disk. If the conditions allow, the apartment is not residential, it will turn out faster if you saw through all the intended strobes with a grinder with a diamond disk or shtroborezom, and then hollow out the rest with a puncher.
But this is too dusty work and you need to work in all protective equipment (respirator, glasses, gloves, headphones, although many work without the last 3). If there are no conditions or you do not like a large amount of dust, you can do the same work with just one puncher.

It is easier to hammer a perforator at the joints of plates (two walls, a ceiling and a wall, 2 ceiling), because as a rule, they are covered with a light cement mixture.

Strobing can be done with a spatula or a special shtrobnik, but they, as a rule, quickly become dull, as they do not have a solid winning layer at the end. The best option is to perform shtrobleniye drill diameter of 12-14 mm. Its winning tip is quite difficult to blunt, and it costs less than a scapula and a shtrobnik.

The recesses under the sockets are drilled with a special crown (for gypsum or brick) or, if the wall is concrete, it will be faster to do it with the same drill. To do this, draw sizes of wall sockets, we drill with a drill around the perimeter and inside the marking of the hole with a depth slightly more than the depth of the undergrowth, set the puncher to the position of only hollowing and with the same drill we cut out all the excess inside the mark.

See also on this topic: Rules for installing hidden electrical wiring in the home

Wiring electrical and low-current (TV, telephone, Internet, speakers) wires.

Tips of an experienced electrician - replacing and installing electrical wiring in an apartment
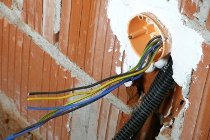
All electrical wires are from electrical panel to the locations of sockets or soldered boxes, from them again to sockets or soldered boxes, etc.

All low-current wires are from the low-precision staircase to each individual point in the apartment.
The wire is mounted in the strobes using dowels and brackets with self-tapping screws.

It is better to lead the electric wire to the light on the ceiling in corrugated pipe (if there is a suspended plasterboard ceiling), if there is no suspended ceiling, then in the strob at the junction of the ceiling and the wall to the place of the electric soldered box (as a rule, it is 15 cm from the ceiling and located above the switch), from it to the chandelier at the junction of ceiling plates etc. in all rooms.

The electric wire to the outlet group and low-current wires should be led along the floor along the walls in separate corrugated pipes (if it is possible to remove the corrugated pipe under the cement floor screed), if not, then in the strobe at the level of the outlets to their location.

Tip for sticking a wall into a wall

We insert electrodetectors into the recesses, start the wires in them and stir the alabaster, after wetting the recess with water. We smear the undergrowths with alabaster, so that they do not protrude from the wall.

Well, that’s probably all.
I wish you success in the field of electrical installation.
Skalin Eugene

See also at i.electricianexp.com:

  • Armature for mounting sockets and switches
  • Installation boxes for sockets
  • Concealed wiring
  • An electrician to himself or everything about independent work with electrical wiring
  • How to make a shtroba and fasten a cable in it

  •  
     
    Comments:

    # 1 wrote: | [quote]


    "It’s easier to hammer a perforator at the joints of slabs (two walls, a ceiling and a wall, 2 ceiling), because as a rule, they are covered with a light cement mixture."

    Recently laid wires between the plates. The customer kicked out, - said, they say, that this is not professional, because plates play among themselves, and you can’t do that.

     
    Comments:

    # 2 wrote: Sasha | [quote]


    Recently laid wires between the plates. The customer kicked out, - said, they say, that this is not professional, because plates play among themselves, and you can’t do that.

    Thanks for the experience with customers.

     
    Comments:

    # 3 wrote: | [quote]


    They don’t play a damn thing. In any case, not enough to affect the wiring. Otherwise, this customer would have dumped dust on the top of the seams. Smart he hurts. And in the ceiling you don’t need to ditch it at all (and sometimes it’s simply impossible). They drilled 2 holes and pulled a wire through the voids of the ceiling. 3 minutes of work and clean and cheerful.

     
    Comments:

    # 4 wrote: | [quote]


    Vladimir,

    I completely agree with you, Vladimir !!!

     
    Comments:

    # 5 wrote: | [quote]


    Why an introductory automatic machine at 50 A? All the same, on the dashboard (or at the counter), the automatic service workers put the machine. At 16, 25 and (rarely, on request and with the release of $$$) at 40 A.

     
    Comments:

    # 6 wrote: | [quote]


    Tell me the kilometer of the lamp lighting line after 15 meters 60 watts, power from the middle with two cables, what section should I choose the VVG wires? I chose 3X1.5mm2 - they say it’s wrong at the ends of the type of lamp they will not shine, but generally a third is almost not at full heat - is that right? Tell me how to properly?

     
    Comments:

    # 7 wrote: | [quote]


    Tell me where to get the land, if only zero and phase enter the apartment?

    And now I look at many sites of the photo of the work of electricians: everything is beautiful - a little shield, sockets, switches on the peeled walls, but there still remains the work of the plasterers painters, what will happen with all this beauty? What is the best option?

     
    Comments:

    # 8 wrote: | [quote]


    PUNP is prohibited for use as an apartment wiring, if you do not know then do not try to teach others. Anyway, if you didn’t have to redo the wiring for the well-read self-taught citizens who tried to save money dough, then you should not teach them how to put the wiring wrong. And it’s also not worth recommending a cable -4 square for electric stoves, the cross section depends on the power of the stove, and now it’s not uncommon for 9-10 kW of the stove, but at least 6 square!

     
    Comments:

    # 9 wrote: | [quote]


    And how to find these voids in the ceiling?

     
    Comments:

    # 10 wrote: | [quote]


    Hello. Tell me the three wiring diagrams in the apartment:
    1 circuit. 1 circuit - lighting automatic machine 16A
    2 circuit - sockets automatic 25A
    opening machine 32A + UZO 40A with a cut-off current of 30mA
    2 circuit. 1 circuit - lighting automatic 10A
    2 circuit - 16A difavtomat sockets
    3 circuit - outlet for a difavtomat machine for 25A
    32A introductory machine
    3 circuit. 1 circuit - 2 lighting lines (automatic 10A)
    2 circuit - 2 lines of the outlet (automatic 16A)
    opening machine 32A + UZO 40A with a cut-off current of 30mA

     
    Comments:

    # 11 wrote: | [quote]


    Good afternoon! We are going to make repairs in the new apartment. Workers said that they did not lay the wiring on concrete, i.e. do not ditch it, but along the prepared walls. And then they are plastered. Likely it is wrong or in order to save, do not tell. Thanks!

     
    Comments:

    # 12 wrote: | [quote]


    In general, here it is necessary to proceed from how much the walls will be plastered, if the walls are not even and the layers of plaster will lie so that it hides the wire, then you do not need to sink the wire into the wall

    Helena, your workers do not want to ditch the monolith it is hard and longer in time and at the end they will rip 3 skins on the plaster supposedly a layer, etc.

     
    Comments:

    # 13 wrote: Ilya Nikolaevich | [quote]


    Why is the lighting machine 16 A and 25A sockets? Like 10A to the light and 16A to the outlets is enough (I'm not talking about air conditioners and stoves, there is a separate line)

    Helena, You think it will be easier to conduct wiring on the floor and ceiling, with vertical gating under the places of sockets and switches.

     
    Comments:

    # 14 wrote: | [quote]


    Hello!

    Tell me please. I am offered in a new apartment (monolithic house) to make consistent wiring. The main cables will be in the floor under the screed. There will be no soldered on top. But from one outlet, the cable goes to another.

    Will there be too much load?

     
    Comments:

    # 15 wrote: Egor | [quote]


    PUNP? Are you seriously? Nothing that it is forbidden to use since 2007?

     
    Comments:

    # 16 wrote: Victor | [quote]


    He was going to change the wiring in the apartment. I thought of doing it myself, but after this article I realized that everything is not as simple as it seemed at first glance. It can be seen that I can’t do it myself. We'll have to look for some pros to replace the apartment wiring. I want to find somewhere typical wiring rates at the moment.

     
    Comments:

    # 17 wrote: MaksimovM | [quote]


    Alexey Evgenievich, Alexey Evgenievich, if I’m not mistaken, you mean a way to connect the outlets with a loop: the cable goes to the first outlet, from the first to the second, from the second to the third, etc. This method can be used if a large load is not included in the sockets connected in this way. If a powerful appliance is included in the last outlet, then the current will flow through the first, second, etc. sockets, even if they will not include electrical appliances. It turns out that in the group of outlets connected in this way, in total, you can include a load that does not exceed the allowable for one outlet.

    With this method of connecting sockets, the most vulnerable places are the contacts of the sockets on which the wire is branched to the next socket. Sockets with an additional pair of contacts, to which you can connect a wire to power the socket, are most convenient for this method. Also, for reliability, you can connect the sockets without breaking the cable.The cable at the point of connection to the first outlet is neatly peeled, but does not bite, then it goes to the next outlet, etc. That is, the cable remains solid and, accordingly, the wiring is more reliable, since there are no intermediate contact connections (branches).

     
    Comments:

    # 18 wrote: | [quote]


    I try not to change the wiring on the ceiling to the chandelier even though it is aluminum, but it is often in good condition, small currents pass through it because chandeliers of more than 300 W are a rarity. In the distribution box I put an adapter for switching from aluminum to copper.

     
    Comments:

    # 19 wrote: Evgeny | [quote]


    Lighting - 10A
    Sockets - 16A
    Plate - 20A

    and nothing else.

     
    Comments:

    # 20 wrote: MaksimovM | [quote]


    Evgeny, I agree to the lighting, enough is 10 A. For sockets - it depends on how many sockets are powered by the circuit breaker, and what their total load is, therefore, it may be necessary to use a larger circuit breaker in nominal current. The same applies to the electric stove - it can be designed for 25 A or 32 A.
    Victor, It is better to change all wiring lines, including lighting. Aluminum is a fairly fragile material and it is highly likely that if it is necessary to replace one of the fixtures, the wire may break so that it will be necessary to open the stroba. Also, the contact connections in the junction boxes: if all the wires are copper, then you can weld, solder them and get a reliable connection. You can’t weld or weld aluminum, it is a flowing and rapidly oxidized metal, so the contact connection in the terminal blocks will deteriorate over time. And the isolation is not eternal, especially if it is a very old wiring. Savings in this case are negligible, and in the future may cause inconvenience and additional costs.

     
    Comments:

    # 21 wrote: Dmitriy | [quote]


    light 1.5mm RCD 30mA + C6 / C10, sockets 2.5mm RCD 30mA + C16 or S16 30mA diffusers, sockets UZO 10mA + C16 or C16 differential 10mA, SM / PM S16 30mA diffusers, oven up to 3.5kW diff C16 30mA, the rest is cooking, water heater, air conditioner ... depending on power: up to 5kW 4mm leaf C25 30mA, 7.5kW 6mm diff C32 30mA, 9kW 10mm diff C40 30mA, 11kw 16mm differential C50 30mA, etc. according to PUE7.
    All good contact and reliable insulation))


    Informative!

     
    Comments:

    # 23 wrote: Rostislav | [quote]


    Good afternoon. Please tell me, I do not understand much in electrics. We make repairs in the apartment and the roof is leaking, but we need to change the wiring. Is it possible to change the wiring with such a problem?

     
    Comments:

    # 24 wrote: electrokrd.site | [quote]


    Correct calculation is the most important thing.