Categories: Electrician at home, Electric installation work
Number of views: 211788
Comments on the article: 25

How to make a shtroba and fasten a cable in it
 

How to make a shtroba and fix a cable in it?In the vast majority of cases when installing hidden electrical wiring You can’t do without such a dirty and noisy procedure as strobing.

Wires and cables must be hidden, but how to do it without a gate, if we just have a plain wall of concrete or brick? Moreover, the harness of these wires is sometimes more than impressive, especially in places connected to the apartment switchboard.


1. Markup

Strobing and laying of cable harnesses must be taken care of long before the final decoration of the room: it is when the apartment does not yet have a trace of furniture, no items, no wallpaper, no linoleum, nothing at all. In a word - bare walls, as in one famous TV show.

On these bare walls, we determine and mark the route along which cable lines will run through us. Marking can be done with a construction pencil and level. It will not be amiss to recall here that the cable lines should not be located anyhow, but should go either horizontally under the ceiling (at a height of 2.5 m), or strictly vertically along a plumb line. No diagonal transitions and horizontal segments at a low level are categorically allowed.

When marking the walls, we immediately determine the location of sockets, switches and junction boxes, because the holes in the wall for their installation will need to be performed at the same stage as the strobes for laying the cable. The width of each strobe is determined in accordance with the number and cross-section of the cable that will be fixed in it.

See here for more details: How is the marking performed during wiring


2. Strobing

Having completed the markup, we move on to the next question of primary importance. How to dash? There is plenty to choose from.


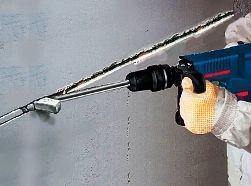
Most often used to perform strobes hammer drill with one of the special nozzles. The first of these nozzles is called - strobe. The strobe is a slightly curved blade with a longitudinal groove. The end of this scapula is pointed and intended to be deepened into the pierced strobes. Work with the strobe should be in pure shock mode, without rotation. The strobe is neat and deep from it. However, using this device to perform the strobe wider than the strobe itself can be done in just a few tricks, which, of course, is not very convenient.

Another nozzle often used for hammering with a rotary hammer is a regular flat shoulder blade. The principle of working with it is about the same as with the strobe, but the performance is slightly lower.

Strange as it may seem, ordinary sharp peaks for a punch or even a borax are also sometimes used for strobing - when there is nothing else at hand, and the volume of work is very small.
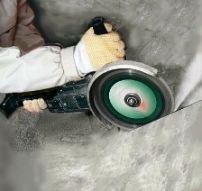
How to make a strobNevertheless, one can’t expect great performance when chipping with a rotary hammer, especially when it comes to chipping concrete walls. Therefore, with large volumes of work, many electricians use a disk cutting tool to perform the strob.

As such, it is often suitable angle grinder (angle grinder), or, more simply, diamond segmented disc grinder. With its help, cuts are made along the edges of the strobe to the required depth, and the middle part is subsequently easily knocked out using the same punch. Despite the seemingly much larger number of work operations, chasing with a grinder is much more productive than the same work when using only a perforator. The reason is that the grinder makes each cut very quickly in one single pass.

The most productive tool for strobing is chipper - a device very similar to a grinder.The chipper has two cutting discs located parallel to each other. The distance between these discs is adjustable, which means that you can set the width of the strobe within the required limits. The position of the disks relative to the supporting surface, that is, the depth of the strobing, also changes.

Disc cutting tools have only one drawback compared to a rotary hammer. Of course, there are a lot of dust and dirt when ditching with a puncher, but from the cutting disc this dust does not even fly in clubs, but in a continuous stream. If an electrician neglects personal protective equipment when gouging with a grinder or stroborez, then having completed several objects, he risks having a lung and / or eye disease.

Therefore, goggles, a respirator and earplugs when performing a strob are far from a luxury, even if you work with a perforator. Your health is always more expensive. Professional chippers, by the way, are equipped not only with a protective casing for disks, but also with a standard pipe for connecting an industrial vacuum cleaner, which can absorb most of the dust produced.


3. Cable installation

And the shtroba is completed, the dust and fog have dissipated, and you can proceed with the installation of the cables. Unfortunately, the requirement for the removability of hidden electrical wiring when laying the cable in the strobe is most often neglected. The execution of large and wide strobe, which could accommodate cable conduitPerhaps not always.

Therefore, as a rule, cables are laid in harnesses in a strob without any additional protection. Insulation of the most popular for home installation cable - VVGng - quite reliable and does not fail with this method of installation.


You can fix the cable in the strobe in one of the following ways:

3.1 Using a perforated strip. It was precisely these nylon perforated strips that were used in the mass in the construction of our “favorite” panel “Khrushchevs”. The strip was fastened across the strobes using dowels and reliably held the entire mass of cables, regardless of their number.
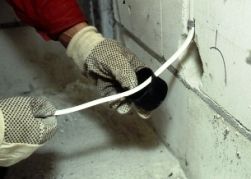
How to fix a cable in a strob3.2 By mounting aluminum strip. Such is sold in any store electricians. Actually, it’s not necessary to buy it either: if you have free time and patience, you can make it by cutting any thin and ductile metal.

For mounting, the strip makes its way in the middle and is screwed to the bottom of the gate using the popular pair of “self-tapping screw”. Cables are laid on a strip from above, and its ends are bent with pliers, forming a tight and reliable lock. The method, of course, is time-consuming, but still very popular.

3.3 It is possible to fasten the cable with alabaster. We pull the cable line along the strobe and immediately fix it with the solution, which we keep at hand. The disadvantage of this method is that the alabaster solution cannot be diluted in large quantities due to the fact that it dries very quickly.

3.4 The most “advanced” and productive way of attaching the cable to the gate is to fasten with dowel clamps. Dowel clamp - This is a dowel with an installation size of 6 mm. At the end of it there is a special loop that allows you to hold the cable harness. Thus, installation using dowel clamps is very simple: you just need to punch a series of holes with a puncher, and then insert the dowel clamps with a fixed plait into them.

We recommend reading:How to lay the cable from the shield to the outlet when connecting the electric stove

See also at bgv.electricianexp.com:

  • How to lay the cable from the shield to the outlet when connecting the electric stove
  • What kind of nozzles for a grinder and a perforator are needed for electrical installation ...
  • Concealed wiring
  • How to choose a chipper
  • Replacing wiring. Little tricks

  •  
     
    Comments:

    # 1 wrote: | [quote]


    As a professional electrician, I use the Bosh GNF-20 CA Stroborez and the Makita-440 vacuum cleaner for gating. There is practically no dust, only small pieces of concrete and stones. In any case, a respirator, glasses and earplugs are used.The strobes are smooth and, so to speak, beautiful, which makes a very positive and sometimes lasting impression on the customer and on the finishers. For domestic needs, such a tool is certainly not needed, and if the amount of work is large, it is better to invite a professional with such things. On concrete, even with a punch, it’s hard, and on brick it’s normal.

     
    Comments:

    # 2 wrote: | [quote]


    As an option, instead of the dowel-clamps, I used an ordinary self-tapping screw-dowel, on which I looped a wire about 10 cm. After screwing the dowel, 2 ends of the wire peek out from under its cap, which the cable is attached to.

     
    Comments:

    # 3 wrote: | [quote]


    And I fix the platform for the clamps on the dowel (many manufacturers have it), pass a clamp-tie through it and already attach a cable or a whole bundle to it.

     
    Comments:

    # 4 wrote: | [quote]


    Another way is to fasten the cable (from any wire) to the dowel-nails in the strobe and then fasten the cable to the cable with clamps

     
    Comments:

    # 5 wrote: Dmitriy | [quote]


    I fasten the wires with plaster, at home, if I lower the sockets just right and dries quickly and then the wire can be coated with it later.

     
    Comments:

    # 6 wrote: Ivan Ivanov | [quote]


    No diagonal transitions and horizontal segments at a low level are categorically allowed.

    What or by whom is it forbidden?
    In addition, a horizontal gate, especially a two-sided one, reduces the cross section of the wall, respectively, affects its bearing capacity.

     
    Comments:

    # 7 wrote: Author | [quote]


    Ivan: common sense is forbidden. How will you display on the plan the fact that the cable lies diagonally? And you must also indicate the angle so that a person can accurately imagine the route. And the fact that the stroba weakens the wall is a fact. Only it concerns any strobes, including the diagonal one. Therefore, it is better to refrain from gating the load-bearing walls. But the ceiling can’t be ditched at all.

     
    Comments:

    # 8 wrote: | [quote]


    For admin: Lack of date for writing a post is not the right decision. Have to date manually. 02/07/13

    "But the ceiling can’t be ditched at all."

    The room in the communal apartment went with a surprise.
    One of the wires of the aluminum wiring, which fed the chandelier, was not even broken to “zero” but to minus. (i.e. the tip of the wire was inside the ceiling plate)
    First thought: use the entire chandelier at once (on a single switch)
    It turned out that the hall was on a power cable ...
    ... A gypsy needle with a threaded stranded wire through the eye and driven into isolation - solved the problem of lighting a room for 21 years.
    I am going to do kaprem and at the same time replace the wiring with copper.
    What will the gurus advise?


    For Omega: Although I still do not consider myself a “guru”, despite the fact that I am writing articles, I will answer your question.

    There are several options:

    1. Lay the cable without strobe in the plaster layer.

    2. To contrive and try to forward a new cable along the route of the old. There is this track in the overlap, but using it is not always easy.

    3. Do not be smart, but use a plastic box.

    4. Sew the ceiling with any sheet material, and lay the cable in the corrugation under the sheathing.

     
    Comments:

    # 10 wrote: | [quote]


    Tell me, dear Author, why can’t you make horizontal strobes at a low level (and even categorically)? About the diagonal is clear) thanks

     
    Comments:

    # 11 wrote: Author | [quote]


    For marlene: because the cable routing height is normalized. It cannot be pulled at the knee level. The higher the safer. And transitions to low-lying network elements are only in a strict vertical direction.

     
    Comments:

    # 12 wrote: marlene | [quote]


    Thanks for the answer, but he did not satisfy me. “It is impossible” and “Normalized” is not an explanation, tell me on the basis of what the low location (laying) of the cable is unsafe? If there is no intelligible answer - give a link to the norm. thanks.

     
    Comments:

    # 13 wrote: Author | [quote]


    That's it, marlene. You brought me to clean water. Crying and crying. There is no strict prohibition on low horizontal transitions for hidden wiring. As, however, on the diagonal too.

    BUT, I still strongly advise against using both of them during installation. It’s impractical, unsafe (I’m not the only one to think so, really, really). Well, in the end, this greatly complicates the plan for laying hidden wiring. And this, in turn, threatens with the prospect of a sudden "pleasant find" while drilling some wall in the apartment. And so they do the wiring under the floor, and put the sockets there, there is such a thing.

     
    Comments:

    # 14 wrote: marlene | [quote]


    all clear. that is, it is not standardized. there is no categorical prohibition. it’s not clear why it’s not safe (as before). thank you very much)

     
    Comments:

    # 15 wrote: Author | [quote]


    It is unsafe because there is a risk of damage to the hidden line. With a strictly vertical installation, the risk is minimal: I see that there is a socket on the wall and I assume that a cable runs vertically from it. If the gasket is not vertical, then with a high degree of probability I can damage this cable, for example, when I hang a shelf on the wall. Counting on devices for searching for hidden wiring here is also not worth it: they are not always at hand and not always reliable. It is not always possible to rely on a laying plan: it may be lost, or it may not be clear enough for a complex track with horizontal transitions.

     
    Comments:

    # 16 wrote: marlene | [quote]


    got it). You will forgive me for importunity) I just laid horizontal wiring at a height of 35 cm from the floor and put out sockets at some intervals (where I need it) and laid strictly vertical wiring for switches and lighting. my sockets show the level and direction of horizontally laid wiring, switches - vertically branching from them. all the same as the upper version, only from the bottom. shelf at a height of 35 cm. I think no one thinks to hang. ps so what is the danger? )))

     
    Comments:

    # 17 wrote: Author | [quote]


    You just did not get the classic version. But in fact - wiring similar to wiring on skirting boards or under the floor. There is a possibility. Do you also get boxes at a height of 35 centimeters from the floor?

     
    Comments:

    # 18 wrote: marlene | [quote]


    Yes, all boxes are at the level of the stroba.

     
    Comments:

    # 19 wrote: Author | [quote]


    Well ... I wouldn’t do that. But in such wiring, low horizontal transitions with absolutely no crime, I agree. Now, if the main line is, as usual, under the ceiling, then you should not lower the line to draw it at a low level.

     
    Comments:

    # 20 wrote: | [quote]


    And can you lay wire 2.5 in a thin strobe not flat but sideways?

     
    Comments:

    # 21 wrote: | [quote]


    Dear Sirs, experts headed by the author! But have you tried, before starting to advise others on this important issue, to begin by advising yourself in the direction of grammar?

    If you describe the procedure for laying hidden wiring in the recesses of brick (concrete) walls, followed by plastering, then this furrow is called SHTRABA !!! Shtroba also has a place to be in construction terminology, but in the electrotechnical orientation it is SHTRAB, and not Shtrob. Wikipedia and google to help you, diplomas !!!

     
    Comments:

    # 22 wrote: Author | [quote]


    Sergei,
    Then the strobah will be deeper. But in principle it is possible.

    Dmitriy,

    So read Wikipedia. "Shtroba" - an equivalent option on a par with the strobe. So be calm.

     
    Comments:

    # 23 wrote: | [quote]


    Marlene, for yourself or a stubborn client, you probably can - the wires will go away less and the strobe is shorter, but for those who come after you - this is an extra headache. And the doorway rounds? And sometimes they are moved - with the lower wiring, you will have to redo the wiring. Once there was no traffic rules, but now pedestrians adhere to the right side.

     
    Comments:

    # 24 wrote: MaksimovM | [quote]


    About the wiring in the ceiling. Typically, floor slabs have voids along their entire length. To lay the wires to power the lighting devices, you can use these voids. At the same time, you do not need to shatter the ceiling. It is enough to make a hole in the place of installation and connection of the lamp and above the wall where the channel (emptiness) goes in the plate. In the same way, you can connect several lights in the room. It is only necessary to take into account that the plates can lie on the ceiling both along and across, respectively, the voids in the plates can have different directions. This must be considered when laying lighting wiring on walls.

     
    Comments:

    # 25 wrote: Alex | [quote]


    In my new apartment, an electrician laid all the wiring in the corrugation on the ceiling, he also put switchboxes in the same place and lowered them vertically along the walls to sockets and switches.