Categories: Sharing experience, Repair of household appliances
Number of views: 10,763
Comments on the article: 0
Microwave does not heat food - causes of malfunction of mechanically controlled microwaves
A microwave is one of the most commonly used electrical appliances in the kitchen. Once again, you put food on warming up - the microwave is buzzing habitually, the lights are working inside, the food plate is spinning, but after the time set on the timer, the food remains cold. What to do in this case? The failure of the microwave oven causes a number of inconveniences, so many people prefer to try to repair the microwave oven on their own, saving not only time, but also money.
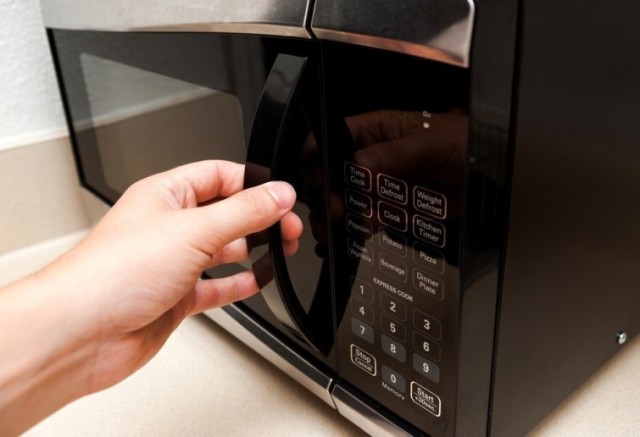
Why doesn't the microwave heat food? Consider the possible causes of malfunctioning microwaves with mechanical control. We also give a good example of troubleshooting a microwave oven.
If the microwave oven works, but does not heat food, then first of all you need to make sure that the voltage in the network is not too low. Very often, the conclusion about the malfunction of the microwave is erroneously made, but in fact the reason lies in the excessively low voltage. Even if the voltage in the electric network is reduced by 20 V, the microwave oven noticeably loses power and instead of the usual two minutes, it takes 5 or more minutes to heat the food.
If the voltage in the network does not deviate from the allowable limits, then it is necessary to look for a malfunction in the household appliance itself.
Troubleshooting Precautions
A fairly common mistake is that people start looking for a malfunction, even having no idea about the danger of electric shock, mistakenly believing that when the microwave oven is disconnected from the network, the danger of electric shock will be eliminated.
It must be remembered that the microwave oven is one of the most dangerous household electrical appliances. Even after disconnecting it from the mains, there is a danger of electric shock of several thousand volts, which is stored in a high voltage capacitor for a long time. In the absence of relevant knowledge and skills for repairing electrical appliances, it is better to contact a qualified specialist in service.
The precautionary measures are always indicated on the body of the microwave oven:
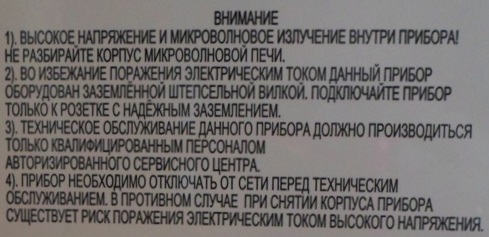
If you nevertheless decided to carry out the repair yourself, then when performing work on troubleshooting, all safety measures should be followed.
Before you begin to remove the cover of the microwave housing, make sure that the appliance is disconnected from the mains.
A dangerous discharge is stored in high-voltage circuits, so you should not rush to check high-voltage elements - as practice shows, most of the failures of microwave ovens are in the primary circuits of 220 V.
Only if a malfunction in the primary circuits could not be found, then it is necessary to go on to check the step-up transformer of the microwave and high-voltage elements.
Checking the electrical circuits to the microwave step-up transformer
The first step in troubleshooting a microwave oven is to check the electrical circuits and various devices through which voltage is applied to the primary winding of the step-up transformer.
It should be noted that structurally microwave ovens from different manufacturers have some differences, but in general, the described principle of troubleshooting allows you to determine the faulty element in the microwave, regardless of its type.
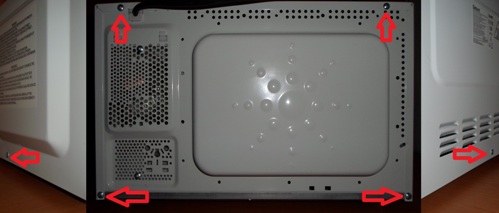
To troubleshoot, it is necessary to remove the cover of the microwave housing by unscrewing the screws (or screws) on the back of the microwave and on both sides.
Often there are recommendations for checking circuits by applying voltage - that is, turning on the microwave oven. Therefore, it is not recommended to carry out a check, as there is a high probability of electric shock. It is only necessary to turn on the microwave oven with the clad cover on.
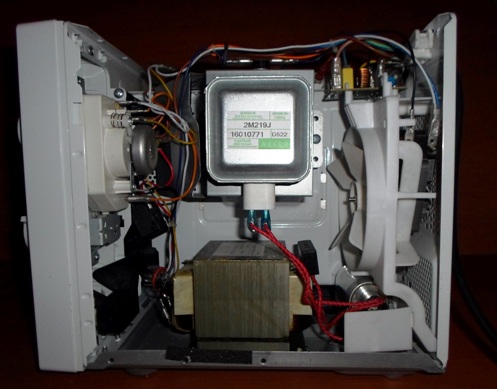
Check the integrity of the circuits by dialing them with a tester or with a multimeter in the dialing mode.
If the lighting was on when the microwave was turned on, the food plate was spinning, and the usual noise was heard during the operation of the microwave, then the voltage was supplied to the microwave - the power cord is integral, the fuses are not blown, the lighting lamp, plate rotation motor and cooling fan receive power.
In this case, first of all, you need to make sure that the voltage of the electrical network falls on the step-up transformer. To do this, remove the terminals from the primary winding of the transformer and proceed to check the circuits.
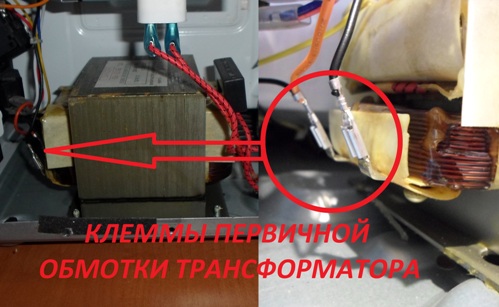
In this case, the microwave oven, as mentioned above, must be disconnected from the network. Before dialing, we turn on the microwave heating operation of the food (the grill mode switches the power to the heating elements, while the transformer is de-energized), the microwave on timer and close the microwave door so that the door lock limit switches are closed.
In the absence of an open circuit and malfunctions in other elements of the continuity, it should show the integrity of the circuit between the phase terminal at the input from the power cord and one of the removed step-down transformer terminals, as well as the integrity of the circuit between the zero input from the power cord to the second terminal supplying the transformer.
If the device shows an open, then you need to find out where it is. To do this, you need to ring all the elements and circuits that go to the terminals of the transformer primary winding.
On the case or in the operating instructions for the microwave oven, a circuit diagram of this appliance can be shown. Having a circuit simplifies the troubleshooting process. In the absence of a circuit, it is necessary to perform a dial-up, visually tracking the path of the current to each element, starting from the very beginning - from the line filter board, to which the phase and zero conductor of the microwave oven power cord is connected.
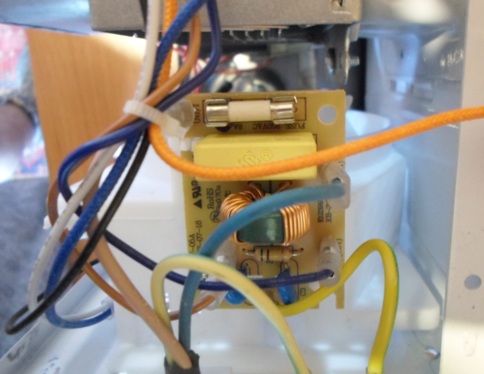
If in the microwave oven there is an additional function of the grill, then when you run the chains you should exclude these chains, in this case we are interested in the chains of the microwave itself.
It is necessary to ring the circuit from the power board to the electromechanical control unit of the microwave oven. If voltage is not supplied to this unit, then it is necessary to check all the circuits through which current is supplied to this element.
From the line filter board, the conductors go to a thermal relay (heat fuse). This element is triggered if the magnetron overheats during continuous operation of the microwave oven at full power.
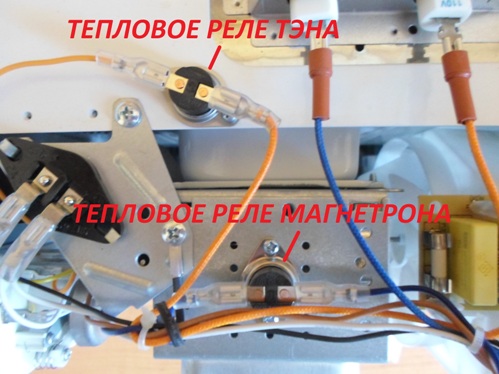
If there was no overheating, but the heat fuse is in the activated state, then this indicates its malfunction - this element must be replaced.
Next, check the door lock limit switches.
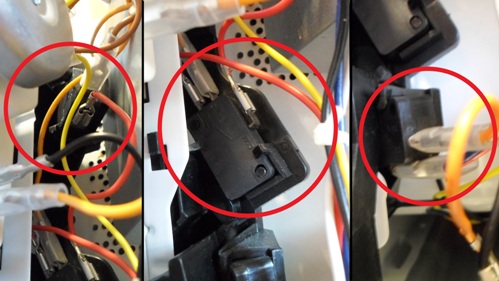
If one of the limit switches does not close when the door is closed, the reason for this may be a loose closing of the door. To eliminate this malfunction, tighten the door fasteners and latches, ensuring its tight closure. Damage to one of the switches is also possible - in which case they must be replaced.
If the circuits supplying voltage to the control unit are integral, then we look for the reason for the microwave inability to continue - we check the unit itself.
Inspection and repair of the electromechanical control unit of the microwave oven
The electromechanical control unit serves to switch the operating modes of the microwave oven, turn on the timer. It contains several contacts that provide the microwave in one mode or another.
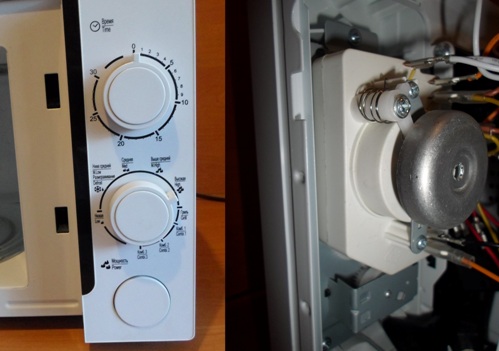
In order to check the operability of the control unit, it is necessary to find the terminal to which the voltage from the mains comes and the terminal through which voltage is supplied to the step-up transformer. Next, you need to enable the microwave mode and timer. In this case, the device must show the integrity of the circuit between the indicated terminals.
If there is no contact between the terminals, this indicates a malfunction inside the electromechanical control unit.
Before removing the control unit, it is necessary to record which wire (wire color) is connected to each of the terminals. All conclusions on the block are numbered. This is necessary in order to prevent mistakes in connecting microwave circuits when installing the control unit.
Also, to remove the control unit, it is necessary to remove the switch handles on the front panel. After removing the handles, it will be unclear where which mode is, so you must immediately put the timer in the off position, and the operation mode at high microwave power. After removing the handles on the inside of the control unit, unscrew the three screws, after which the unit can be removed from the microwave housing.
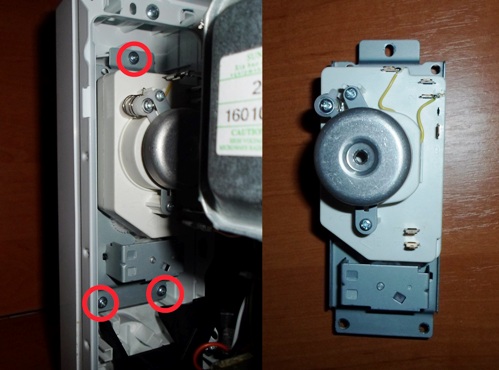
Next, we put marks on all moving elements with a marker and the corresponding mark on the control unit body - these marks will help to avoid errors when assembling the mechanism. We unscrew the three screws (1), remove the upper part of the control unit - in front of us is the part of the block in which the contacts (2) are located.
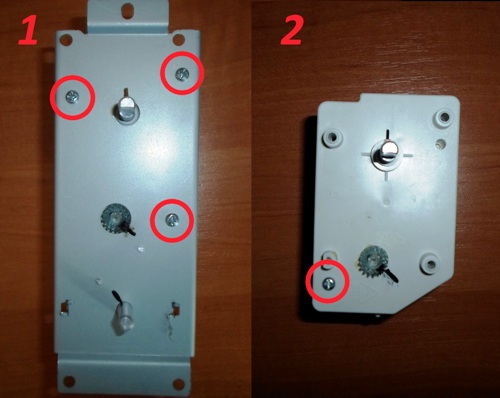
We unscrew one screw and remove the top cover of this unit.
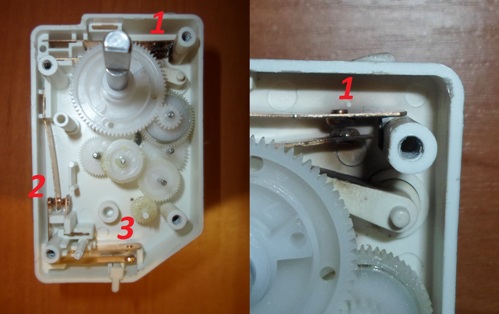
We see that contacts 2 and 3 are in normal condition, and contact 1 is burned, when the timer is turned on, this contact should close, but it does not close. The reason for the contact disturbance was a decrease in the stiffness of the contacted plates, as well as their displacement relative to each other, as a result of which the contacted surfaces were very weakly touched. Under load, the contact sparked, which ultimately led to a complete disruption of contact.
In this case, troubleshooting is quite simple. The contacted surfaces must be well cleaned and bent so that when the timer is turned on, the contacted plates touched firmly and did not move relative to each other. At the same time, the plates should not touch when the timer is off.
If the contacts are badly burned and the control unit case is deformed under the influence of heated contacts, then it is better to replace such a unit with a new one.
We further consider the possible causes of inoperability of the microwave.
Checking the integrity of the windings of the step-up transformer
If the chains to the primary winding of the microwave step-up transformer are complete, that is, the voltage is supplied to the step-up transformer, but the microwave does not heat food, then one of the windings of the transformer may be damaged.
Checking the integrity of the windings is carried out by measuring their resistance. To measure the resistance, remove the terminals from both windings. One terminal is removed from the secondary winding, since the second terminal is shorted to the transformer body and, accordingly, the microwave oven, since it is screwed to it without surface insulation. The filament winding is checked after removing the terminals from the magnetron.
When removing the terminal from the secondary and filament windings, it is necessary to remember the danger of electric shock from the residual charge of the high voltage capacitor, which was mentioned at the beginning of the article.If the high-voltage capacitor is not discharged, then the terminals from the secondary winding must be removed using a tool with insulating handles - pliers and a screwdriver.
We measure the resistance of the primary winding by setting a measurement limit of 200 ohms on the multimeter (or within this value, depending on the type of measuring device). The primary primary resistance is 2-5 ohms.
At the same measurement limit, it is necessary to check the integrity of the filament winding, the conclusions of which go to the magnetron. One of the terminals goes directly to the magnetron, and the second terminal goes to the terminal of the high-voltage capacitor and from the same terminal to the magnetron, that is, to check the winding it is not necessary to remove the terminal from the capacitor, it is enough to remove two terminals from the terminals of the magnetron. The permissible resistance of this winding is 3-8 Ohms.
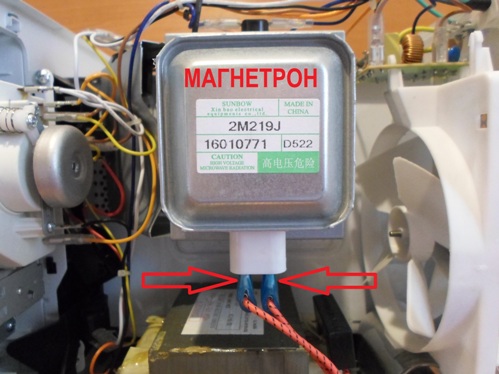
We switch the measurement limit to 2 kOhm and measure the resistance of the secondary winding between the terminal on the transformer itself and any place that has been stripped to metal on the body of the microwave oven. The permissible resistance of the secondary winding is in the range of 140-350 ohms.
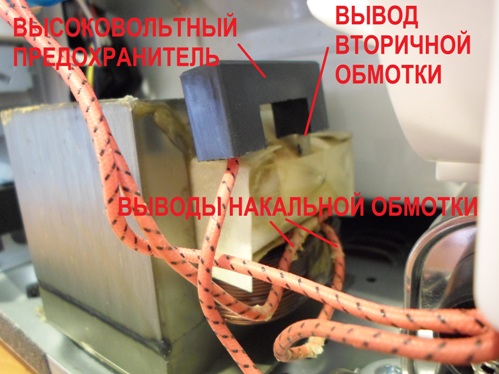
If the resistance of one of the windings is higher than the permissible limits, then this indicates a break in the winding, and if the resistance is below the permissible limit, then this indicates the presence of an inter-turn short circuit in this winding.
The primary signs of malfunction of a step-up transformer in a microwave oven are;
-
the presence of extraneous noise, crackles, not typical for the normal operation of the appliance;
-
the smell of burning from the microwave;
-
strong heating of the transformer;
-
blackening, melting of insulating materials of windings.
See also on this topic: Why does the microwave spark and crack
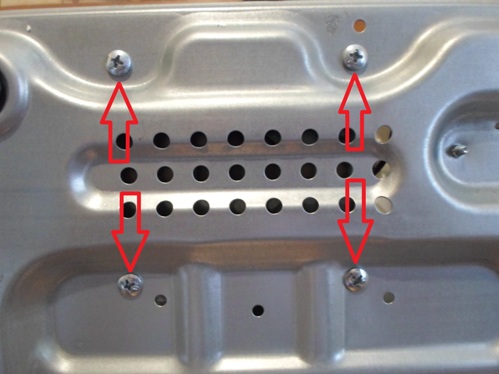
The defective transformer must be replaced with a new one of the appropriate capacity. To dismantle the transformer, it is necessary to unscrew the 4 screws located under the body of the microwave oven.
Before replacing the transformer, it is necessary to check the serviceability of high-voltage elements, since it is highly likely that the cause of the transformer failure is damage to one of the elements in the high-voltage circuit. Also, the high-voltage circuits are checked if the circuits to the transformer are complete and the transformer itself is in good condition.
Checking the health of high-voltage elements
First of all, it is necessary to visually check the integrity of all high-voltage circuits, the reliability of the terminal contact at the terminals of the fuse, capacitor, diode and magnetron.
The high-voltage fuse (see photo above) is checked by continuity dialing.
The magnetron is checked with a multimeter in resistance measurement mode. With the terminals removed, it is checked by the resistance between the magnetron terminals at the lowest limit of resistance measurement. If the magnetron is operational, then it should show a low resistance, up to 1 Ohm. Also, the resistance of each terminal relative to the magnetron body is checked - it should be very large, several megohms.
The magnetron constructively has a feedthrough capacitor, therefore, when checking the health of the magnetron, the capacitance of each of the magnetron pins relative to the housing is also checked. Without the availability of a special device, measuring the capacity will not work.
The same goes for the high voltage capacitor. Without a special device, this element cannot be checked.
Therefore, it is necessary to focus only on the primary signs of damage to the capacitor, magnetron - the presence of extraneous sounds that are not characteristic of the normal operation of the microwave, bloating of the capacitor, the smell of burning.
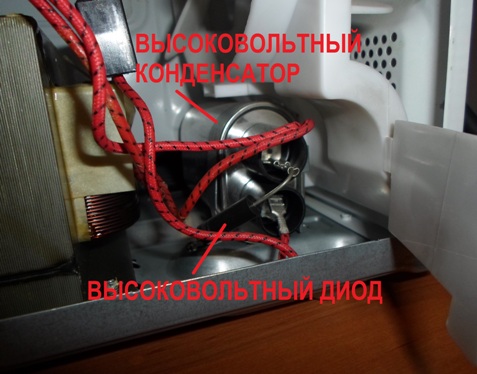
A high-voltage diode cannot be checked with a conventional multimeter. One of the options for checking a high-voltage diode is to check with a conventional incandescent lamp.This method is quite dangerous, as if careless handling of electricity can cause an electric shock.
It is better to leave the diode check in the end - when all the elements have already been checked, and the malfunction is not detected. Or purchase a new high-voltage diode, which is guaranteed to be serviceable.
If you still need to check the diode, then an incandescent lamp, this element is checked as follows. The cartridge is connected from the incandescent lamp to the plug for inclusion in the network, a high-voltage diode is turned on in the gap of one of the conductors, the lamp is turned on. Both with direct and reverse switching on of a working diode, the lamp should burn at half light and noticeably flicker.
See also at i.electricianexp.com
:
