Categories: Repair of household appliances
Number of views: 20121
Comments on the article: 1
How to repair an electric kettle
Often there is such an unpleasant situation as the failure of the kettle, and at the most inopportune moment. You can hand over a failed appliance for repair, but it will take time. Also, there may not be free masters and will have to do without a kettle even longer. Or, perhaps, the cause of the failure could be a minor easily fixed malfunction - then it will be a pity for the means thrown out for repair.
In general, why not try to repair it yourself, while saving time and money? In this article, we give recommendations that will help determine the malfunction of an electric kettle and, if possible, eliminate it.
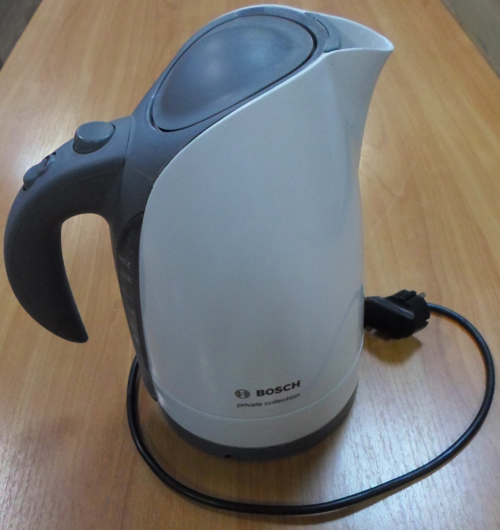
Electric circuit and principle of operation of an electric kettle
Most electric kettles, regardless of their cost, have a similar design. For clarity, we give a typical scheme of an electric kettle:
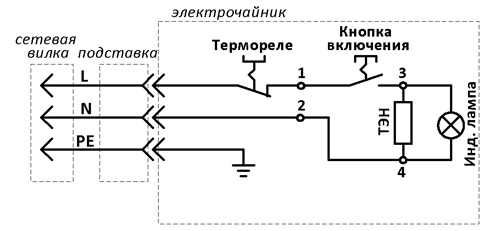
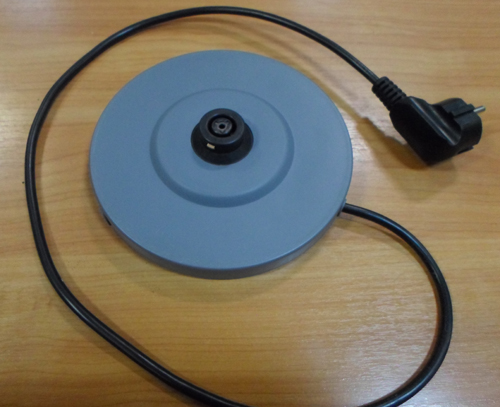
In order to find a malfunction of an electric kettle, it is necessary to understand the principle of its operation. Let us briefly describe the principle of operation according to the above scheme, showing clearly all the elements of the scheme. Electricity from the household network is supplied through the plug and wire to the stand.
Further, the current goes from the stand to the kettle through a special contact part. Directly in the kettle, the ground conductor is connected to the metal parts of the kettle. The zero and phase conductors in a special unit are output to terminals 1 and 2 (see diagram).
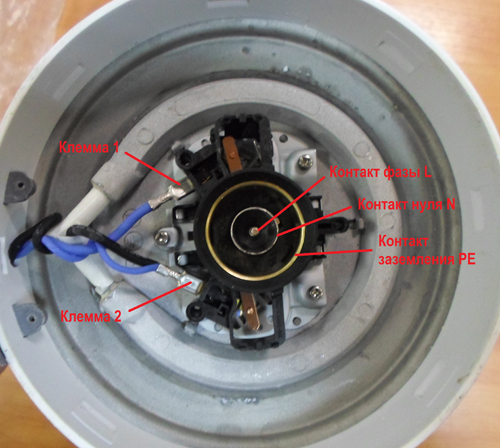
In the same node is thermal protection - thermal relay. The electrical diagram shows that the thermal relay is in the gap of the phase conductor.
Thermal protection serves to protect TENA the kettle from damage if you turn on the kettle without water, or if the lid of the kettle is open, and it works for a long time without turning off automatically. In normal mode, the thermal relay contact is closed. It opens in case of excessive overheating for the above reasons.
Further, from terminal 2, the voltage goes directly to the heating element to terminal 4, and from terminal 1 to the other output of the heating element to terminal 3, but not directly, but through the kettle's power button.
The kettle’s power button allows you to manually turn the kettle on and off, it has a bimetallic plate that, when a certain temperature is reached, acts to turn off the button - that is, when the water boils, this button automatically shuts off the electric kettle.
In parallel with the conclusions of the heater's electric kettle, an indicator lamp or backlight is connected, depending on the design features of the electric kettle. This can be an ordinary lamp or LED backlight connected via a power driver.
So, we begin troubleshooting. First of all, you need to make sure that the cause of the inoperability of the kettle was not the triggering of the above thermal protection. If there was a trip, then you must wait until the protection returns to its original state - that is, until the contacts are closed. If there was no protection operation, we proceed to troubleshooting.
Checking the stand of the kettle
Do not rush to disassemble the kettle. Very often, the reason the kettle does not heat up is the lack of contact between the contact elements of the electric kettle and the stand or a violation of the contact in the power cord and plug.
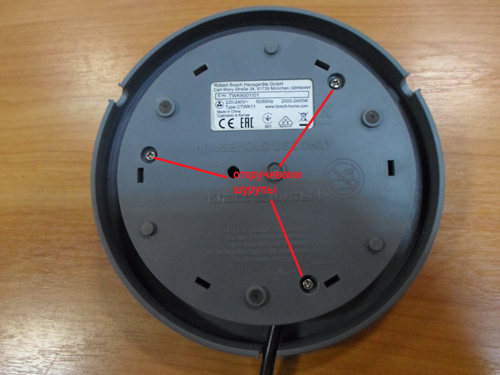
Unscrew the screws on the stand and remove the cover. We take a multimeter, put in the dialing mode and check the integrity of the cord from the plug to the contacts. In inexpensive electric kettles, the manufacturer, in order to save money, puts the cord in a section that is lower than the allowable load for the electric kettle.
For example, for a kettle with a capacity of 2 kW, a supply wire with a cross section of 0.75 square meters is installed. mm, but in fact there may be an even smaller cross section.During the operation of the electric kettle, such a wire heats up, which ultimately can lead to damage or burning out at the point of connection to the plug.
If the continuity showed a wire break, then you need to purchase a new wire of a larger cross section, which corresponds to the load of the kettle. For example, for a 2 kW kettle, a wire with a cross section of 1-1.5 square meters is enough. mm It is also necessary to purchase a new plug - a euro plug designed for a load of 16 A. is suitable
Next, you need to assess the state of the contact part of the stand. If traces of soot are visible, this indicates poor contact between the stand and the contact part of the kettle.
Regardless of whether this is the reason the kettle is not working at the moment, you should clean the contacts from soot and slightly bend them, providing greater rigidity of contact with the electric kettle.
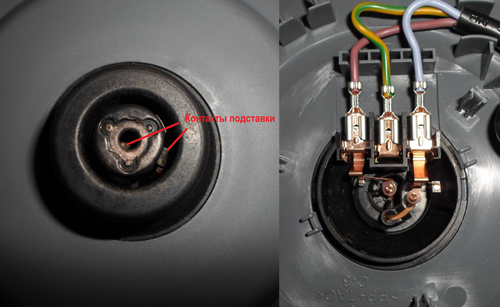
You should put the stand on the kettle, while paying attention to the contacts - they should be bent when installing the kettle on the stand. If the contact does not press, it means that it has loosened, and it needs to be slightly bent up. It is impossible to bend the contacts strongly so as not to displace them.
We assemble the stand and check the operability of the electric kettle. If the kettle still does not work, then we proceed directly to troubleshooting inside the kettle.
Checking the operability of the electric kettle heater
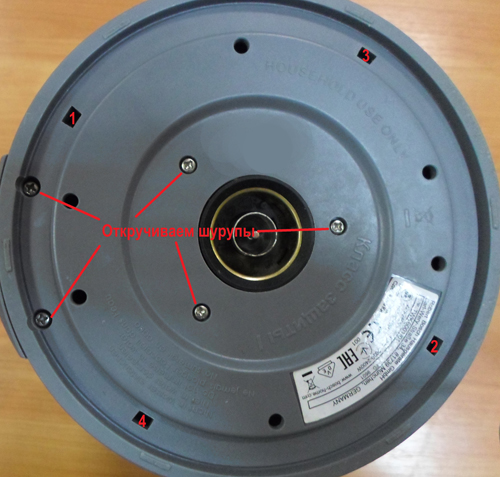
A situation is possible when the indicator light (backlight) of the kettle is on, but the kettle itself is not heating. In this case, there are two reasons: the heater has burned out or the contact at the point of connection to the heater has been broken. Remove the lid of the kettle by unscrewing a few screws. Some types of dummies, including the one discussed in this article, in addition to screws, have special grooves that hold the lid of the teapot.
Without the experience of opening electric appliances, you can damage the electric kettle by adding another fault to the existing one. To remove the cover, bend it inward. By inserting a screwdriver into the existing holes, first into holes 1 and 2, then into 3 and 4. By bending the cover inward, the cover fixing slots go out and it is removed.
We return to troubleshooting. Check the integrity of the chains inside the kettle. Next, we check the integrity of the heating element by moving the insulation to access the terminals. We set the multimeter in the resistance measurement mode to the smallest limit - in this case 200 Ohms and measure the resistance of the heating element.
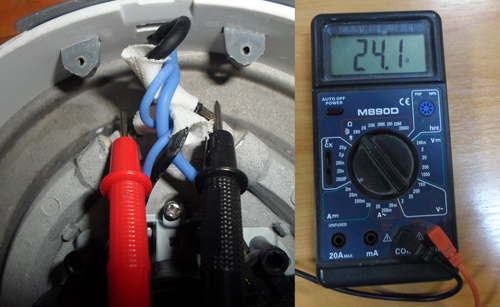
The device showed a resistance of 24.1 ohms, which indicates the health of the heater. A burnt out heater indicates a very high resistance - the multimeter will show a few megohms. You can also check the heater with a multimeter in the dialing mode.
With a working heating element, the device will show a small value of the voltage drop, and if the heater is faulty, the device will show an open - one.
If it became necessary to remove the terminals, then they should not be torn off, as is often done unknowingly. A torn terminal when putting it in place will not provide normal contact and the next time it will cause the kettle to fail.
The terminals can be easily removed if you lightly push a sharp object into the hole, while simultaneously pulling it together. If there is insulation on the terminal, it must be moved before removing the terminal.
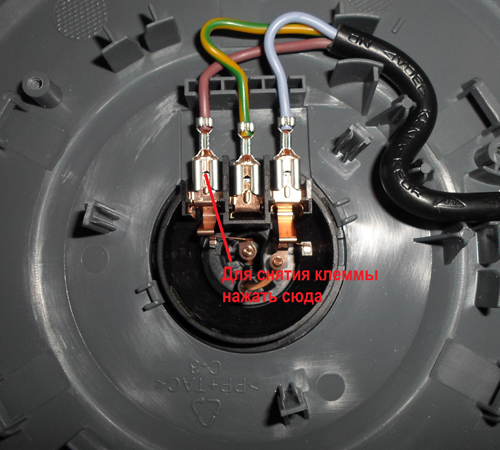
A normally removed terminal also fits back easily. But in any case, it is necessary to check the reliability of the contact, and if the terminal is not dressed tightly enough, then it should be removed and slightly tightened with pliers.
If the check showed that the heater is faulty, then in this case it is necessary to think about whether it is advisable to purchase a new heating element. If the kettle is inexpensive, then installing a new heater will cost as much as a new kettle.
If the heater is OK, but the kettle does not heat, then the integrity of other circuits should be checked. It is necessary to check whether voltage is coming from the contact part of the kettle to terminals 1 and 2.
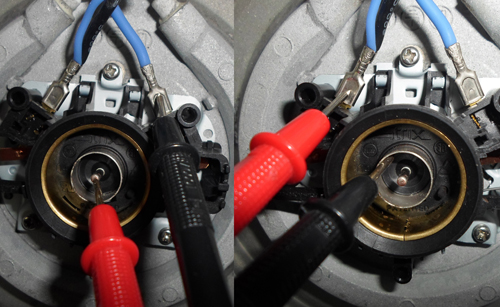
We call with a multimeter as shown in the photo.If one contact rings and the other does not, then this indicates that the contact of the thermal relay, which was mentioned at the beginning of the article, is open. There are cases of spontaneous opening of the protection contacts.
If there were no signs of overheating, the kettle without water did not turn on, but the thermal protection contact is open, this indicates a malfunction of this element. You can try bending the bimetallic plate (or plates, depending on the design of the electric kettle), ensuring the protection contact closes.
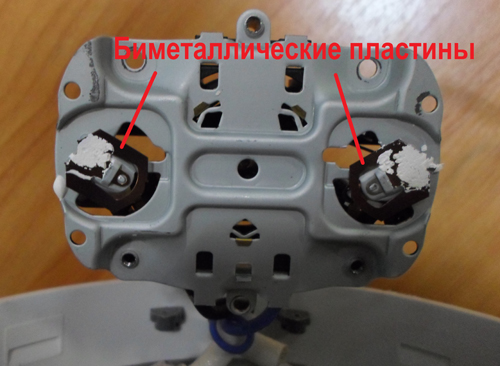
If the problem persists, it is recommended to completely replace this unit. It is also possible to turn on the circuit directly, without thermal protection, forcibly closing the contacts in this node. But you should be aware of the consequences of a lack of thermal protection.
If you turn on the kettle without water in the absence of protection, the heater will heat up until it burns out. In this case, the kettle may catch fire. To avoid negative consequences, do not operate the kettle without a thermal relay.
Another reason for the inoperability of the electric kettle may be a breakdown of the kettle's power button. The inoperability of the button is determined by dialing between terminal 1 and the output of heater 3 (see diagram).
If, when the button is in the on position, the device shows an open between contacts 1 and 3, this indicates that the button is faulty or the integrity of the contact at the point of connection to the button is broken. It is necessary to open part of the electric kettle body on the handle, gaining access to the button and, depending on the malfunction, restore contact integrity or replace the button.
There are also certain types of electric kettles with built-in electronic devices that provide timer functions and adjust the temperature of water heating. If a malfunction occurs in such a kettle, you can check the nodes discussed in this article - heating elements, contacts, connecting conductors. But if the cause of its malfunction is the failure of electronic components, then to eliminate such a malfunction you need to have the appropriate skills and qualifications - therefore, it is better to hand over such a kettle for repair to an experienced specialist.
See also on our website:
See also at bgv.electricianexp.com
:
