Categories: Electric installation work
Number of views: 23149
Comments on the article: 0
How to extend the heating cable connection
The heating cable has found many uses, it is used to heat the floor, the greenhouse, to prevent freezing of pipes and to defrost them. It is also convenient to use it for heating the roof, so that the snow will not linger on it, and you will avoid the descent of snow and ice blocks from the roof.
Usually it is sold a fixed length for a specific situation, but still, in case of damage or the need to increase the length - you have to connect. In principle, the process consists in simple twisting or sleeving of conductive conductors, but there are some nuances that depend on the type of cable.
Kinds
There are two types of cables:
-
resistive;
-
self-regulating.
In resistive electricity is converted into heat due to the high resistance of conductive wires.
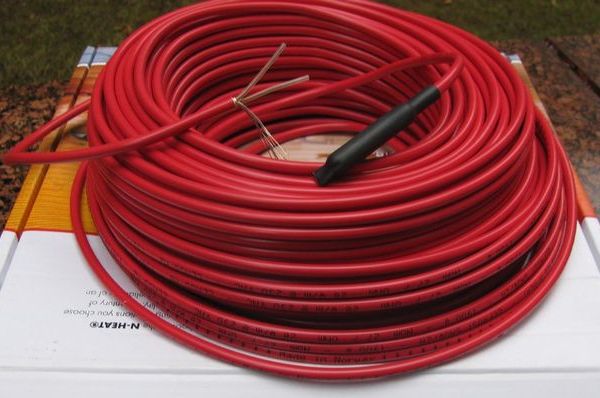
Resistive (in appearance it resembles radio frequency cables for transmitting television signals) converts the electric current flowing through it into heat, in fact it is a heating element made by cable technology. In any cable (wire) 1-3% of the transmitted electricity is converted into heat (they try to reduce this value). In heating cables, all power must be converted into heat, and its release per unit length of cable (specific heat) is the most important technical parameter.
They are divided into two subspecies - ordinary single-core and two-core resistive cables and zonal.
Single core cable:

Two-core cable:
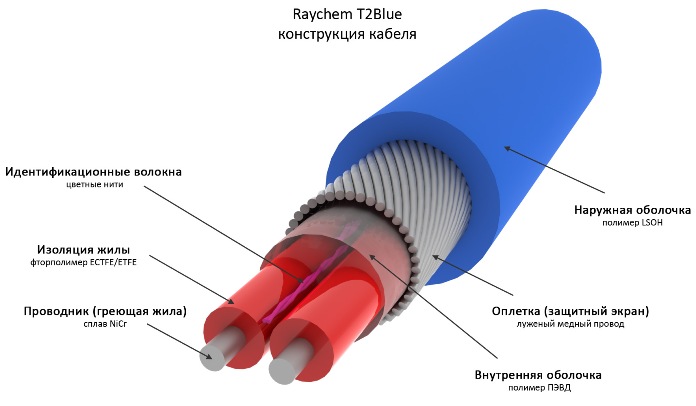
Please note when buying a single-core cable that both ends are connected to a power source, so its length should be twice as long as the length of the heated section.
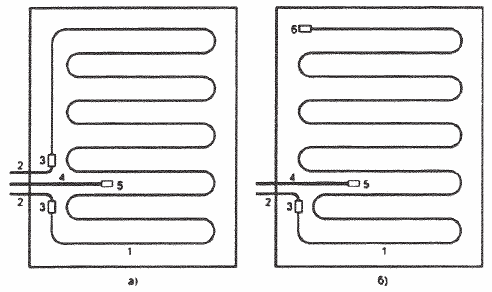
Laying schemes for single-core (a) and two-core (b) heating cables: 1 - heating cable; 2 - power conductors; 3 - connection point; 4 - control cable; 5 - temperature sensor; b - end cap
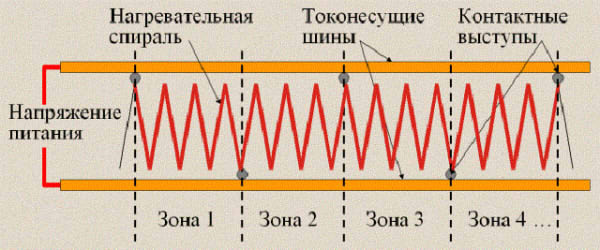
Zonal is two conductive conductors between which heating elements with high resistance are connected.
Conventional resistive cables are sold in a certain length; they cannot be extended or shortened, because their thermal conditions will change. If you lengthen it, the resistance will increase, it will warm worse, and if you shorten it, the resistance will decrease, it will overheat and burn. If in some place the cable burned out, broke off or was torn, then you can allow the connection - a significant change in resistance will not occur.
Connect the resistive cable is sleeves. Twisting, bolting or screw clamps will not work, because when heated and subsequent cooling, they will weaken, and contact will disappear with time. It is also necessary to insulate the junction, it is even better to wrap it with varnish, because the cable is energized, and this is necessary to prevent short circuit to the ground or electric shock.
Zonal heating cables, due to their construction, can be cut or extended. Connecting is also better sleeves or by weldingthen insulate each core individually and put on a heat-shrink tubing or wrap a common layer of electrical tape.
Self-regulating heating cable
Self-regulating cable consists of:
-
two current-carrying veins;
-
a polymer heating matrix located between them;
-
the heating part is covered with a layer of PTFE insulation;
-
on top of which a shielding;
-
the screen is covered with a layer of general insulation.
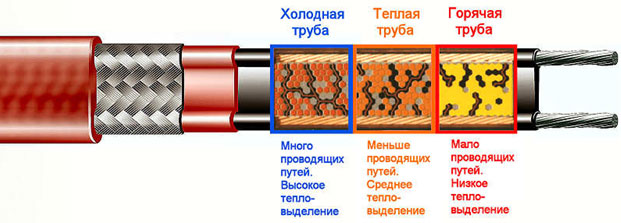
Due to the properties of the heating element, it seeks to maintain a certain temperature, depending on environmental conditions. The picture above schematically depicts the process of self-regulation.Each section of the wire, depending on its temperature, emits a certain amount of heat.
The self-regulating cable has a stepwise characteristic of specific power (due to the presence of a special semiconductor self-regulating matrix), which can significantly reduce energy costs.
A cable of this design can be extended and connected.
See this topic - The use of self-regulating heating cables
A set of tools and materials that you will need:
1. Knife (mounting, construction or clerical).
2. Pliers.
3. Insulating tape and heat shrink (it is possible without heat shrink, but with it aesthetics and a better connection).
4. A tool for cleaning the cable (in principle, you can do it with a knife and pliers, but the stripper will cope with this faster).
5. Sleeves. Heat shrinkage needs two diameters - one slightly larger than the diameter of the cores, and the other, a little one and a half to two times larger than the outer diameter of the cable.
Tip:
Do not forget that the connection point will be a thickening on the cable, and do not buy heat-shrink end-to-end, under the general section of the cable.
For this:
1. Remove the top insulation by 5-6 centimeters.
2. Unscrew the screen and twist it into a thin core.
3. Next, remove the inner insulation 4-5 centimeters from the edge.
4. Select a pair of cores by removing the heating part.
5. Next, put the heat shrink on the cores so that one of its edges rests on the undivided part of the cable, and the second does not reach the end of the cores by 1-1.5 centimeters. Thus, the cores are freed and at the same time will be isolated to the base, and the non-insulated edge will be ready for connections.
6. The same procedure must be done with a second heating cable or cable through which power will be supplied.
7. The next step is the connection. Of course, you can twist the conductive conductors, insulate them, but it is better to use sleeves. Each core needs to be isolated.
8. Connect pairs of cable cores and screens. The screen is connected to ground.
9. After connecting and isolating each core, you need to install a heat-shrink tube on all joints, making a common insulation layer.
Do not forget to put heat shrink on one end of the cable BEFORE sleeve, otherwise you will have to redo it. Also, do not forget to put the gland on the cable before you install it in the pipeline.
The sequence of actions is perfectly shown in this video:
Conclusion
The heating cable can be mounted on the surface of water and sewer pipes and inside them, driven through a tee with a special gland, this will prevent them from freezing. It is also installed on the roof and gutters, in order to avoid the accumulation of water and snow on them, which reduces the load on the floors and the likelihood of injuries in the event of snow blocks.
The cable connection is necessary both for its extension, and for connecting to power supply cables made of copper and aluminum. Care should be taken to connect to obtain reliable and long-lasting contact; do not neglect insulation to avoid short-circuiting and electric shock.
See also at i.electricianexp.com
:
