Categories: Repair of household appliances
Number of views: 22885
Comments on the article: 0
How to find a malfunction and repair a power drill
An impact drill is capable of performing conventional drilling only with impact. The gearbox of such devices can have either one or two speeds. As additional functions, there is a reverse stroke and the ability to configure the desired idle speed.
An impact drill has two helical gears that contact during normal operation of the drill. When it is necessary to drill with impact, one gear moves, thus forming a gap with the gear in front. Further, the rear gear remains stationary, and the one in front begins to slide along the teeth and move the cartridge up and down. This is how the impact of many impact drills is created. Moreover, the number of such strokes can be 40,000 in one minute.
It should be noted that the shock function of the drill should be used only in the most emergency cases. If the drill is constantly used with a shock function, then very soon the hammer mechanism may fail. It's all about gears, which sooner or later will grind off and the shock mode of operation will disappear.
Electric drill device:
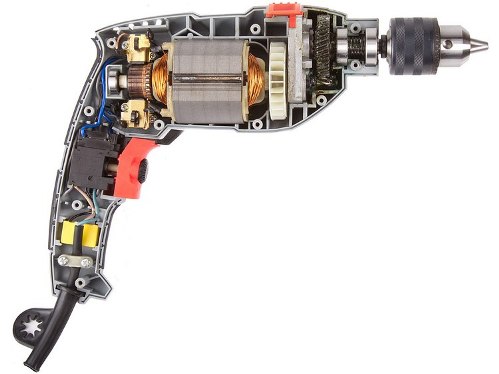
A tool like a percussion drill is an indispensable tool in construction. For example, she can easily drill a brick. As for concrete, then the performance of an impact drill depends on the brand of concrete in which you need to drill a hole.
For example, with the 300th grade of concrete, from which the internal partitions of rooms are usually built, an impact drill copes perfectly well. But this cannot be said about the 400th grade of concrete, which is involved in the construction of load-bearing walls. In this case, you must use a hammer drill.
See also: Specifications and functions of electric drills
An electric drill is the most popular electric tool during any repair, so it often fails due to frequent and intensive use. If you have the basic skills and experience in repairing such tools, it will not be difficult to repair the drill.
Possible impact drill malfunctions
There can be several reasons for the breakdowns of this kind of tool, there is an opinion that the main reason is the improper operation of the drill or not the "firmness" of the tool, because of which its insides consist of low-quality components. Among other more technical reasons, we can distinguish the following:
-
Failure of the movable part of the electric motor, its stator or anchor;
-
Bearing failure;
-
Breakdown of the button (speed controller);
-
Reverse switch failure;
-
Deterioration of brush collectors and their burning;
-
A wire break in the cord, in the drill itself or on the motor coil itself;
-
Gearbox or chuck failure.
How to find the fault
In order to understand the cause of the breakdown, it sometimes happens that it is not immediately visible, for example, the drill simply does not rotate. Inspection begins with a power cord, often due to intensive use, the cord is interrupted either in the area of the plug or where-something else. Also inspect the button and various controls. Try to crank the cartridge.
This all the diagnostic procedures end, you need to disassemble the drill to gain access and examine it from the inside. To do this, unscrew (all) the screws around the perimeter of the drill body and remove the upper half of the body. When unscrewing the screws, we pay attention to their length and remember in which hole the screws were of what length were, it is easier to leave them immediately in the removed part of the case.
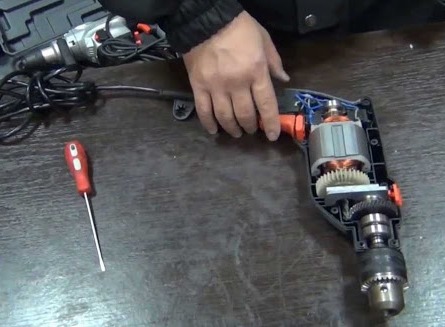
We inspect the power cable and internal wiring for burnouts, breaks and the reliability of the contact connection.In the place where the power cable enters the drill body, you can often see a damaged outer layer of insulation, its rupture, and the power cord itself is eventually twisted.
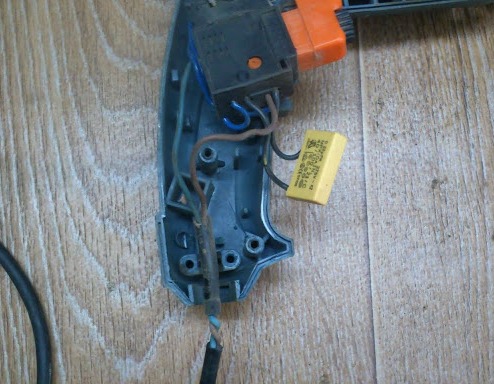
If you have a malfunctioning button or reversing switch, it is easier to replace it with a new one. You can of course disassemble, clean the contacts, but it will be troublesome to assemble, a lot of small parts and springs that everyone strives to jump out of.
One of the most common types of damage is the wear of the engine brushes, and you can easily replace them yourself at home. Sometimes, brushes can be replaced without disassembling the drill body, if the design allows it.
For some models, it is enough to unscrew the plugs from the installation windows and install new brushes. For other models, disassembly of the case is required for replacement, in this case, it is necessary to carefully remove the brush holders and remove worn out brushes from them.
A characteristic sign of a problem with the electric brushes is a strong sparking and unstable operation of the electric motor when it works intermittently or jerkily. What comes from intermittent electrical contact between brushes and plates on the manifold.
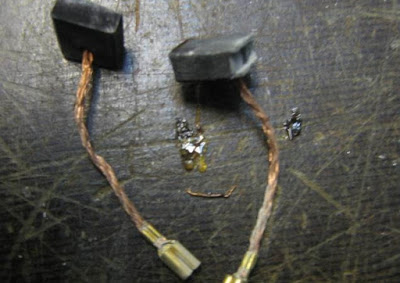
You should also not allow the brushes to wear to a minimum size. This is dangerous because the gap between the brush and the collector plates may increase. As a result, increased sparking occurs, the collector plates are very hot and can "move away" from the base of the collector, which will lead to the need to replace the armature.
It is necessary to regularly clean the collector plates from soot and constantly check the tension of the fit of the brushes to the collector drum. Other malfunctions of the electrical part can occur in the form of a lack of rotation of the drill motor when there are no signs of turning on the motor (no buzzing is heard).
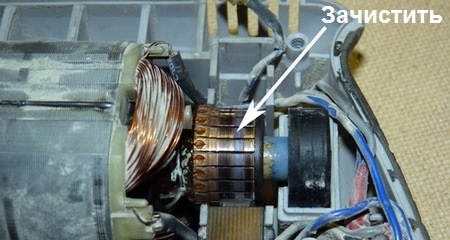
If the drill does not turn on and its chuck is easily rotated by ordinary force, then we can most likely assume a malfunction of the electrical part.
The reason for the specificity of the cause is checked as it becomes available, the power cord, speed control button, starting capacitor and motor windings are checked, everything is just called with a multimeter in resistance mode.
Among the electrical faults, a breakdown of the anchor can be noted. Damage to the anchor or stator occurs for two reasons - improper operation and poor-quality winding wire. Top manufacturers with a worldwide reputation use high-quality wire with double insulation and heat-resistant varnish, which significantly increases the reliability of engines and can significantly extend the life of your drill. Cheap models do not withstand prolonged and intense overheating robots.
Anchor failure (coil malfunction) can be diagnosed by a characteristic odor, an increase in sparking during operation. And during inspection, you can see charred windings of the wire. But you can also observe a drop in engine power, which will mean that the windings began to burn, their resistance from this has already changed, which can be seen with the help of a tester.
It is possible to observe such breakdowns of the armature and stator: inter-turn electrical breakdown, breakdown to the “body” (magnetic circuit) and winding breakage. Breakdown to the housing can be determined using a megger (multimeter) by touching the probes to any output of the winding and the magnetic circuit. Resistance of more than 500 megohms indicates the absence of breakdown.
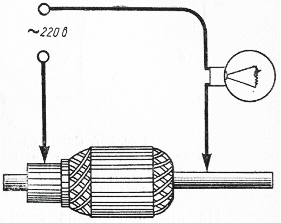
You should know that, ideally, the measurements should be made by a professional megger, in which the measuring voltage is not less than 100 volts. Making measurements with a simple multimeter, it is impossible to accurately determine that there is no breakdown, but you can determine that there is definitely a breakdown. Another breakdown can be measured by a simple method, using a light bulb connected to a 220-volt network with one terminal and using the second leads to the body and collector plates.
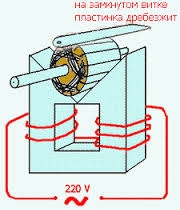
An interturn breakdown of an anchor will be a little more difficult to determine.To do this, you can use a special transformer, which has only a primary winding and a break in the magnetic circuit in the form of a gutter, for installing anchors in it. In this case, the anchor with its core becomes the secondary winding.
Turning the anchor, so that there would be windings in turn, we put a thin metal plate on the armature core. If the winding is short-circuited, then the plate starts to rattle strongly, while the winding heats up significantly.
Often the inter-turn closure can be seen during a routine inspection, the turns can be bent, wrinkled. You can try to fix it yourself by bending the closed or bent turns of wire to the sides.
To find the breakage of the armature winding, you can connect a milliammeter to adjacent armature plates and slowly turn the armature. In whole windings a certain identical current will appear, a dangling current will show either an increase in current or its complete absence.
By a comparison method, you can find a faulty one or make sure that it is working if all the windings give the same value on the multimeter.
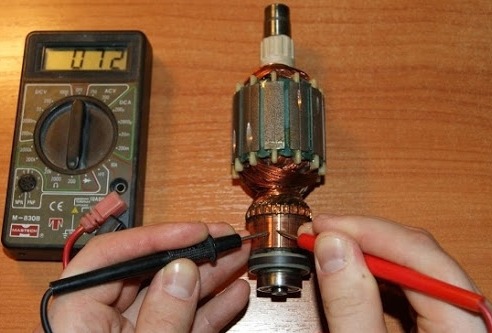
A break in the stator windings is determined by connecting an ohmmeter to the disconnected ends of the windings; the absence of resistance indicates a complete break. In this case, make repairs with your own hands, rewinding the anchor or stator, without special devices is impossible.
When rewinding the windings, it is necessary to fulfill the conditions: winding the windings is carried out in one direction, the beginning of the winding is marked at the coil, the wire is wound clockwise, after which the end of the output is marked. The second winding is wound in the same direction, with a mark of the findings beginning and end.
To replace the rotor or stator, it is necessary to disassemble the housing, disconnect the wires, brushes, if necessary, remove the drive gear, and remove the entire motor together with the thrust bearings. Buy a replacement and insert everything back.
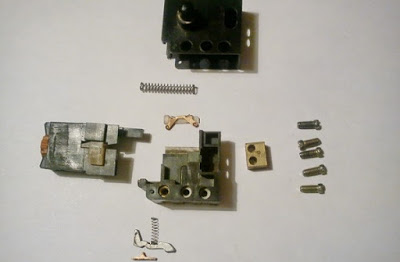
If you suspect a breakdown of the button (speed controller), make sure that there is voltage at the input and output terminal of the button. If, when the button is pressed, the output voltage does not appear, you need to disassemble the button housing and inspect all the contacts.
As a rule, burning or sticking of contacts is determined visually. All contacts must be thoroughly wiped with alcohol and cleaned with a sandpaper for grinding. Then check the voltage again. Do-it-yourself button repair is only possible with certain skills.
It is important to understand that after opening the case, many switching details will simply fall out of the case. This can only be prevented by smoothly and accurately lifting the lid initially.
When replacing a button with a new one, you need to make sure that the new button is designed for the power of a particular drill. So, for example, for a 750-watt drill, the regulator must have a current of at least 3.4 amperes.
Drill button button wiring diagram:
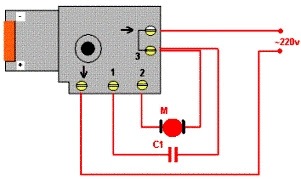
The reversing button is checked in the same way sequentially. The reverse mechanism is based on a system of make and break contacts. Its prevention is carried out similarly to the start button.
Wiring diagram for the speed control knob and hammer drill reverse:
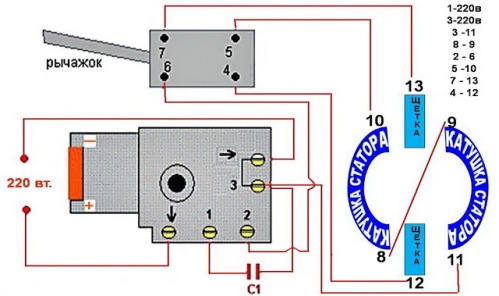
The cause of the "non-operation" of the electric motor may also be the failure of the starting capacitor. Typically, the inoperative state of the capacitor can be seen by a color change. But it is more reliable to measure its capacity and compare with the face value.
Repair of the mechanical part of the drill
In the mechanical part of the impact drill, there can also be various breakdowns, for example, jamming of the drill shaft. If the cartridge cannot be scrolled by hand, while the engine is buzzing when turned on, the cause is most likely a gearbox or bearing failure. A common cause of failure is the destruction of the thrust bearings.
Damage to the gearbox can also occur in the case when the cartridge is cranked by hand and the electric motor is running, and rotation is not transmitted to the main shaft.All malfunctions in the mechanical part can cause periodic stops and malfunctions during operation, buzzing, grinding and insufficient shaft rotation speed.
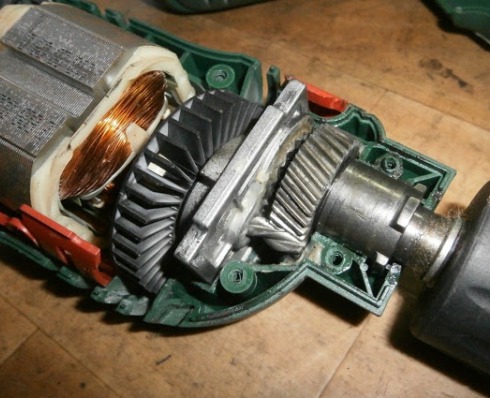
The principle of the impact drill is based on the translational movement of two ratchets, which are repelled from each other during rotation of the motor spindle. During hammer drilling, the motor drives the spindle.
From the motor spindle, rotational movements are transmitted further to the large gear of the gearbox to which the ratchet is rigidly attached.
Planetary gearbox diagram:

The corrugated surface of the ratchet of the large gear slides along the corrugated surface of the second ratchet, rigidly fixed to the gear housing, thereby making impact actions.
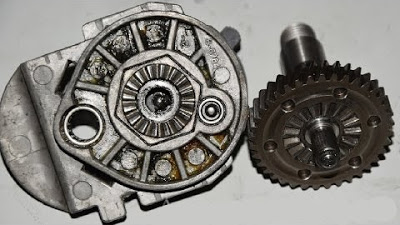
Over time, during prolonged and intensive operation of the drill in the drilling mode with a shock, the wavy surfaces of the ratchets wear out, the impact becomes weaker and weaker or does not occur at all. It is necessary to inspect the worn gear parts and, if necessary, replace them with new ones.
When jamming a cartridge or audible grinding, first of all, you need to disassemble the drill body and inspect the condition of the gears in the gearbox. Deterioration of fastening slots or broken gear teeth indicate the failure of the part. Such gear must be replaced.
Gears inspect the entire circumference, smoothly turning the shafts by hand. Bearings can be checked by turning the shaft in them. When the shaft is running hard, start by lubricating the bearings. If this does not help, then they are removed from the axis using a special puller.
Hands scroll the bearing race. If movement is difficult or extraneous sounds are heard, the bearing should be replaced. If the bearing is not replaced on time, it will lead to jamming of the armature, or, in the best case, the bearing will simply rotate in the seat.
In order to get to the bearings of the drill, it is necessary to completely remove the engine with the gearbox, having previously removed the brushes so that they would not break and so that they would not pop up.
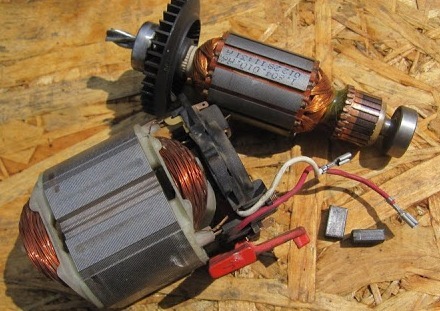
Before you take out the insides of the drill, carefully consider what, where it was, so that when assembling, as it often happens with "experienced" craftsmen, there aren’t a lot of unnecessary elements that are hard to find. Do not lose the ball, which is located at the end of the drill chuck shaft, it is responsible for drilling with and without impact.
If necessary and severe wear on the drill chuck, unscrew the fixing screw, which is located inside the chuck. After that, unscrew the cartridge with a left-hand thread and remove it from the shaft. The cartridge is replaced with a new one.
Often, a drill breaks during serious work, during an started repair or in other conditions, so as not to waste time and that would not be a problem for you, you should remember how to repair the drill yourself. You should know the design of the drill used and easily and quickly determine the cause of the malfunction and eliminate it.
See also on this topic:Why spark brush motor andHow to check the electric motor - simple tips for electricians
See also at bgv.electricianexp.com
:
