Categories: Microcontroller circuits
Number of views: 105187
Comments on the article: 0
10 interesting projects for Arduino
Arduino is a universal platform for homemade products on microcontrollers. There are many shields (expansion cards) and sensors to it. This diversity allows you to make a number of interesting projects aimed at improving your life and increasing its comfort. The areas of application of the board are unlimited: automation, security systems, systems for collecting and analyzing data, and more.
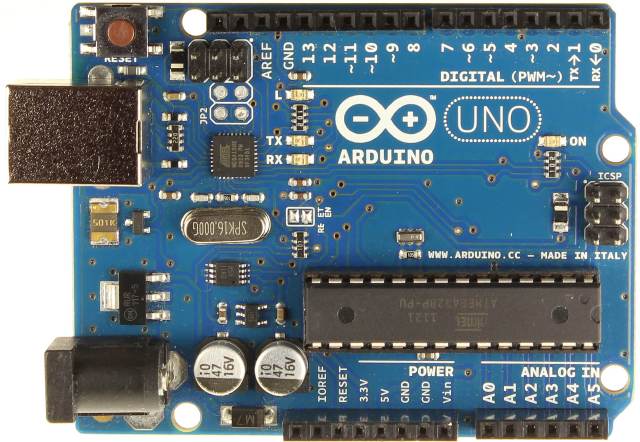
From this article you will learn what can be done interesting on Arduino. Which projects will become spectacular and which will be useful.
What can be done with Arduino
Robot vacuum cleaner
Cleaning the apartment is a routine and unattractive, especially since it takes time. You can save it if you put a part of the household chores on the robot. This robot was assembled by an electronic engineer from Sochi - Dmitry Ivanov. Structurally, it turned out to be quite high quality and not inferior in effectiveness factory analogues.
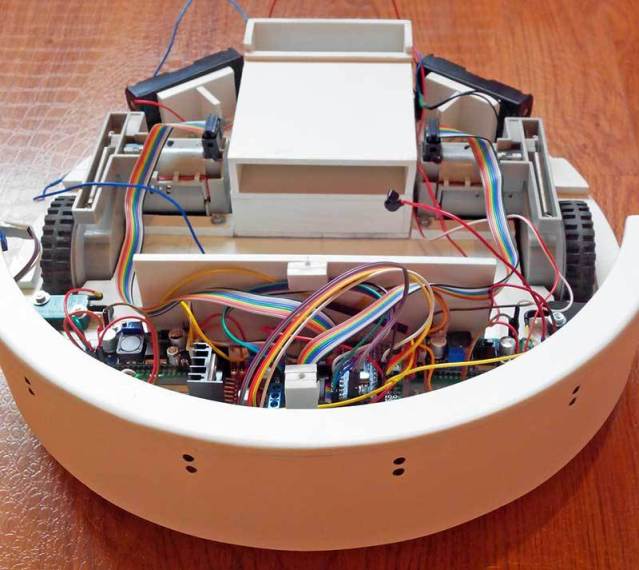
To build it you will need:
1. Arduino Pro-mini, or any other similar and suitable in size ...
2. USB-TTL adapter if you are using Pro mini. If you chose the Arduino Nano, then it is not needed. It is already installed on the board.
3. The L298N driver is needed for controlling and reversing DC motors.
4. Small engine with gear and wheels.
5. 6 IR sensors.
6. Engine for a turbine (bigger).
7. The turbine itself, or rather the impeller from the vacuum cleaner.
8. Brush motor (small).
9. 2 collision sensors.
10.4 18650 batteries.
11. 2 DC / DC converters (step-up and step-down).
13. The controller for the operation (charge and discharge) of the batteries.
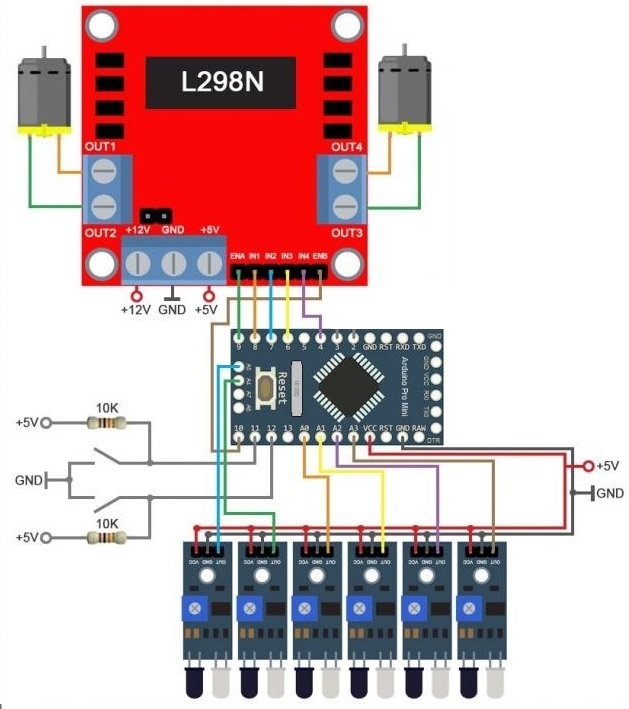
The control system is as follows:
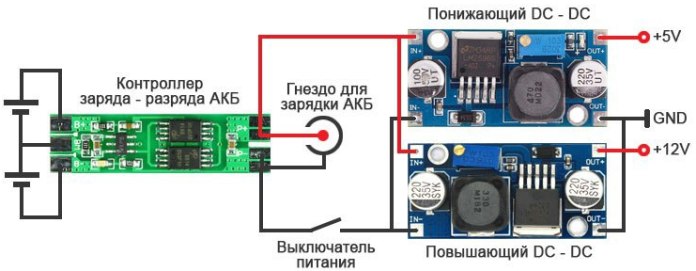
And here is the power system:
Such cleaners are developing, factory-made models have complex intelligent algorithms, but you can try to make your own design, which will not be inferior in quality to expensive analogues.
RGB tape control from smartphone and Arduino
RGB tapes able to produce a light flux of any color, they usually use LEDs in the housing of which there are three crystals glowing in different colors. For their management are sold special RGB controllers, their essence is to regulate the current supplied to each of the colors of the LED strip, therefore - the intensity of the glow of each of the three colors is regulated (separately).
You can do it yourself with an RGB controller on Arduino, even more so, this project implements control via Bluetooth.
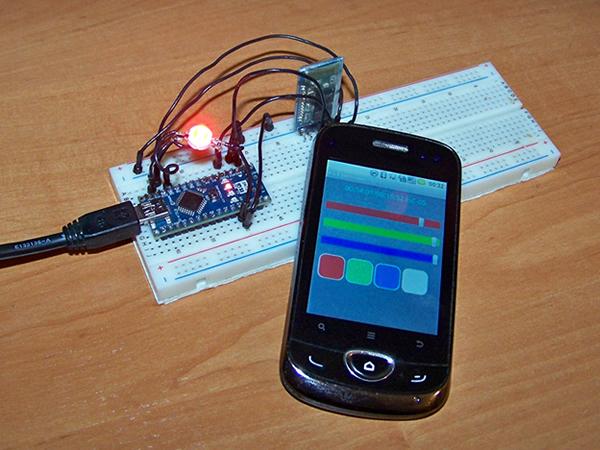
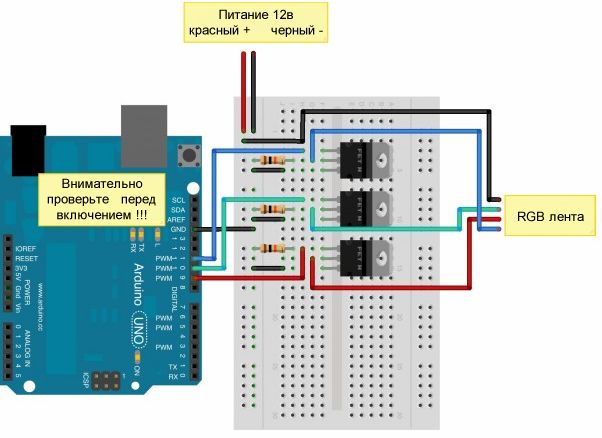
The photo shows an example of using a single RGB LED. To control the tape, an additional 12V power supply is required, then Arduino PWM Outputs will control the gates of the field effect transistors included in the circuit. The gate charge current is limited by 10 kΩ resistors; they are installed between the Arduino pin and the gate, in series with it.
The author used Bluetooth to communicate with the smartphone; for this, the HC-05 module was purchased.
Remote control based on Arduino and smartphone
Using the microcontroller, you can make a universal remote control controlled from a mobile phone.
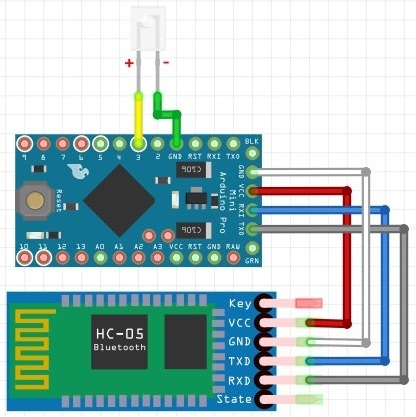
To do this, you will need:
-
Arduino of any model;
-
IR receiver TSOP1138;
-
IR LED
-
Bluetooth module HC-05 or HC-06.
A project can read codes from factory consoles and save their values. Then you can control this homemade product via Bluetooth.
Face Recognition and Tracking System
The webcam is mounted on a swivel mechanism. It is connected to a computer with installed software. It is based on the computer vision library - OpenCV (Open Source Computer Vision Library), after the program detects a face, its coordinates are transferred to the Arduino board via USB cable.
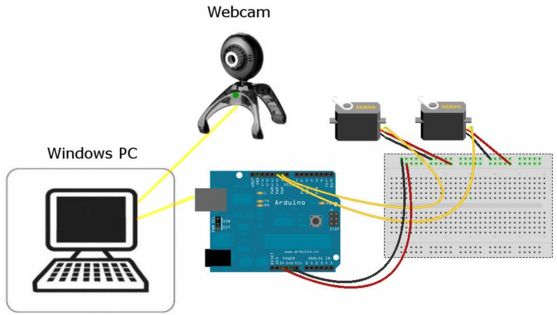
Arduino gives the command to the drive of the rotary mechanism and positions the camera lens. A couple of servos are used to move the camera.
The video shows the operation of this device.
Watch your animals!
The idea is to find out where your animal is walking, it can cause interest for scientific research and just for fun. To do this, use a GPS beacon. But to store location data on some kind of drive.

At the same time, the dimensions of the device play a decisive role here, since the animal should not feel discomfort from it. You can use to record data Arduino Shield for working with micro-SD memory cards.
Below is a diagram of the original version of the device.
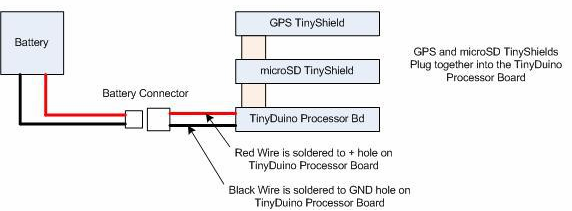
In the original version of the project, the TinyDuino board and shields for it were used. If you can’t find one, it’s quite possible to use small instances of Arduino: mini, micro, nano.
For power, a small-capacity Li-ion element was used. A small battery lasts about 6 hours.The author eventually everything fit in a cropped jar from under the tic-tac. It is worth noting that the GPS antenna must look up to get reliable sensor readings.
Combination lock cracker
To break the code locks with Arduino, you need a servo and stepper motor. This project was developed by hacker Samy Kamkar. This is a rather complicated project. The operation of this device is depicted in the video, where the author tells all the details.
Of course, such a device is hardly suitable for practical use, but this is a great demo.
Arduino in music
This is more likely not a project, but a small demonstration of what application this platform has found among musicians.
Drum car on Arduino. It is noteworthy in that this is not an ordinary enumeration of recorded samples, but, in principle, the generation of sound using "iron" devices.
Sound spectrum analyzer with video output.
Device Diagram:
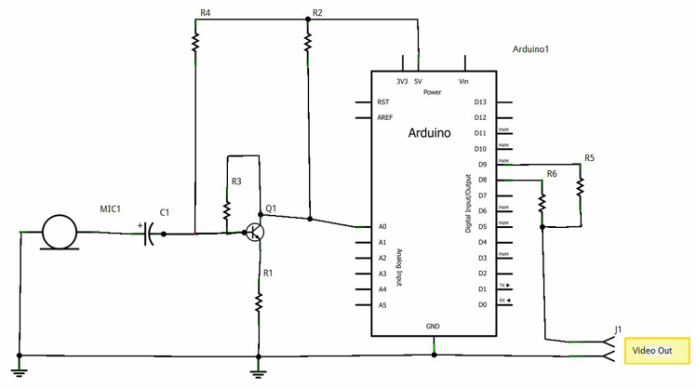
Part ratings:
-
NPN transistor, for example 2n3904 - 1 pc.
-
Resistor 1 kOhm (R2, R4, R5) - 3 pcs.
-
330 Ohm (R6) - 1 pc.
-
10 kOhm (R1) - 1 pc.
-
100 kOhm (R3) - 1 pc.
-
3.3 μF electrolytic capacitor - 1 pc.
For the project to work, you need to connect the library for quick expansion in a Fourier series.
This is a fairly simple and interesting project from the category of "you can brag to your friends."
3 robot projects
Robotics is one of the most interesting areas for geeks and just lovers to do something unusual with their own hands, I decided to make a selection of several interesting projects.
BEAM-robot on Arduino
To build a four-legged walking robot, you will need:
-
Servomotors, for example, Tower Hobbies TS-53;
-
A piece of copper wire of medium thickness (to support the weight of the structure and not bend, but not too thick, because it makes no sense);
-
Microcontroller - AVR ATMega 8 or Arduino board of any model;
-
For the chassis, the design indicates that the Sintra Frame was used. This is something like plastic, it bends into any shape when heated.
As a result, you will receive:
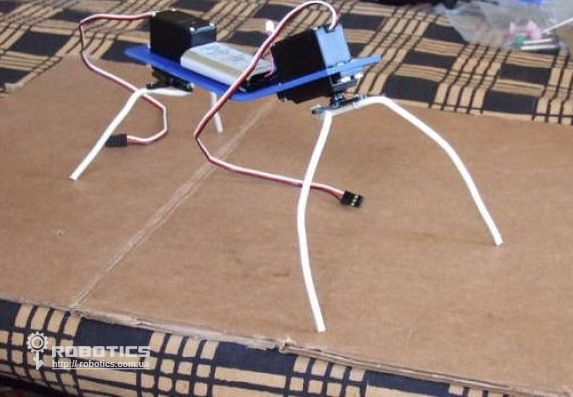
It is noteworthy that this robot does not drive, but walks, can step over and go to elevations up to 1 cm.
Fijibot self-recharging robot
For some reason, this project reminded me of a robot from the Wall-e cartoon. Its feature is the use of solar cell to charge the batteries. It moves like a car on 4 wheels.
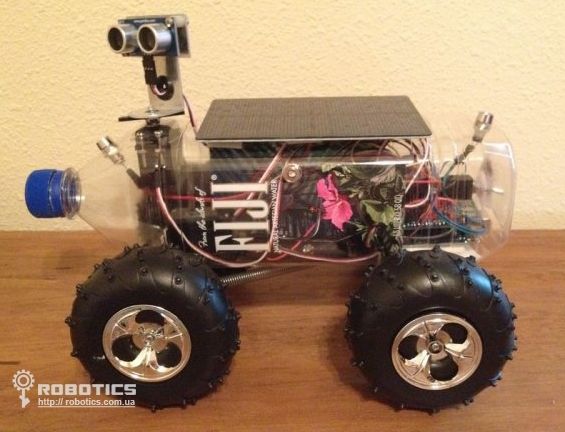
Its constituent details:
-
A suitable plastic bottle;
-
Arduino UNO;
-
Proto-shield;
-
Jumpers mom-dad;
-
Solar panel with an output voltage of 6V;
-
As a donor of wheels, engines and other parts - a radio-controlled machine;
-
Two servos of continuous rotation;
-
Two ordinary servos (180 degrees);
-
The holder for AA batteries and for "crown";
-
Collision sensor;
-
LEDs, photoresistors, 10 kΩ constant resistors - only 4 each;
-
Diode 1n4001.
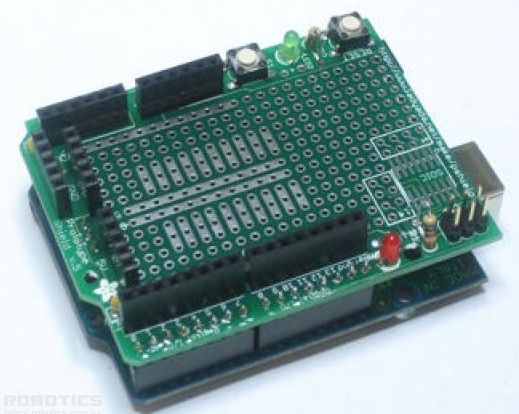
Here is the basis - Arduino board with proto-shield.
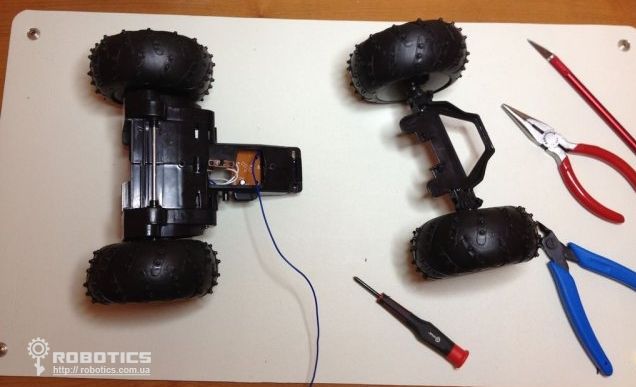
This is how spare parts from rc car - wheels.
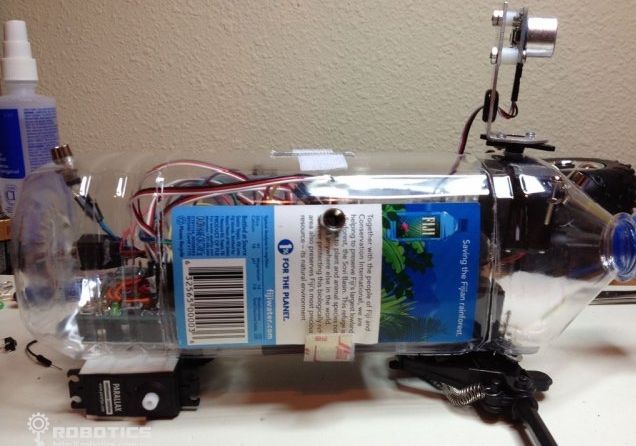
The design is almost complete, the sensors are installed.
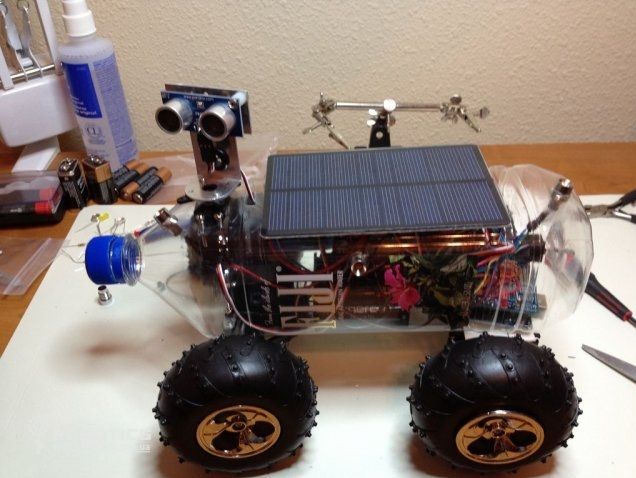
The essence of the robot is that it goes to the light. Abundance photoresistors he needs to navigate.
Artist from parts from CD drives
It is more like a CNC machine than a robot, but the project is very entertaining. It is a 2 axis painting machine. Here is a list of the main components of which it consists:
-
(DVD) CD-drives - 2 pcs;
-
2 drivers for stepper motors A498;
-
servo MG90S;
-
Arduino Uno;
-
12V power supply;
-
Ballpoint pen, and other structural elements.
Blocks with a stepper motor and a guide rod, which positioned the optical head, are used from the optical drive.From these blocks, the engine, shaft and carriage are removed.
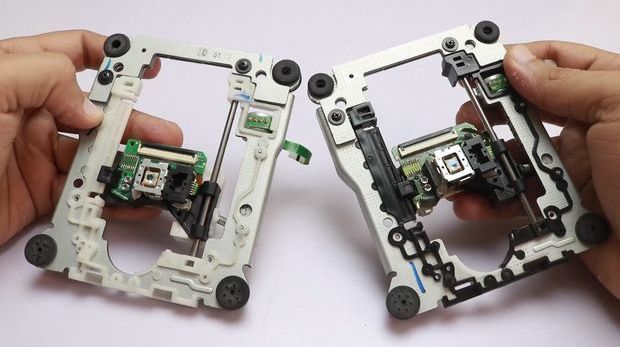
You won’t be able to control the stepper motor without additional equipment, so they use special driver cards, it is better if the engine radiator is installed on them at the time of starting or changing the direction of rotation.
The complete assembly and operation process is shown in this video.
See also 16 of the best Arduino projects from AlexGyver:
Conclusion
The article considers only a small drop of all that you can do on this popular platform. In fact, it all depends on your imagination and the task that you set for yourself.
See also at bgv.electricianexp.com
:
