Categories: Featured Articles » Practical Electronics
Number of views: 29467
Comments on the article: 2
We solder radio components from old boards
The article describes the amateur radio technology for extracting radio components from unnecessary radio boards.
 There are many different ways to solder radio components from circuit boards with a view to their further use. Of course, preference should be given to professional techniques and devices for the dismantling of radio elements. However, it is unlikely that professionals with serious special equipment need transistors, resistors, and other amateur radio tricks obtained in this way.
So we’re talking, of course, about home technology. And more precisely, I would like to share just a couple of simple tricks that will certainly accelerate this desired process.
So, we will talk about the procedure for extracting the necessary parts from old boards or boards that are not intended for further restoration. I will make a reservation that we are not talking about chip desoldering, they need a thinner approach.
Preparation of the workplace: the light should be enough and - not in the eyes, the experimental board should be fixed vertically if possible, the details on the left, the tracks on the right - under soldering iron (if you are not left-handed).
We take a powerful soldering iron - 100 watts, well tinned and ground, on a stable stand. A powerful soldering iron will quickly melt the tin in the soldering place and the part will not have time to overheat.
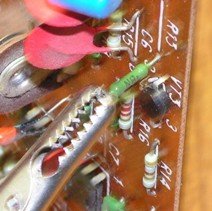
Instead of tweezers, which radio amateurs usually work with, we take a crocodile clip. Now you can find anything in the store, so, if possible, we select a crocodile with a fairly tight spring and a narrow working part. Such a clamp will serve simultaneously as a reliable non-slip grip and heat sink.
Next, do this:
 1. Electrolytic capacitors: with a wide soldering iron tip, we immediately heat up two electrolyte leads and remove from the board, grabbing fingers onto the case .. If necessary, heat up the “widely spaced” leads - you can “put” the soldering iron on the board to grab both, or heat the leads one by one, soldering the “heap” part .
2. Transistors: we grab a drop of solder with a soldering iron sting, “cover” it with all three (four) transistor leads and quickly remove it from the board.
3. Resistorssmall chokes, diodes, non-polar capacitors: Often, the conclusions of these radio components before soldering are bent from the back of the board, so here we proceed as follows. We snap the “crocodile” on the output of the part, heat up the soldering place with a soldering iron and, overcoming the resistance of the bent output, remove it (output). We do not unfasten the clamp, but continue the movement of the hand, put the part perpendicular to the plane of the board and immediately heat up the second output. Now a slight movement of the resistor in the heated piston of the board is enough, and it is in your hands.
Of course, if we are talking about drinking one piece, then you should not bother, anyone can handle it. But if the task is to “clear the board” from radio components, then the described approach will speed up the work and save the parts from damage.
Nikolay Martov
See also at bgv.electricianexp.com
:
