Categories: Sharing experience, Practical Electronics, Electrician Secrets
Number of views: 111,998
Comments on the article: 4
Tricky probe instead of a tester
 I borrowed this sampler circuit from N. Shilo (Ukraine) in 1984. I don’t know who its author is, but many years of experience using this sampler show that it would be useful to share experience.
In my specialty, I deal with electric drives, as well as control circuits for automatic lines, etc. I believe that in nine out of ten cases this probe replaces a regular tester. The probe allows you to evaluate the magnitude and sign ("+", "-", "~") of the voltage in several ranges: up to 36 V,> 36 V,> 110 V,> 220 V, 380 V, as well as ringing electric circuits, such as the contacts of relays, starters, their coils, incandescent lamps, p-n transitions, LEDs, etc., i.e. almost everything that an electrician encounters in the course of his work (with the exception of measuring current).
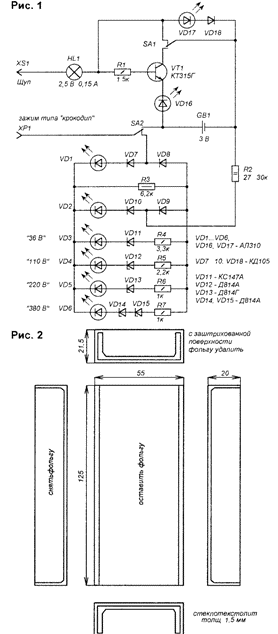
In the diagram, the switches SA1 and SA2 are shown in a non-pressed state, i.e. in the position of the voltmeter. The magnitude of the voltage can be judged by the number of LEDs in the line VD3 ... VD6, VD1 and VD2 indicate the polarity. Resistor R2 must be made of two or three identical resistors connected in series with a total resistance of 27 ... 30 kOhm. The pressed switch SA2 turns the probe into a classic dial, i.e. battery plus a light bulb. If you press both switches SA1 and SA2, then you can check the circuit in two resistance ranges: - the first range is from 1 MOhm and above to ~ 1.5 kOhm (VD15 is on); - the second range is from 1 kOhm to 0 (VD15 and VD16 are lit).
Many of my friends who repeated this design appreciated its merits. Housing size options depend on the parts used and range from domino boxes to about two matchbox sizes. In my version, the case was made of one-sided foil fiberglass. Where the junction line goes out, the foil must be removed to a thickness of -1.5 mm, solder the seams from the inside. Crackers with M3 thread are glued at the corners to fasten the top cover, in which holes for eight LEDs and one lamp are drilled. The lamp must be closed with a transparent cap. By the degree of lamp incandescence, low resistances (up to several ohms) can be estimated. A printed circuit board can be made either by etching or with a knife. The lamp holder HL1 can be made by wrapping 2.5 turns of copper wire with a diameter of 1 mm directly along the thread of the lamp.
Switches are best placed on opposite sides of the board. There will be fewer errors when using it at first. The most common mistake is that, having not made sure that there is no voltage in any circuit, the user presses the switches for dialing. At the same time, the lamp HL1 burns out, acting as a fuse. Thus, when working on disconnected circuits, one must be careful and attentive, which is what safety rules require. This is well known to those electricians who measure the voltage with an avometer included in the measurement mode R or I. In our case, in order to avoid such an error, it will be enough to replace the lamp HL1, which must be kept in reserve.
As pushers of the switch buttons, you can use unusable LEDs, slightly turning them.
The switches are mounted with brackets made of copper wire with a diameter of 1 mm. The conclusions of the LEDs do not need to be shortened, their length only needs to be clarified so that the LED lenses protrude from the top cover by 1 ... 1.5 mm.
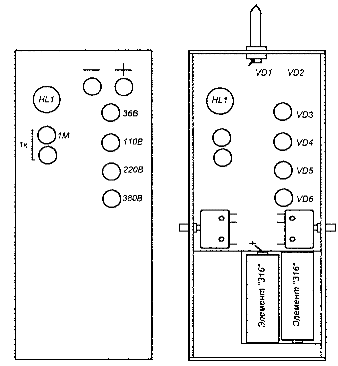
The drawing of the printed circuit board is not given, since it was made in one copy, and when repeating the probe, the location of the LEDs changed depending on the tastes of the performer. The arrangement of elements on the front panel and in the housing is shown in Fig. 3. Stabilitrons can be used for small-sized imported products. Batteries (type "316") last a year or more. The probe can be supplemented with a “phase” indicator, which is very useful when repairing lighting.
See also at bgv.electricianexp.com
: