Categories: Featured Articles » Sharing experience
Number of views: 55616
Comments on the article: 4
How to install a satellite dish yourself
 Instructions for self-installation of a satellite dish. Using these recommendations, almost anyone will be able to independently install and configure a satellite dish.
In order to install a satellite dish, we need:
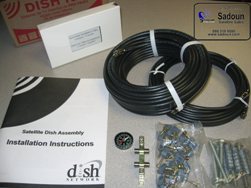
1. A set of satellite equipment (receiver, antenna with a diameter of 90 cm, bracket, bracket mounting hardware, universal converter, RG-6 coaxial cable, two F-connectors).
2. Tools: compass, rotary hammer, pliers, screwdriver, wrenches, portable TV, insulation tape, extension cord for connecting to the mains.
First of all, it would not hurt to determine the name of the satellite to which we will direct the mirror of the satellite dish. This article will describe in detail how to configure a satellite dish to receive a television signal from the Hot Bird 13E satellite, but using this technique, you can configure the satellite dish to other satellites yourself.
The only thing to consider is that for some satellites, such as the Eutelsat 36E, a universal converter is not suitable. Instead of a universal converter, you should use a converter with circular polarization, the rest of the steps are similar.
A bit of theory. All satellites are in the geostationary orbit of the Earth, which is located directly above the equator. Therefore, you need to direct the antenna in a southerly direction. Since the satellites are located above the equator, then the latitude of all of them will be equal to zero. Therefore, satellites are distinguished by longitude, for example, Hot Bird 13E, which means that the satellite is located at 13 degrees east longitude (E-East-East).
 We first determine the direction of the antenna. Given that Moscow is located at 37 degrees east longitude, we make a small calculation. In our case, with Moscow, the direction of the compass arrow to the south will correspond to 37 degrees east longitude, and our satellite is located 24 degrees west of the south direction, 13 degrees east longitude.
Noting on the compass 204 degrees (180 degrees south + 24 degrees to the desired satellite), we evaluate the situation. This direction should be free from nearby buildings and trees. The antenna can only be installed in a place where there are no obstacles in the right direction for the signal from the satellite.
The angle of elevation of the beam from the satellite is approximately 30 degrees, so obstacles that are below the angle of elevation are not an obstacle. Such calculations may seem rather complicated to you, so pay attention to the antennas already installed, they will tell you what to do in your situation.
Enough theories, let's get down to practice. First of all, we will prepare a small piece of coaxial cable (2-3 meters) for fine tuning the satellite dish. From both sides it is necessary to wind F-connectors on it.
It is better to pre-assemble the antenna. To do this, you can use the drawings, which are usually attached. Even without the drawings, assembling it will not be difficult. We fix our converter in the holder, the converter must be slightly rotated counterclockwise (if you look at the antenna in front) by 5-10 degrees. We will perform further operations at the installation site.
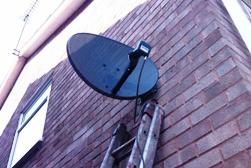
 It is necessary to bring electricity to the installation site, we will use an extension cord for this. And proceed to fixing the bracket. Having decided on the place of fixing the bracket, use a hammer to make holes for fasteners. It should be borne in mind that the "trunk" of the bracket must be strictly vertical, this is important.
On the installed bracket we put on the satellite antenna assembly, approximately aiming in the right direction. Do not tighten it strongly, because we will rotate it, but it should not hang out either.
We connect our receiver to a portable TV and to a converter using a prepared cable. We turn on the equipment in the network and on the receiver select the frequency to which we will tune. It is very convenient if your satellite receiver has a list of channels preinstalled.
Press the “SAT” button and select our Hot Bird satellite from the list. In the list of channels, find, for example, the channel "RTR planet" and display information about the channel. Usually this is the “INFO” button, actions may differ on different receivers, so read the instructions for your receiver.
If the channels have not been pre-installed, go to the receiver menu, find the “Installation” section and select “Search for channels”. We find Hot Bird in the list and press the transponder button. We need a transponder with parameters 11034 V 27500 3/4, if not, use the add transponder button. You will find how to do this in the instructions for your satellite receiver.
 Having tuned the equipment to the desired frequency, we proceed to aim the antenna at the satellite. We will be interested in the “Quality” scale, which is displayed on our portable TV. The antenna must be given the desired direction by setting its correct position in two axes: horizontal and vertical plane. To point a satellite dish to a satellite, give it an initially higher elevation angle than necessary. Then, slowly turning the antenna in a horizontal plane, we monitor the quality level on the monitor of a portable TV. Gradually reducing the angle of elevation, we continue to rotate the antenna in the horizontal plane, and we monitor the signal level on the TV.
Having caught the signal, achieve its maximum value and firmly fix the antenna to the bracket. Further changing the angle of rise, also achieve the maximum signal level and tighten the bolts.
And the last stroke, turning the converter in the holder, again we achieve the maximum value of the “Quality” scale. After which we finally fix all the elements, just do not overdo it so as not to damage the threads and plastic parts.
Now it remains to connect the coaxial cable and conduct it to your stationary TV. Use insulation tape to secure the cable.
According to the instructions for your receiver, scan and sort the channels. Now you can enjoy watching.
See also at bgv.electricianexp.com
:
