Categories: Sharing experience, Electrician Secrets
Number of views: 37554
Comments on the article: 1
How to protect the wiring in the country
 The manufacture of removable wiring for the garden.
I work as an electrician in our garden community. Most of the houses in our gardening are single-story, summer. It is difficult to protect such a house from looters. Now, when prices for non-ferrous metal have risen, the devastating raids on holiday villages from autumn to spring have become constant.
In my house I made removable wiring. He recommended and helped do the same to his neighbors in the country. Now to us no need to restore power to your garden house from scratch. I think that this way to save wiring in the country interested gardeners and gardeners.
For the manufacture of removable wiring, you will need the following tools: straight and Phillips screwdrivers, pliers, side cutters, knife, scissors. Required simple electrician: wall mounted electric cartridges, sockets, switches, wire. You will also need thin tin, screws or screws of various lengths, thin boards or plywood.
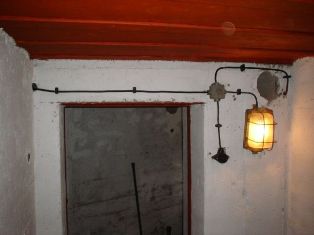
First of all, plan where to place the sockets and electric cartridges. The fact is that with this method of wiring, the socket, switch and lampholder are located on one rectangular panel mounted vertically on the wall. In the room it is logical to place such a panel near the table.
In the kitchen, it is necessary to provide for the possibility of connecting an electric stove and a kettle. In the bedroom, it is better to arrange a lamp and a switch so that you can read it before bedtime and turn off the light without getting out of bed.
Now let's calculate how many meters of electric wire we need. To do this, add the distances from the input point of the external cable or electric meter to the places of intended placement of our panels. By the way, I make panels 100-150 mm by 500-700 mm in size from thin boards or plywood 5-10 mm thick. We place such panels vertically on the wall using self-tapping screws.
In the upper part of the panel, fasten with a screw or short screws a wall socket with a bulb. In the lower part we have a socket. We fix the switch above it.
Sockets, switches, electric cartridges I often buy in a thrift store. Here you can find obsolete electrics at very low prices. The electric wire is better to use a new one. Its cross section should be calculated on the total power of those electrical appliances that you intend to use. In order to save, you can use a wire of different sections. The one that goes to the kitchen is more powerful, designed for a kettle and electric stove. In the bedroom you can stretch a wire of a smaller cross-section, designed to connect a light bulb.
Which wire is better to choose? Perfect option - stranded copper double insulated. Such a wire can easily withstand multiple installation-dismantling. Unfortunately, it is quite expensive. You can do with a two-core aluminum cable with double insulation, however, with careless installation or dismantling, the cable cores can break.
I will give approximate values of the cross section of copper and aluminum wires. When using a kettle and electric stove, the total power will be about 5 kW. For the safe operation of electrical appliances, a copper wire with a cross section of 1.5 mm is needed2or aluminum section of 2.5 mm2.
We proceed to the assembly and installation of electrical wiring. We start by connecting the main wire to an outlet on the panel. We also connect the wire going to the electro-cartridge through the switch.
After assembly, we fix the wire on the panel. We install the panel on the wall so that from the lamp to the ceiling it is at least 15-20 cm. We lay the main wire along the wall with staples.Paper clips are strips of thin tin with a width of 10-15 mm fixed to the screws or screws along the intended route of the wire. The length of the paper clip depends on the thickness of the wire used.
Between the rooms we stretch the wires through the holes in the wall. If there are branches, then it is necessary to connect the wires using a connecting terminal block or, in extreme cases, ordinary twisting. Twisting wires carefully wrap with insulating tape. All connections are placed in junction boxes.
For winter, the boxes themselves are not removed, they are usually not of interest to looters. It is better to put plastic boxes, rather than carbolic. The mentality of our vandals is this: that you can’t pick it up, you need to break it.
So, all the wires converge to one point - the input, or the place where the meter is located. Now the most important thing is to correctly and safely connect the electrical wiring of your house to the power cable. Your electrician will do the job best.
If you have the skills to work with electricity, then you can connect yourself.
All connection work is carried out with the fuses turned off.
It is understood that your meter is mounted on a shield that is securely attached to the wall. The external cable must be connected directly to the 1 and 3 terminals of the meter. Wires from terminals 2 and 4 go to fuses. We connect our internal wiring to the output of the fuses.
Turn on circuit breakers. We check the operation of lighting and sockets. If some light or socket does not work, we are looking for an open circuit. If after connecting the fuses blow, there is a short circuit in the wiring.
I hope that your knowledge and experience is enough to avoid these problems. Otherwise, I highly recommend contacting a specialist. So you protect yourself from electric shock, and your house from the danger of fire due to faulty wiring.
I wish you a comfortable stay at your favorite cottage!
Read also:Safe wiring in a wooden house: not a myth, but reality
Electrical engineering and electronics for beginners, electrical work,do-it-yourself electrician.
Open wiring in the country
See also at bgv.electricianexp.com
: