Categories: Electrician at home, Sockets and switches, Electric installation work
Number of views: 33799
Comments on the article: 5
How to install a box under a wall outlet or switch inside a wall
When repairing electrical wiring, it is always necessary to have access to the ends of the connecting cables and the contacts of sockets, switches. In modern buildings, a hidden method of installing communications is often used, when all wires are hidden inside the walls for security and design purposes.
To the veins of the cable ends can be reached only at the entrance of the lamp, switch, socket and electrical distribution box. For the convenience of servicing such electrical equipment, certain rules must be taken into account:
-
cables are laid along certain routes provided by the project;
-
in places where sockets and switches are installed inside the wall, recesses are made to accommodate the corresponding equipment;
-
inside the recesses, installation boxes are placed in which the switches and sockets are mounted.
The most favorable time for such work is the construction or repair phase, preceding the decorative processing of the walls:
-
wallpaper sticker;
-
painting.
Finishing of surfaces has already been completed during this period, the boundaries for the location of outlets and switches have been determined, and construction debris from drilling walls and laying a gate causes minimal damage. When new wallpapers are pasted, then it becomes much more difficult to work.
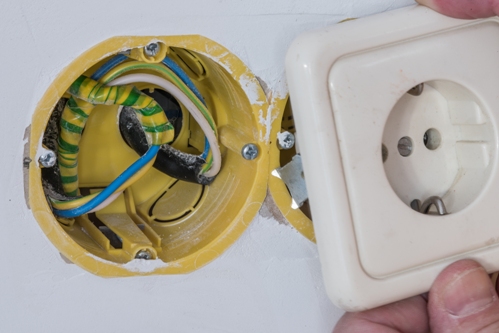
How to choose a mounting box design
By type of material, the boxes are:
-
plastic;
-
metal.
They are made in the form of:
-
cylinder;
-
parallelepiped.
Round boxes are used for single switches and sockets, and rectangular ones for blocks of them. Moreover, the latest models usually have rounded edges.
Installation boxes are selected for the specific equipment that will be placed in it. Otherwise, situations may arise when the circuit breaker you just don’t fit in the case or the installation of wires on it will be very difficult.
Sizes of typical round boxes
When placing the socket mechanism or switch inside the box, a depth margin is created for connecting and laying wires of about 2.5 ÷ 3 cm. If compresses or pads are supposed to be used inside the box, the free space is increased to 3.5 ÷ 4 cm.
How to make a wall socket for the installation box
Buildings are made of bricks, concrete slabs, foam concrete building blocks and other materials. To even the surface, the walls are covered with a layer of plaster, sheets of drywall, chipboard, fiberboard ... The choice of tool and the methods for creating recesses for mounting a socket or switch depend on this.
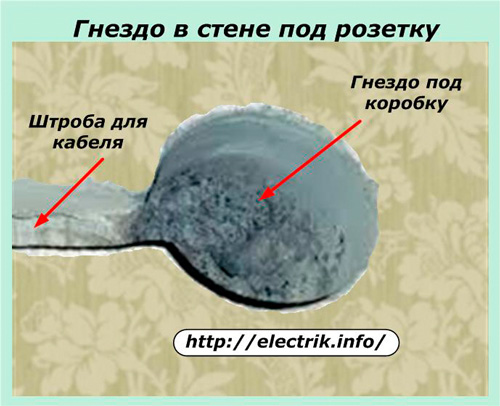
The most difficult thing is to hammer concrete slabs. For their processing, powerful punchers are used, with which they first drill holes, and then cut the jumpers between them with a special bit. In addition, the cable that is connected to the outlet must be hidden in the wall - cut through the strob.
Rough edges are obtained with this method, and the recess in width significantly exceeds the required size. Accurate nests with smooth edges are created when drilling a concrete wall with perforators with special crowns.
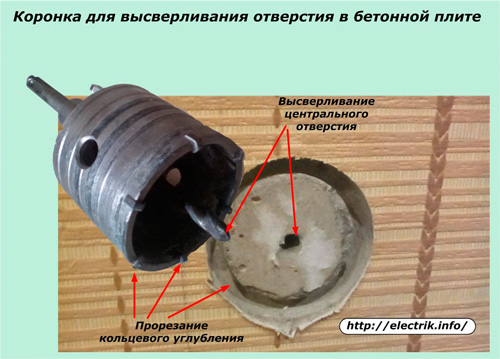
Their design provides for two stages of work at once:
-
drilling precisely in the center of the installation of the future outlet of the guide hole;
-
cutting through the lateral round recesses in the wall.
Due to the drill, the lateral incisors of the crown are precisely oriented and cut neat smooth edges.
After drilling, it is only necessary to cut down the remaining partition. The final hole has smooth edges and precise size.It must be deepened not only by the thickness of the installation box, but taking into account the addition of a small fixing layer of plaster.
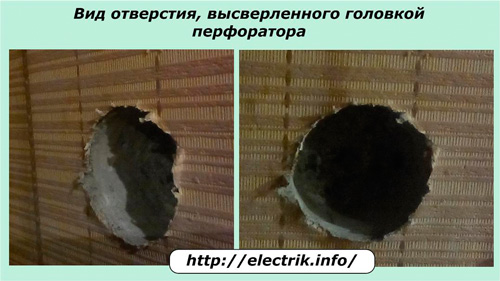
The same method is suitable for processing foam concrete blocks and masonry, although in these materials it is quite possible to work with a drill fixed in an impact drill, as well as a hammer with a chisel.
For drilling circular holes in drywall and wood materials, similar in design, but less powerful crowns are used. They are most often produced for installation in a quick-clamping drill chuck. Special adapters allow you to use them in the holes of perforators.
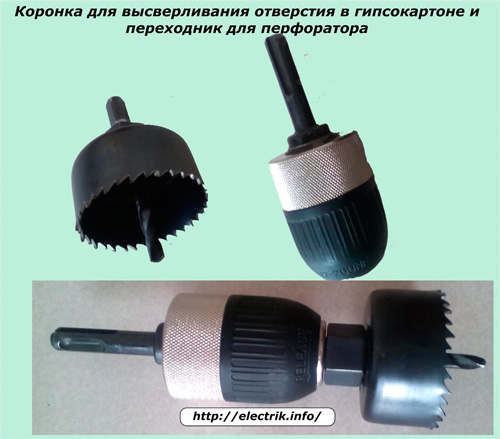
If a stone wall is located behind the drywall sheet, in which you need to deepen the hole, then work on the concrete crown.
How to fix the installation box inside the wall
In an ideal design, the mechanism of the switch or outlet should be strictly located along the horizon and merge with the plane of the wall. Bulging and skewed devices not only violate the design, but also create discomfort for the owners. Too deep buried boxes may not provide the necessary structural strength.
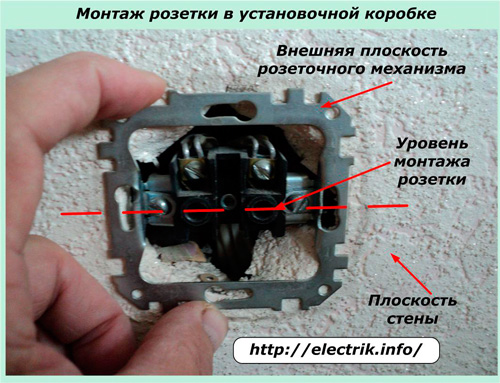
In order to correctly mount the installation box, it is necessary to provide for the implementation of a certain sequence of actions:
-
fasten the cable to the wall;
-
insert its ends into the installation box and remove excess insulation correctly;
-
evaluate the possibilities of mounting the outlet mechanism.
How to fix the cable
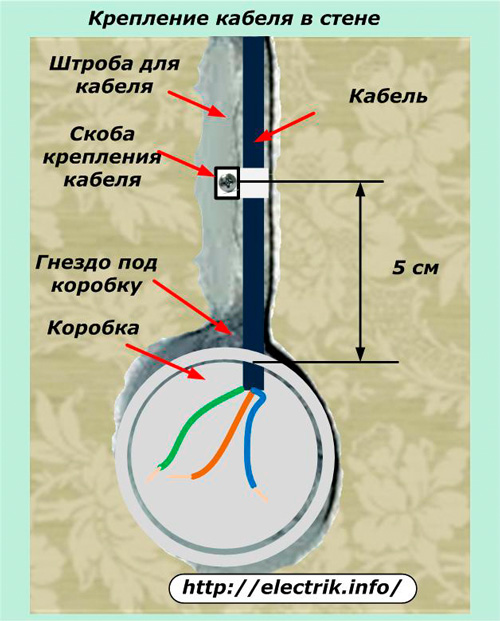
When there are no hollow cable channels in the wall, strobes are cut for it. To keep the cable in them, it is fixed after several tens of centimeters in small portions of an aqueous alabaster solution.
When mounting the socket mechanism, the cable inserted into it is subject to significant mechanical loads, which increase with increasing thickness of the cores. During their bends, you can tear the cable out of the usual alabaster fastening.
Therefore, the cable end at a distance of 5 cm from the edge of the box is fixed with a plastic bracket fixed with a screw. This mount has increased strength.
When choosing a place to enter the cable into the box, consider the possibilities of connecting it to the terminals. In sockets, you can output the ends from above or below, and with switches - only on one side.
Sometimes, due to insufficient deepening of the nest, when filling it with putty mortar, the edges of the box may protrude slightly above the plane of the wall. If they are metal, then you can bend them with light hammer blows on the edges. Plastic is cut with a knife.
How to cut the end of the cable and install the socket mechanism
From the cable end brought into the installation box, it is necessary to remove the external insulation and release the cores. This place should be visible and located at a distance of 10 ÷ 15 mm from the input.
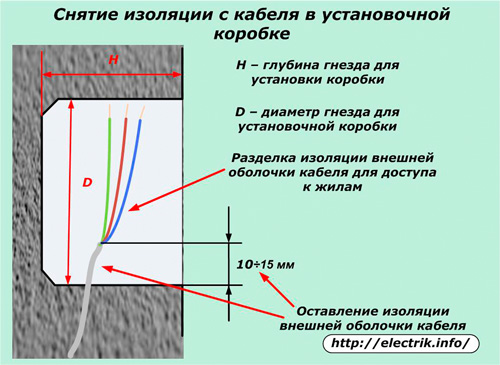
Moreover, the length of this end is better to leave about 20 cm. So it will be more convenient to mount the socket mechanism, install it in the box. The steps for connecting the outlet are shown in the picture.
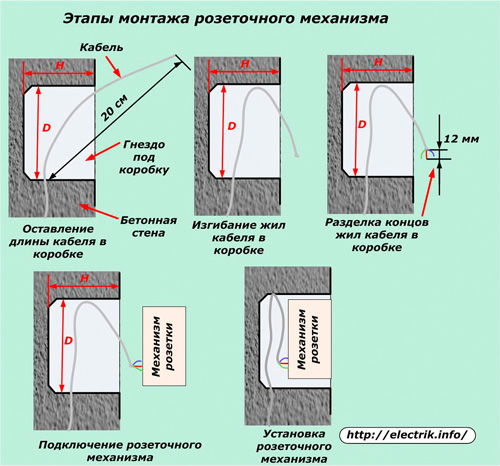
During installation, various situations may arise. If the length of the wire is not enough, you will have to redo everything all over again, and bite off a few extra centimeters from the end at the final stage is not difficult.
After the veins are released from the protective cable sheath, they are laid around the circumference with rings. The ends of the wires at a distance of about 12 mm are slightly bent and freed from insulation for connection to the terminals.
Then try on the entry of the socket mechanism and the placement of wires in the box. If everything is done normally, then the wires are connected to the terminals outside the box (it is more convenient) and the outlet is turned inside.
At the same time, hard and thick copper conductors work like coils of a spring and do not create much effort.
How to facilitate installation of the installation box
You can accurately do all the work with a simple home-made device that allows you to accurately orient the installation box in the wall socket.
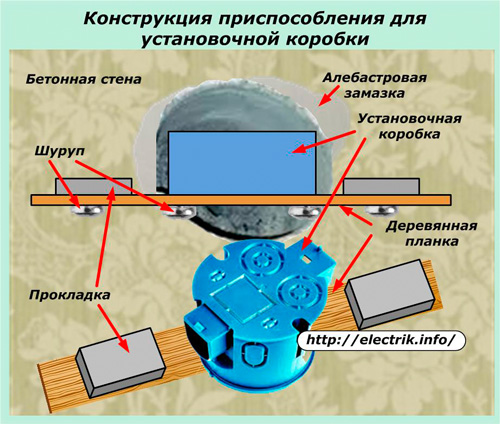
It will require a piece of wooden battens, in which holes are drilled for the screws securing the socket mechanism. The principle of using the device is based on the fact that the plank with its side fits snugly on the wall surface, and the mounting box mechanism fixed on it fits exactly into the desired plane.
In some cases, the owners of the premises level the walls with a layer of plaster after creating electrical communications. Gaskets, which are also fixed at the ends of the plank with screws, help to take this thickness into account.
When the device is assembled, then part of the cavity of the recess in the wall is filled with alabaster solution and the assembled template is tightly applied to the wall. Do not forget to insert the end of the cable prepared according to the method described above into the box.
If alabaster put a lot, then its excess will be squeezed out on the wall. To avoid this, the internal partitions break out. Through these cavities, the solution enters the box. After a short hardening, it is easy to remove from there.
A small building level is placed on the outer surface of the rail. It allows you to strictly position the outlet. And its orientation relative to the wall plane is automatically created by the position of the rail.
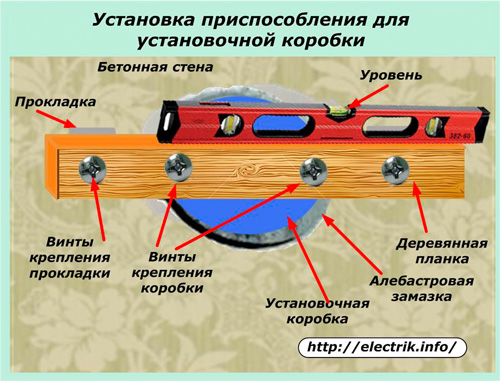
When the alabaster hardens, the mounting box mounting screws are unscrewed, and the template is removed for mounting next devices.
Features of mounting boxes of a different kind
Rectangular constructions are somewhat more difficult to mount, but all the technology methods described above for round boxes remain fully applicable to them.
You can cut through rectangular nests with a grinder using a diamond-coated disk, and you will have to drill and cut out the internal cavities.
An alternative to rectangular blocks are round round mounting boxes, which are simply inserted one into the other, and the nests under them are drilled with a crown, as for single designs.
Sometimes it is necessary to fix the socket or switch in a hollow wall. For this case, use special models of installation boxes with mounting tabs for mounting on drywall sheets.
After installing the box in the holes drilled under it, tighten the foot screws. Fasteners approach the back of the drywall and fix the box in it.
Read also on this topic:Features of mounting sockets and switches on various surfaces
See also at bgv.electricianexp.com
:

