Categories: Featured Articles » Electrician at home
Number of views: 102669
Comments on the article: 14
Retro wiring in a wooden house
 "Retro" and "vintage". These two words alone can cause a sinking heart in a certain category of people endowed with an increased sense of beauty. These people are consistent in everything, therefore retro wiring in their eyes personifies good taste and originality.
And if the house is built, for example, of logs, and the interior is deliberately missing, then retro roller wiring certainly will look the most aesthetically pleasing. After all plastic cable channel in such a situation, it will not fit snugly against the wall because of the grooves between the logs, and cable installation using brackets on combustible structures is prohibited. About dull gray and everyday corrugated pipe and completely silent.
It turns out that the choice of retro wiring for installation in a wooden house is quite justified.
So what is retro wiring? Classically, in the beginning of the 20th century, it was carried out by two single-core stranded wires twisted in a spiral. The insulation of these wires was single, and they were mounted on supporting porcelain insulators (rollers). Junction boxes not used at all, wire connections were performed by twisting, which was hidden under the insulation of the wire so that the ends did not stick out to the side.
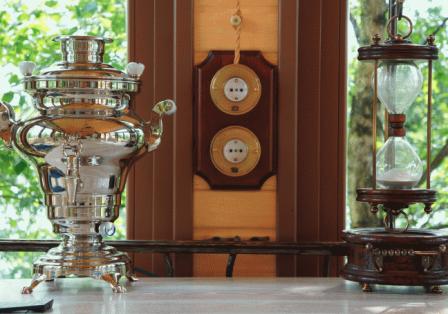
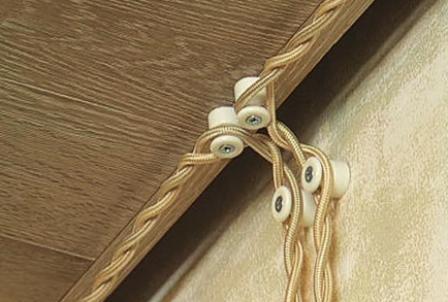
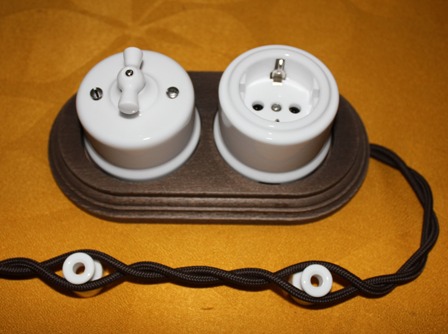
 Of course, this wiring does not meet the modern requirements of fire and electrical safety. Therefore, today it is possible to perform only imitation of the wiring of the old model, styling it under a retro.
For these purposes, some electricians acquire small plastic or porcelain insulators and twist single-core wires with a drill into a common bundle. Depending on the presence / absence of grounding, the harness may contain two or three wires. During installation, the harness is simply worn on insulators screwed to the wall or ceiling at regular intervals. Before and after the insulator, it is best to put on small pieces in advance heat shrinkable tube (HERE), matching the color of the wire. The tube will ensure reliable installation.
But still, self-winding the wire under the retro is for those who want to save money. Yes, and pick up a wire whose insulation will have the indices of NG (non-combustible) and LS (with low smoke emission), it will not be easy to lay a bundle in retro. Therefore, it is better to purchase factory-made special retro wirespecially certified for installation as part of open wiring.
 Rumor has it that the production of such a wire has already been established on the territory of the Russian Federation somewhere in the suburbs, but in the stores of our country the Russian retro wire has not yet caught my eye. As a matter of fact, the situation on the market with foreign retro wire is not much better.
Wire and fittings for retro-style wiring usually have to be ordered in Italy. You may not have to go there on your own, but your supplier may very well deal with Italians.
For instance, Fontini and GI Gambarelli produce not only retro wire with a cross section of 0.75 - 2.5 square meters. mm with two or three cores, but also rollers for installing wires, as well as sockets, rotary switches, junction boxes and blocks containing a socket and a switch on a common basis.
All these elements of electrical wiring are styled antique, their material is porcelain, and they are made in compliance with all fire safety standards. Sockets, of course, contain a grounding contact. In a word, you can perform retro wiring that meets the highest safety requirements.
There is only one “but”. A bay of retro wire 50 meters long can easily cost seven to eight thousand rubles. A switch or socket will cost one and a half to two thousand rubles. One clip - about 30 rubles (and how many they need for a whole house!).That is, retro wiring will cost lovers of antiquity and aesthetes not at all cheap, and this should be remembered.
The most interesting thing is that Salvador products, also specializing in the production of retro cable and accessories, but having its production in China, is not inferior in price to its Italian counterparts. So saving is hardly possible.
Regardless of where you get the retro wire, the structure of each of its wires will be as follows: multi-wire copper in a double sheath made of PVC compound, covered with artificial fireproof silk. The color of the outer PVC sheath of each core corresponds to the PUE standards: blue, brown and yellow-green.
The color of the outer silk coating is a matter of personal taste and design. Someone thinks that a golden or beige wire is suitable for the color of a tree. And someone thinks that retro wiring is also an element of the interior, and it should stand out against the background of the walls in color - for example, be white or so black that it’s just anthracite.
 The color of the housings of sockets, switches and junction boxes, as well as the color of insulators (rollers) are chosen to match the color of the wire.
Due to the fact that the retro wire is very expensive, and also because its maximum cross section is limited to 2.5 square meters. mm., you should not expect to complete all the wiring in retro style. The lead-in cable will not fit into the general vintage style, it will have to be hidden in a pipe. And if the latter does not fit into the interior, then it can be hidden behind the casing.
In the pipes you have to lay and cable to powerful stationary receivers, for example, to an electric stove or a water heating boiler. Instead of pipes, you can use a plastic cable channel, matched to the color of the walls. As a cable for stationary power receivers, you can use ordinary VVGng, because he still will not be visible and he will not have any relation to the retro style.
Often when installing retro wiring in wooden houses electricians, in agreement with the landlord or designer, find another way to save on expensive wire. That part of the wiring, which moves away from the input shield and feeds the groups, can also be performed with an ordinary cable under the sheathing of the ceiling in the pipe or simply along the wall in the box. Then it turns out that the retro wire itself goes only from junction boxes to sockets, switches and lamps. Often this is enough, since the most noticeable part of the wiring is the one that runs vertically along the walls or goes to the ceiling to the lamps.
To connect the wires of retro wires in junction boxes, you can use two methods:
1. Tin and insulate ordinary twisting. Stranded wires are easily twisted, and if you do not save on solder and do not forget about flux, the connection will be reliable.
2. Tinned the ends of the cores and put them on terminal block e.g. Wago. If the wires of the retro cable and the single-wire wires of the VVG are connected, this method becomes the only one.
Alexander Molokov, bgv.electricianexp.com
The article uses illustrations from the catalogs of Salvador and GI Gambarelli companies specializing in the manufacture of wires, fittings for installation and wiring accessories for retro wiring.
See also at bgv.electricianexp.com
:
