Categories: Electrician at home, Electric installation work
Number of views: 27303
Comments on the article: 2
How to connect a chandelier to a switch
We have known the lighting of apartments with the help of chandeliers from childhood. Such lamps are quite easy to connect and work for a long time even with certain installation errors.
However, if individual violations of installation technology do not affect operability, they can lead to electrical injury to the owner when in contact with metal parts of the case or when replacing a burnt out foot.
To avoid the typical mistakes made by home craftsmen, read the contents of the article and compare its recommendations with the circuit for switching on your fixtures.
Four Chandelier Safety Tips
1. Always assemble the wiring so that the phase comes to the remote contact of the cartridge, and zero to the near contact. This technique will save you from electric shock to someone who will replace the light bulb in the chandelier when the voltage is applied to it and accidentally touch the nearest live part.
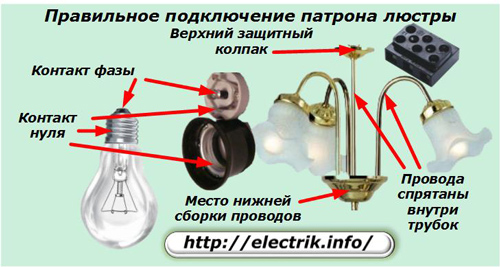
2. All wires are hidden inside metal tubes. To prevent the network potential on the lamp housing, it is necessary to control the quality of their insulation: to exclude open areas without a dielectric layer. Please note that there are varieties of PVC insulation tape, the adhesive layer of which dries and loosens over time.
3. The assembly of wires from cartridges is made in one place of the chandelier. In the design shown in the picture, it is located below. Two conductors exit from it through the tube: zero and phase, which are connected to the terminal block. A third wire is connected to it - a protective PE conductor. But in models of the old assembly, it may not be available. All contacts at the junction must be securely clamped and insulated;
4. The switch must break the phase, not zero.
Connecting a chandelier to a single-key switch
We will not consider methods of mounting fixtures on the ceiling. They are detailed in this article: Ways to install fixtures on the ceiling
Hereinafter we will use a chandelier with three incandescent lamps. The use of halogen, luminescent or LED sources does not introduce any significant differences in the circuit, except for the case of operation of devices with a reduced voltage of 6, 12 or 24 volts, when a step-down transformer is required for operation.
If there are more bulbs in the chandelier, then they are connected by additional parallel chains, as shown in dotted lines in the figure.
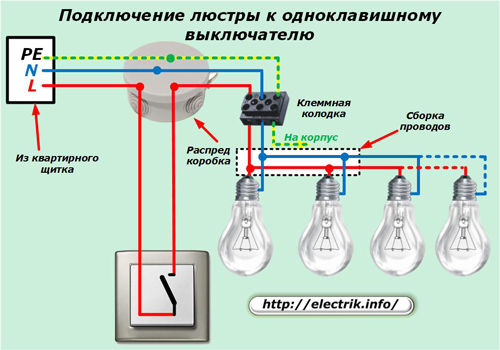
In this scheme, three cables from:
1. housing shield;
2. circuit breaker;
3. chandeliers.
The protective PE conductor and the working zero N go directly and are not connected to the switch.
In buildings of the old construction, equipped according to the TN-C system and not passed the modernization of the electrical wiring, the protective PE-conductor bus and he himself are not mounted. For this reason, the potential equalization system with protection against voltage on the case is not implemented, will not be able to work.
The phase L wire from the apartment shield enters the junction box and connects to the switch cable in it, returning back to the other core. After that, he goes to the terminal block of the chandelier.
Often there are cases when the wiring is long laid and made with solid veins. It is not possible to visually trace the affiliation of each wire, and it is not possible to pull through the cavities of the wall and ceiling.
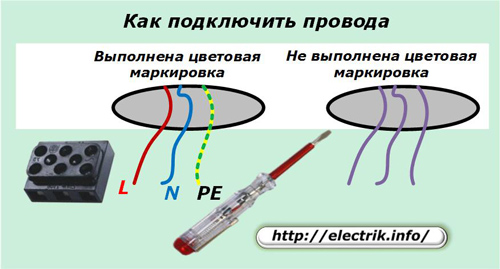
In this case, it is necessary to determine them by electrical methods. The phase wire will show a cheap indicator screwdriver with a neon bulb. It will light up upon contact with one of the three cores when the switch is on and will not light when it is off.We make a reservation: if the wiring is correctly assembled. The vein of the found phase must be marked.
Then you need to distinguish the working zero from the protective one. When connected to electrical appliances, they must not be confused. Otherwise, not only the function of the PE conductor is lost, but also conditions are created for the malfunctioning of the protections.
To do this, in the apartment panel, the wires of the outgoing cable are removed from the PE and N buses and called up at the connection point of the chandelier. Do not forget to pre-mark the ends to correctly return them to their original place, so as not to create additional problems.
If there are no devices operating in ohmmeter mode, then this can be done with a simple battery and a light bulb.
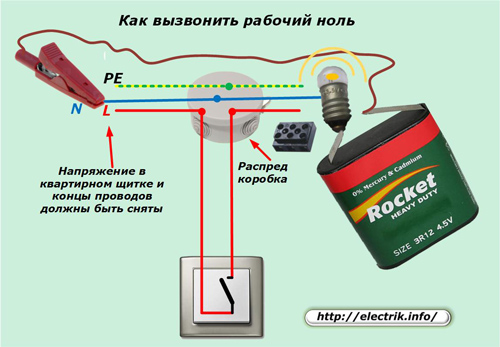
Remember to mark each wire after it rings. This will facilitate the work and eliminate mistakes.
Operational features of illuminated switches and low voltage lamps
LED indicators
Now many people seek to modernize the lighting system and install illuminated switchesequipped with LEDs that are clearly visible in the twilight.
Such designs are justified when using incandescent and halogen lamps. And when operating energy-saving or LED sources, their slight glow or flicker often occurs. This is especially true for cheap models made with low quality.
The cause of the defect is the lamp power supply and a sensitive source that responds to minor currents necessary for the LED to work, creating a potential transfer to the chandelier bulbs.
In this situation, many craftsmen use capacitors or resistors to reduce flicker. But you can radically solve the problem:
1. the refusal of the backlight, for which it will be necessary to dismantle the board from the switch;
2. installation of a repeater command based on an electromagnetic relay.
The built-in LED backlight has the design shown in the photographs.
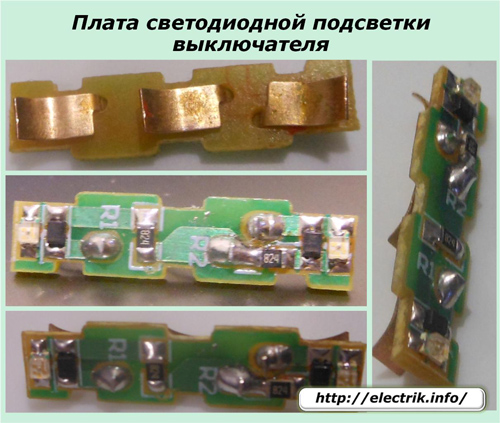
In the second case, the LEDs remain in operation due to the current passing through the relay winding, and the power supply units for the bulbs are connected in a separate circuit.
In this situation, it is better to install the relay near the chandelier, and not the switch because of the need to connect a zero wire to the winding. But this will require additional space.
Low Voltage Lamps
By the same principle, include halogen and other bulbs operating under reduced voltage. Only use relays instead electronic transformer. Its power should correspond to the connected load.
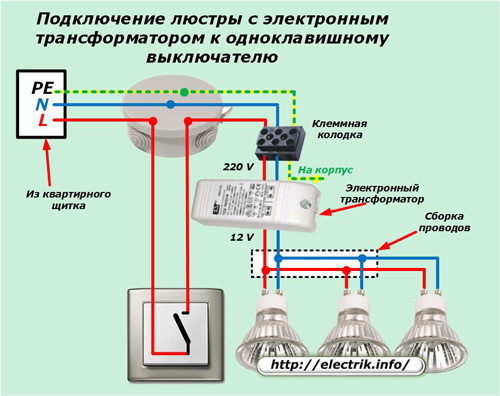
It can be placed inside the chandelier or, if space is limited, then in front of it.
Connecting a chandelier to a two-gang switch
The previous circuitry is complicated:
1. by adding conductors in cables to the switch and chandelier;
2. the need to reconnect the lamp wires to two lighting groups;
3. upgrading the terminal block;
4. using an additional terminal in the junction box;
5. installation of the switch with two keys.
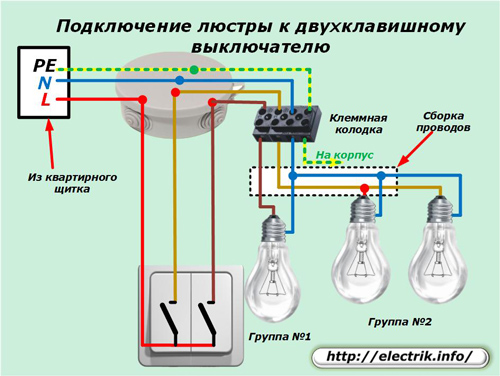
Everything else does not change.
Connecting a chandelier to a three-gang switch
In this scheme, the elements of the previous one are once again sequentially supplemented, and the algorithm of work remains the same.
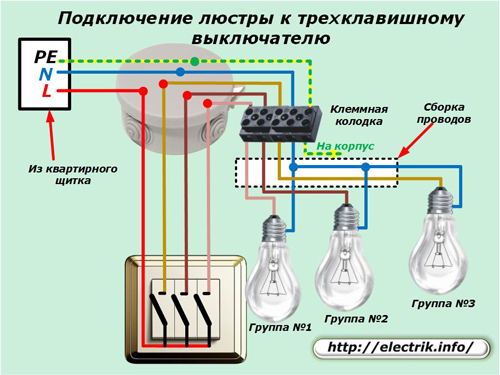
How to connect a dimmer to a chandelier
An ordinary single-key switch allows you to adjust the level of lighting in the apartment only by unscrewing some of the bulbs. This is not always convenient. Therefore, manufacturers of lighting equipment produce various designs dimmerscombining functions:
-
circuit breaker;
-
dimmer.
More complex models allow you to perform other tasks:
-
light control by clap or voice;
-
remote control;
-
smooth inclusion of lighting and additional functions.
The option of connecting a dimmer to the installation box of an ordinary switch is shown in the figure.
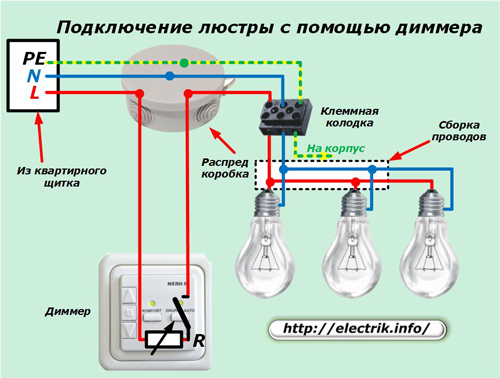
However, this is not the only way, because there is a wide variety of dimmers that are installed inside the distribution room box or on a Din rail in the apartment cabinet.
When choosing a dimmer model, attention is paid to its compatibility with light sources according to their type and load. For LED lamps and fluorescent sources, their own special designs are issued, different from other models. The simplest devices work only with incandescent and halogen lamps.
Chandelier Remote Control Methods
Modern luminaires allow you to create various lighting effects and at the same time save energy. To control them, remote methods based on the transmission and reception of commands via radio channels are used.
A controller with an antenna and a radio receiver is installed in the chandelier, and it is controlled by a small-sized remote control with a built-in transmitter. These devices operate on the same frequency and use unique encryption algorithms.
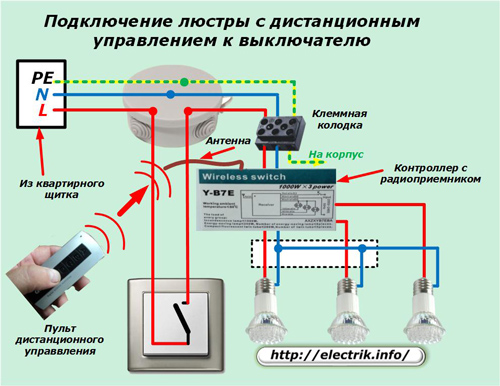
The settings of the controller and remote control performed in the factory exclude the replacement of the faulty remote control or controller with another similar device. They work only in established pairs.
However, a functional controller can be controlled from a simple switch without a radio remote control. To do this, just turn off and apply voltage to it.
This separate and extensive topic is detailed in another article: How do remote-controlled chandeliers work?
Another interesting way to remotely control a chandelier is to use the NooLite lighting control system.
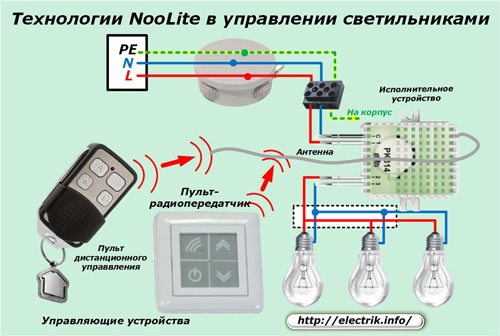
To control the chandelier, you will need a special remote control with a specific set of commands and a power unit with a radio and antenna. Read more about this here: NooLite Lighting Technology
See also at bgv.electricianexp.com
:
