Categories: Electrician at home, Electric installation work
Number of views: 46481
Comments on the article: 2
How is the marking performed during wiring
 A home foreman, planning to repair an electrician in his apartment or complete its laying in a house under construction, must first think carefully about the technology of the upcoming work and the sequence of its stages, including the layout of the wiring. Otherwise, as practice shows, serious errors arise that require the investment of additional funds and time.
What does the word markup mean?
If we turn to the clarification of the verb "mark" the explanatory dictionary of the Russian language, then he explains it as a measurement, marking, designation of the size of something.
With regard to wiring, as well as any technical systems, this means that for marking, you must have:
1. object - a building of a house or apartment premises in which it will be necessary to lay electrical wires;
2. embodied work project master's plan.
In other words, the marking process means transferring paper drawings prepared in advance by the project directly to the building structural elements (walls, floor, ceiling) for laying cable and wire routes, mounting outlets, fixtures, switches, junction boxes.
The owners of certain electrical engineering sites publish articles on the Internet explaining the processes from its planning by the project to the laying of cables from the distribution panel to consumers and fasteners in the walls under the wiring markings. This is misleading to many readers.
Preparatory stage
When marking, the master should have the following documents in his hands:
-
detailed electrical circuits for each room and the entire building as a whole, developed on the basis of already working standard solutions;
-
installation drawings indicating the location of each element of the wiring, supplemented by information on the laying of low-current circuits (telephone, computer networks, intercom, antennas, alarm and other circuits), gas pipeline, water supply, heating systems, sewage systems to take into account their mutual influence.
If you neglect this rule, relying on the rich life experience of the owner or the great practice of performing electrical work by a visiting electrician, then there is a high probability of making mistakes that will have to be corrected in the future.
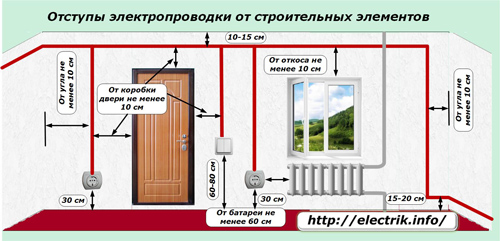
In the extreme case, when there is already no time for design, for reference and guidance, you can use the simple recommendations for the placement of electrical wiring regarding building structures shown in the picture, although it is still better to refer to building codes and rules.
All wires and cable channels here have only with horizontal and vertical direction at right angles. It is not possible to arbitrarily mark tracks at an angle to save distance. In the course of operation, after a few years there is a possibility that when fastening to the walls of furniture, hanging pictures ... the drill bit will fall into the electric wire and create an emergency.
Height of sockets and switches It is not strictly regulated, but is selected according to the habits and preferences of the owners of the apartment. When wiring relative to the door, window, heating battery, gas stove, adjacent walls and ceiling, one must be guided by the requirements of regulatory documentation.
Electrical wiring is the process of drawing lines on the walls and ceiling. For its implementation, it is necessary to use at least simple drawing devices:
-
ruler or tape measure for measuring distances;
-
marker, pencil or ballpoint pen to indicate lines;
-
Plumb and level to determine the horizon and verticals.

This simple set is available from almost every home master.
Marking work
During repair, expansion or initial installation of electrical wiring, the marking begins with the designation on the walls and ceiling of the places for the future location of lamps, switches, sockets, junction boxes and the apartment panel. That is, at first, from the project drawings, the dimensions of all terminal devices of the apartment’s electrical equipment, which must be connected by cables and wires, are transferred to the building structures of the room elements in real scale.
To place these items in hidden wiring it is necessary to draw the boundaries of the places of deepening of the installation boxes.
It should be borne in mind that:
-
the walls of apartments can be leveled, coated with a layer of stucco or with construction finishing sheets;
-
suspended or suspended structures can be mounted on the base ceiling;
-
the height of the floor can be raised due to additional flooring from parquet, laminate or other floor coverings.
All these elements reduce the interior space of the room and thereby affect the accuracy of determining the places of wiring.
It should be noted that the strict rectangular geometry of the apartments during the construction of the building, as a sad rule of our reality, is often not maintained. Therefore, it is necessary to use the distances from the upper and lower corners of the walls, which are corrected for alignment, at the beginning of the reference of dimensions.
This is explained by the fact that the finally completed marking indicating the size of the indent from the basic elements should become the basis for the executive scheme, which a good owner will store and use for all future reconstruction of premises, so as not to damage the already laid routes of cables and wires.
Ceiling marking methods
To perform the work you will need to climb a small height. For this purpose, it is convenient to use an ordinary building stepladder. To prevent falls, it must be stably installed and the locking strips and screws securely fixed.
Usually in small rooms hang one central lamp located in the middle of the room. To determine the installation point, it is convenient to use the method of diagonals drawn from different angles on the ceiling. This method is shown in the picture on the left.
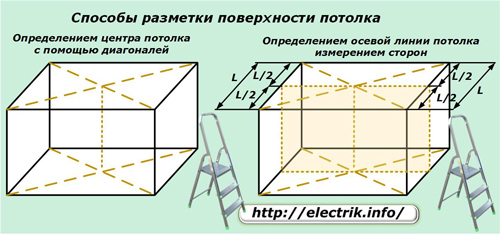
Sometimes, subject to the geometry of the floor and ceiling, it is more convenient to draw a diagonal on the floor and mark the center of the room on it. Then they lift the plumb line to the ceiling so that the sharp end of the weight rises slightly above the floor and points to the point of intersection of the lines. Then the placement of the upper end of the cord will coincide with the center point of the ceiling. It will need to be circled.
If the project of the work plans to hang out several fixtures, then in this case it is necessary to draw an axial line along the ceiling, which is formed first by dividing the opposite sides into equal sections, and then connects the formed points with a straight line, as shown in the right picture.
When the room is large and the ceiling must be divided by several axial lines, the corresponding opposite sides are divided into additional equal parts.
Attention! When laying electrical wiring on the ceiling, it is impossible to weaken its supporting structure. For this purpose, gating of ceiling slabs is prohibited because of the possibility of their collapse.
Methods for drawing straight lines on the ceiling
To conduct diagonals and axes connecting points on the ceiling, there are several technical methods.
First way based on the use of a construction chipping cord impregnated with coloring powder.For its use, it is advisable to work with an assistant who stands on the stepladder and rigidly sets the beginning of the cord at the first intended point for drawing the line.
The second worker unwinds the prepared cord to the end point, pulls it and also securely fixes its end with one hand. When the thread is well stretched, one of the workers takes it away from the surface of the ceiling like a bowstring, and then abruptly releases it.
The thread returned under the applied tension drastically moves to the ceiling and beats with it with its paint a clear and even line.
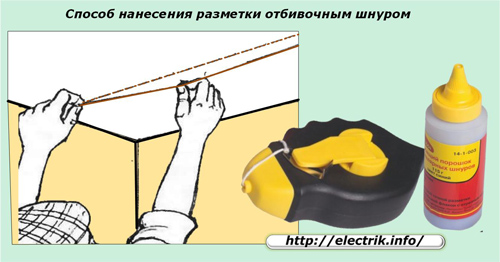
If there is no special construction thread at hand, then you can use ordinary twine or a long cord, which must be impregnated with chalk, smeared with soot or some kind of powder paint. The quality of the line made in this way has been tested by our distant ancestors.
However, the safety of the lines stained in this way should be assessed first. If the paint is easily showered, it is better to draw additional lines with a stable color.
Second way drawing lines on the ceiling is based on the use of modern laser pointers or levels that use them in their design.
The relatively low cost of these devices makes them affordable for the home master. The laser beam is clearly visible on any surface. It is very easy to orient and fix in space.
One worker is aiming the laser beam, and the second at this time is marking the surface of the ceiling. After drawing the lines, it is advisable to make a check of the markup performed to eliminate possible errors.

Wall marking methods
The methods for drawing lines on walls using flashing threads or using a laser beam work the same way as on the ceiling. Only here it is necessary to take into account the level of their location in horizontal and vertical planes. To do this, use plumb lines and levels.
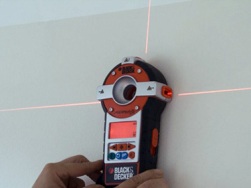
Significantly facilitate the marking of modern laser levels, creating two rotating beams in perpendicular planes. You can work with such devices and mark the surface of the walls to one person. However, they acquire such a device so far only for constant work with it because of the rather high cost.
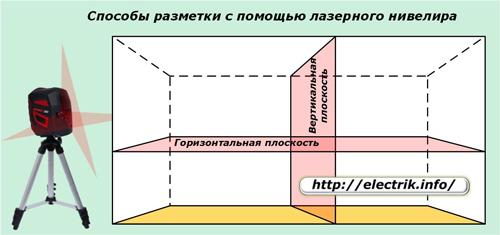
Attention! Long and deep horizontal strobes on load-bearing walls weaken the building structure and can cause them to collapse.
The sequence of marking work for cable lines
It is advisable to start this operation after the marking of all the other elements of the wiring is completed, since the cables must connect them along the optimal path.
Cable locations in future gates are immediately drawn so that the required width is clearly defined. On such lines, it is easier to drive a chamfer or cut grooves in other available ways.
The marking of cable channels starts from a floor, apartment or entrance panel into the house. First of all, it is always necessary to determine the method of supplying voltage to the switchboard, from which all the mains will stretch. This will facilitate the rest of the installation and the selection of optimal paths.
After the power supply path to the switchboard is indicated, the mains of the power circuits are sequentially drawn, diverging in all rooms. In this case, questions may arise related to the problems of the project. They need to be timely clarified and resolved.
When the location of the cable routes to all rooms is drawn, you can gradually start marking the wiring inside each room. It is carried out according to the above rules and ends when all the lines for connecting sockets, switches and all terminal devices are drawn.
In some cases, a space under the floor is used to lay electrical circuits.With such a project, hidden cable routing is performed and places of their intersection with each other are quite possible, which will be further protected from damage.
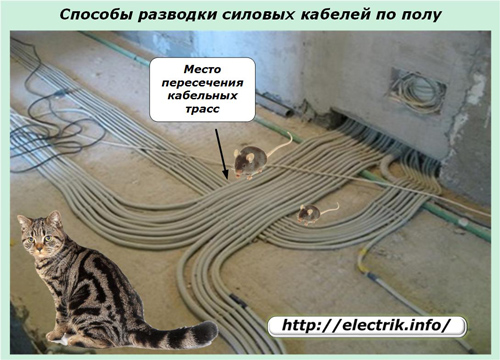
Under the floor covering, the cables must run entirely without creating switching points and connections.
In conclusion of the article, it should be emphasized once again that the fully completed wiring layout serves as the basis for creating an executive power plan for the apartment and house, which during the operation of the building greatly facilitates the planning and execution of any subsequent work.
Owners of apartments do the right thing, taking pictures of the final stage of the markup and storing the photos taken on several information carriers using the disk space of Internet services and cloud storage. This method allows in a few years to clarify the detailed location of all elements of the wiring, even if all information is deleted from the computer and camera.
See also at bgv.electricianexp.com
:

