Categories: Electric installation work
Number of views: 10978
Comments on the article: 0
Tile underfloor heating
Methods of heating residential premises to ensure comfortable living conditions are constantly being improved. Among them, the electric heating system of the lowest building structure - the floor - is gaining more and more popularity.
With the correct installation system, the heat of the heating elements is directed only upward due to the action of the forces of natural circulation. Its consumption for heating the foundation and surrounding lower elements is blocked by a layer of thermal insulation and redirected by a reflective screen into the room.
Stages of technology for laying a warm floor under a tile
Installation sequence for any heating elements electric underfloor heating strictly defined. It must be adhered to and carried out strictly.
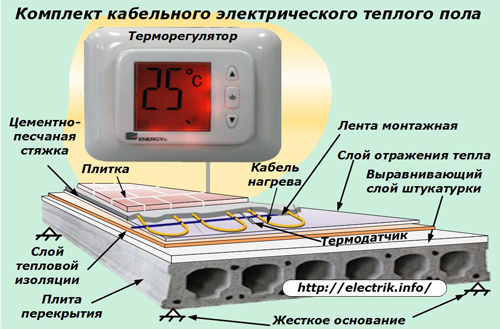
Laying a warm floor under the tile for reliable operation should be divided into stages:
-
planning;
-
foundation preparation;
-
create a heat shield;
-
installation of heating elements;
-
installation, health checks of the electrical circuit;
-
pouring fixing screed and laying tiles;
-
holding the mounted system at room temperature until the fastening screed solidifies completely;
-
switching on the circuit under load with testing the operation in automatic mode.
Planning for laying floor heating
At this stage, it is important:
-
take into account the features of building structures for the possibility of installing a warm floor;
-
familiarize yourself with all existing models of heating elements;
-
to analyze their capabilities in relation to specific conditions of the room;
-
choose the most suitable system according to technical characteristics and cost;
-
draw a diagram or a sketch of the room on a scale with the designation of the places of laying and the absence of heating elements, the placement of a temperature sensor, temperature regulator, electrical distribution box;
-
make a calculation of the power of electricity consumed and on its basis create an electrical circuit for connecting to the power supply network, select the brand of wires at rated load and protection devices.
Foundation Features
If you live in a multi-storey building designed by a professional construction organization according to a standard project, the floor base is most likely a reinforced concrete slab, reliably laid on a rigid foundation or transition elements. It does not undergo shifts and deformations due to climatic effects, weather changes, changing seasons.
In this situation, the very base of the warm floor during operation will represent a reliable monolithic structure that resists external influences. It will ensure a good operation of the heating system for a long period without mechanical damage.
In a private house, especially made of wood, shrinkage is possible, deformation of the walls or foundation can be created with poor-quality assembly. This issue must be carefully analyzed. A slight displacement of the base forms distortions of the structure. They will lead to the formation of cracks in the screed, damage to the heating elements.
Laying scheme of underfloor heating
It is created for the exact determination and marking of the required heating area. It does not make sense to install heating elements under furniture, a bathroom, a refrigerator and other large-sized stationary objects.
In addition, some of them are capable of exerting an increased static load on the elements of the warm floor, when the bathtub, for example, is filled up to at least half with water, and people still crawl into it. Resistive cables from such loads can be damaged.
Heating elements are able to effectively heat the room when their coverage area is up to 70% of the space of the room. They are placed with a minimum clearance of 10 cm from the walls for cable systems and 20 film systems. Also indent from pipelines and protruding building parts with different temperature differences.
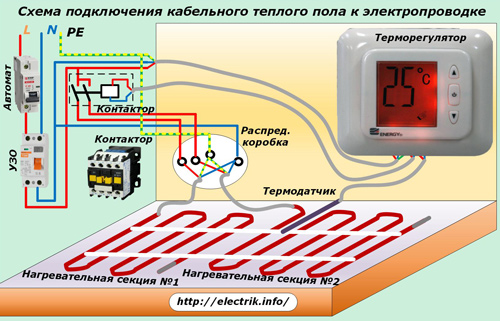
The temperature regulator is mounted on the wall no closer than 30 cm to the floor in a convenient place for the owner. For him, with hidden wiring along the external dimensions of the case, you will have to drill a mounting hole in the wall, perform a wall chasing from it to the floor level, You will need to lay the connecting cable in the gate.
The temperature sensor is placed in a sealed corrugated hose, which is placed in a floor chambers with a cross section of 20x20 mm, placed at an even distance from the nearest heating elements. The location of the temperature sensor and the hose for its installation are indicated on the laying scheme.
Wiring diagram for underfloor heating
According to the laying scheme, the calculation determines the required heating area and the required number of heating elements. These data will clarify the power consumption of the load. It will serve as the basis for all electrical calculations:
-
determining the brand and cross-section of wires for connecting the power circuit and the temperature measurement circuit with a sensor;
-
the choice of protection with a circuit breaker and a residual current device or a differential machine according to the rated load current;
-
identifying the need to include in the circuit a contactor that protects the thermostat from increased loads;
-
solutions to other issues in tables and directories.
Ground preparation for underfloor heating
After making sure that the floor slabs are rigidly laid on the base, check the condition of the layer of their plastered surface. It should be perfectly aligned and horizontally aligned strictly in level. Identified violations are eliminated by applying a new layer with the control of its parameters after complete drying.
Heat exchangers must be reliably protected from mechanical damage. If necessary, create reinforcement, provide waterproofing.
Then carry out drilling holes in the wall to fix the temperature regulator, cut the strobes of cable laying and the corrugated sleeve of the temperature sensor.

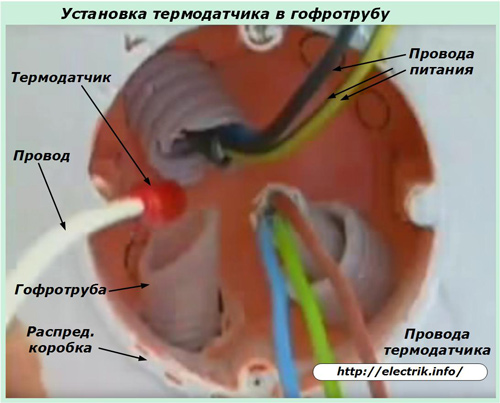
Pay attention to the creation of optimal conditions for the temperature sensor. This measuring device translates the heating indicators of the screed layer surrounding it into proportional values of the electric current, transfers information via wires to the temperature controller.
The temperature sensor is located inside the mortar and the solidified screed. It must be possible for it to be replaced without damaging the floor covering. To this end, it is placed in a corrugated pipe, laid in a shtroba and closed with a plug from the bottom end to prevent ingress of mortar from the outside.
The corrugated pipe with a smooth bend near the wall from a horizontal position in the floor should turn into a vertical one near the wall with a bend of the internal radius of at least 5 cm. This will allow reliably removing and installing the sensor for the wires connected to it.
Then do a thorough cleaning of construction waste, remove dust with a vacuum cleaner.
Creating a heat shield
There is a technology for laying a floor heating, which excludes this stage when cable heat exchangers or heating mats are mounted directly on a prepared base. With this method, the number of construction operations is reduced, material consumption is reduced, installation money is saved.
The method can be justified when the apartment is inside an insulated building, and the underfloor heating system is used occasionally. However, this option must be calculated and analyzed.
The heat shield works on the principle of a household thermos, retaining heat inside a limited volume of the room and blocking its loss down through building structures with a reflective screen.
To save energy during long-term operation of the heat-insulated floor, it is recommended to mount a heat shield in an already operating house, and when building a building, pay extra attention to the implementation of heat-saving processes. Even a simple layer of expanded clay will retain some of the heat.
Lay the insulation material on a clean surface. Its manufacturers can supply two types of coatings with insulating and heat-reflecting properties individually or in a single layer.
Penofol is popular - it is a material that combines both layers examined. It comes in wide rolls that are convenient to cut and fasten to the required size. The foil is always located on top.
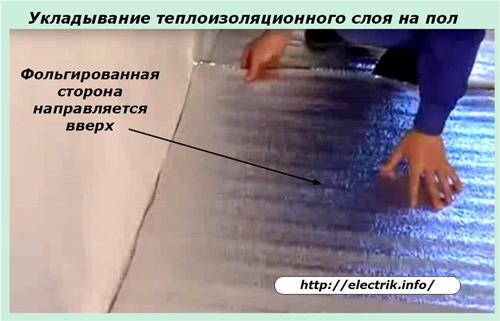
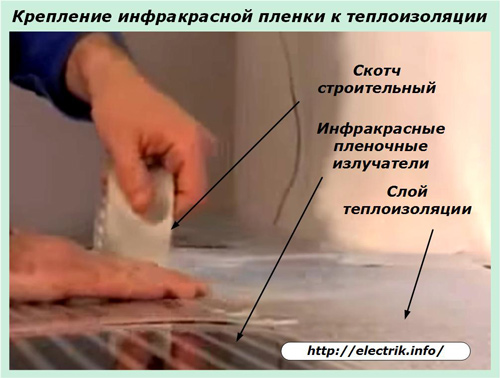
The edges and bases of the thermally insulating coating are fastened together with construction tape, creating a common layer from separate parts.
Installation of heating elements and wiring diagrams
If a heat insulating layer is not used, then the floor surface after dust removal is treated with a primer to improve the contact of the working surfaces with the adhesive mixture.
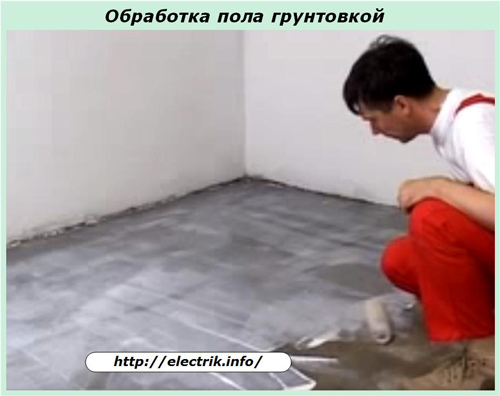
A heating cable or heating mats are laid on it, achieving an even distribution of coolants throughout the working area.
The infrared floor film and electrofluidic modules are usually placed on the surface of the heat shield and attached to it with tape. His retention efforts at this stage are quite sufficient. After pouring and drying the retaining screed, it will act as a retainer.
After fixing the heating elements, thermostat and temperature sensor, they are connected by wires to the supply circuit, the assembly is checked for correctness and turned on under voltage to test the health for a couple of tens of minutes. During this time, you should make sure:
-
uniform heating of coolants;
-
the ability of a temperature sensor to respond to temperature changes;
-
the capabilities of the thermostat to automatically heat the floor.
The check is carried out quickly, and after its completion give the system the opportunity to cool naturally to room temperature.
Fixing screed pouring and tile laying
This stage can be divided into two consecutive operations or performed immediately in one go. Experienced tilers will try to solve the problem comprehensively, but it can be complicated by the thickness of the screed layer, which is necessary for fixing the heat carriers and transferring heat.
For heaters with a thick cable or liquid electric module, it can be from 5 cm or more. Such a volume will have a thermal inertia: heat up longer, store heat well, cool slowly.
Cable thermomats, depending on the design, require a smaller thickness of the tie. Manufacturers indicate its value in the accompanying documentation. For film infrared emitters, it can be from 2 cm. When creating it, it is convenient to immediately lay tiles on top.
It is recommended to use special dry building mixes for mounting tiles on a warm floor. The solution prepared for screed is distributed over the heating elements. It is leveled with a wide spatula with wavy edges. Tile is laid on the solution.
Uniform joint gaps allow you to create plastic crosses. A strict horizontal plane is provided with level control with wedges and slight tapping. Work is carried out from the far end of the room to the entrance so as to exclude violations of the position of already glued tiles until they completely dry.
Inside the screed, the chemical processes that complete its final hardening should completely end. Their course will require a minimum of 28 days.During this time, the assembled system must not be exposed to temperature. mechanical loads, and drafts, moisture should be excluded.
Test load on
Before applying voltage for the first time after the screed solution has dried, make sure that the protective devices are operational: circuit breaker and RCD. If during the laying of tiles damage to the electrical insulation is allowed or installation is broken, they will prevent emergency situations. associated with the actions of short circuit currents and leaks.
The operability of the mounted system is checked by creating a comfortable environment with automation and measuring currents of consumption by measuring devices or by the readings of the electric meter. They must be within the boundaries of the technical specifications declared by the manufacturer.
Being engaged in the technology of laying a warm floor under a tile, it should be well understood that its overall design consists of a large number of different layers, each of which performs a specific function. In the complex, they provide a comfortable atmosphere in the room for a long time of operation.
If marriage is allowed anywhere, then the total resource of the created system is sharply reduced. And it is designed to operate for decades. Therefore, work must be thought out in advance and performed reliably.
See also at bgv.electricianexp.com
:

