Categories: Electric installation work
Number of views: 16171
Comments on the article: 3
Mounting fixtures on suspended and suspended ceilings
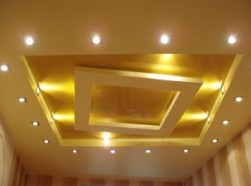 When using modern materials for coating ceilings, original lighting effects and unusual appearance of rooms are created. But, at the same time, the volume of the premises is slightly reduced due to the indentation of the decorative coating from the base building surface with power supporting elements, on which chandeliers and other lamps were previously fixed.
Suspension, and especially tension structures, by themselves do not have high strength, they are not able to withstand the created static load from the weight of ordinary and heavy chandeliers. They are made to work without third-party efforts.
Therefore, to fix the fixtures, one of two methods is used:
1. Mount an elongated mounting hook on the base ceiling, on which it will be possible to hang the chandelier after installing the stretch fabric;
2. make mounting adapters with a thickness equal to the space gap between the construction base surface of the power element and the decorative canvas. This fastener is securely fixed in the ceiling plate, and the lighting chandelier is already being installed on it.
Both of these methods must be completed before the suspension plates are fastened or the web is tensioned on the ceiling. In this case, the wiring must already be installed, tested for operability and tested. Otherwise, if any malfunctions are discovered in it, you will have to dismantle the decorative coating.
During subsequent work on the ceiling, the voltage from the room lighting system must be turned off in the apartment panel and additional measures must be taken to prevent unauthorized persons from supplying it.
Examples of placing fixtures on the ceiling: Recommendations and schemes for the location of lamps
Mounting chandelier mounting options
There are many ways to fix fixtures at a small distance from the base ceiling. They depend on the material and construction of the building. If the house is made of concrete, brick, stone blocks, then it has reinforced concrete slabs for the ceiling.
They can be mounted in one of the hooks shown in the picture or their varieties.

Choosing the desired design should take into account the peculiarity of its fastening:
1. the need to create a through hole through the plate;
2. knocking out the recesses with a perforator for fastening with screws using self-tapping screws through plastic dowels.
For the first method, hook designs are created:
1. requiring access to the back of the ceiling plate to install a wide lock washer and screw the fixing nut onto the threaded portion of the hook;
2. not requiring such access and secured by a fixed unit with a rotary head.
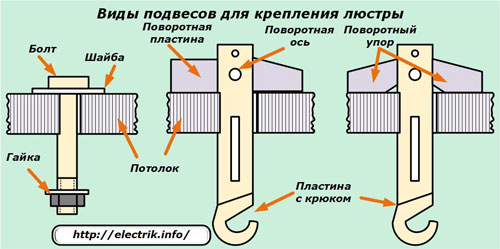
The length of the hook protruding from the concrete slab should not interfere with the installation and tensioning of decorative coverings.
For wooden ceilings, you can use an elongated self-tapping screw screwed into the wood, but it should be fastened not only to the ceiling board, but also directly to the core of the building beam. This will provide the necessary margin of safety.
Installation methods for mounting adapters
The size of the space between the ceiling plate and the suspended or suspended ceiling affects the design of the fastener. When it is small, it is possible to pick up a block of dry dense wood by the same size, screw it with screws to the base plate, and after installing the decorative canvas, install a chandelier on it.
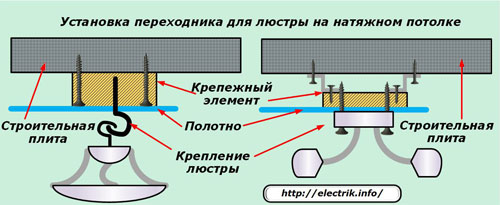
If necessary, a greater distance from the supporting structure using a variety of metal plates, bent to the required size or factory adapters with adjustable clearance. Through them carry out the intermediate fixing of the body of the light source.
Features of fixing the lamp to a stretch ceiling
After the fabric is finally fixed in the fixing devices, holes are prepared in it for access to the mounting adapter and the output of electrical wires. In order to eliminate the violation of the integrity of the tension material, a protective ring is glued to it.
First, it is applied to the fabric and by probing the place with your fingers, the location of the fastener is determined. The ring is placed in the most suitable, optimal place and on the inside of the canvas (and not from the outside) is circled with a soft pencil around the perimeter of the hole (position 1).
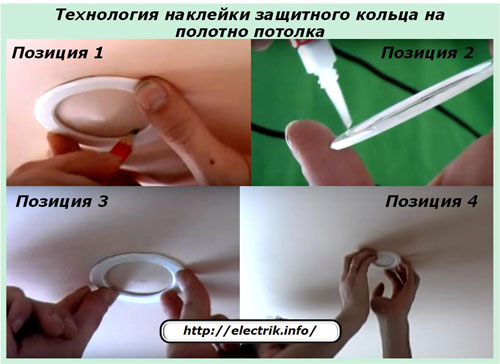
After marking, the ring is removed. A pencil trace should be clearly visible on the ceiling. It will be necessary to accurately stick the protective ring on it. To this end, a layer of special glue is applied to its inner plane (position 2).
It must be evenly distributed over the ring so that there are no empty sections, excess drops. The treated surface can withstand the short time specified in the instructions, and then the ring is applied to the canvas and firmly pressed with your hands to the mounting adapter (position 3).
After a short period of time necessary for the glue to dry, the quality of the ring fixing on the stretch ceiling is checked (item 4). If the result is satisfactory, they proceed to the next step.
With a mounting knife, the fabric is cut out of the inner cavity of the protective ring and the electric wires are brought out through it, preparing their ends for connection to the chandelier.
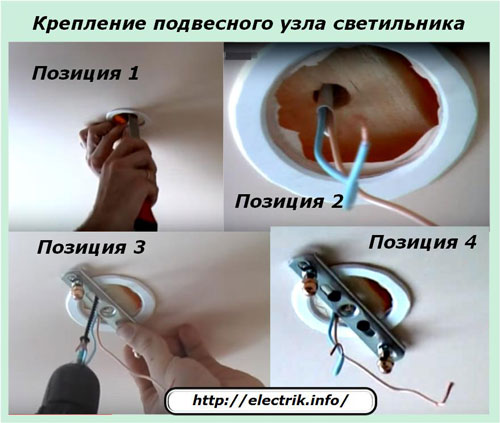
Next, screw self-tapping screws through the mounting bracket of the lamp into the mounting adapter and check the quality of its installation.
Then connect the electric wires to the body of the chandelier. As a rule, this will require an assistant who will hold it in her hands until the end of the work. When the second person is not nearby, then you can tie the lamp housing with a reliable cord to the mounting bracket.
To connect the wires of the chandelier with electrical wiring, many technical techniques have been developed. The most affordable are twisting and application of terminal blocks. With any method, it is necessary to separate the connected ends from each other and surrounding objects with a layer of insulating material.
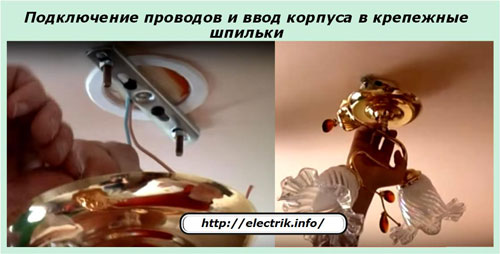
Then the chandelier is inserted into the mounting studs of the bracket, and the position of its body is alternately fixed with decorative nuts.

The end of the fastening is checked by hand on the strength of the suspension and the subsequent supply of voltage to the lamp from the switch.
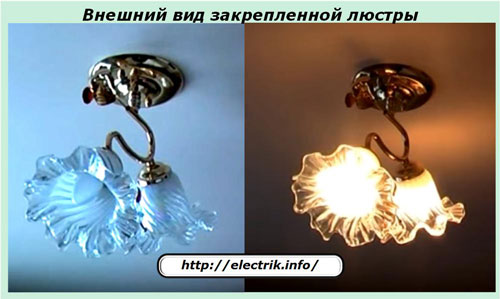
The described method is suitable for light chandeliers and medium weight, all designs of point light sources.
If it is necessary to install a large and heavy chandelier on the stretch ceiling, then for this it will be necessary to manufacture a complex transitional fastening element that follows the shape of its base, use reinforced fittings.
The proximity of incandescent or halogen lamps near a stretched film or woven material will have a thermal effect on the fabric and may damage it. Therefore, for such lamps it is better to use LED or fluorescent energy-saving sources with low heat generation.
Stretch ceilings with uniform illumination
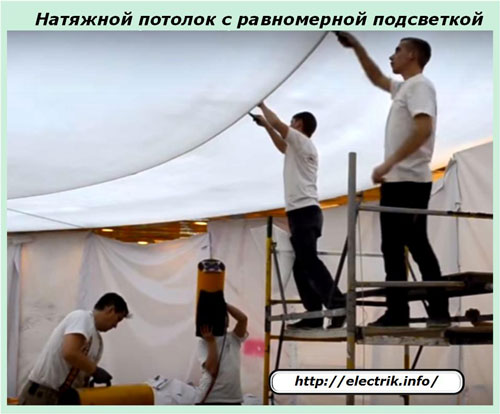
Original lighting effects in rooms are created using hidden sources that provide the same brightness of the canvas over its entire area or in certain areas of the selected areas.
To this end, are used led stripevenly spaced beneath a layer of film or fabric. Their arrangement has a significant impact on the final result.
A development is proposed that can significantly facilitate the solution of this issue. To do this, he made a setup that allows you to visually evaluate the lighting effects from:
1. the frequency of the LED strips in a row;
2. the distance from the LEDs to the stretch ceiling;
3. The effect of additional paintings on the brightness and uniformity of the glow.
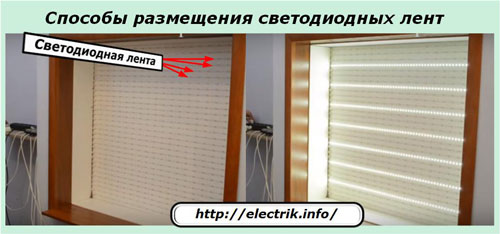
The left photo shows rows of LEDs 3 cm distant, and the right shows power supply for every fourth row located after 12 cm.
Above them, every five centimeters, you can attach a stretch fabric for a visual assessment of the effects created.
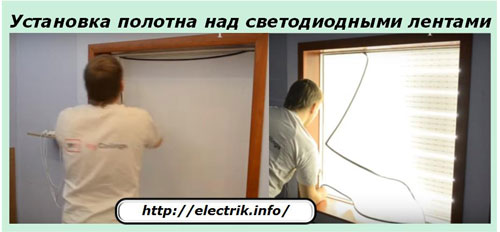
After assembling the circuit and applying voltage, the ratio is selected that is optimal for a particular user.
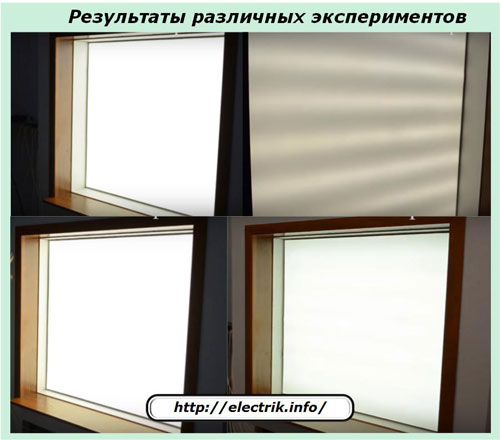
Based on the experiments made the following recommendations are summarized in table.
Using LED strips, it should be borne in mind that, buying them even from eminent manufacturers, you can purchase a design that will stop shining due to defects that have arisen inside the branched circuit in individual sections or along the entire circuit.
With a large accumulation of working LEDs in a limited space, they are intensively heated. The situation is aggravated by the upper location of the stretch ceiling in the room, the lack of ventilation and heat sink. All this reduces the warranty life of LED strips, especially on hot summer days, when a malfunction can occur literally after a few weeks of operation.
Therefore, you should consider the possibility of removing the tension web for repairs and free access to the power supply.
Features of mounting the lamp on a suspended ceiling
If fabric and film cloths do not have mechanical strength that can reliably support the weight of even small-sized point light sources, then drywall, PVC boards, sheets of plywood or fiberboard can be used for these purposes.
In these materials, it is necessary to drill a hole along the diameter of the lamp for fixing it to a decorative coating. It is convenient to carry out such work with special circular saws inserted into an electrified tool.
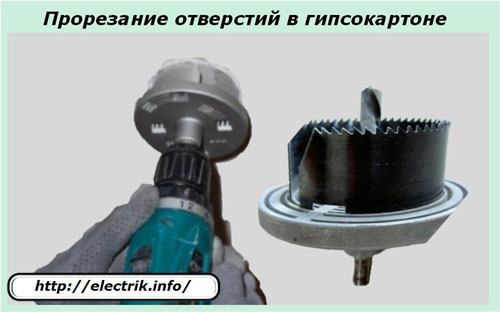
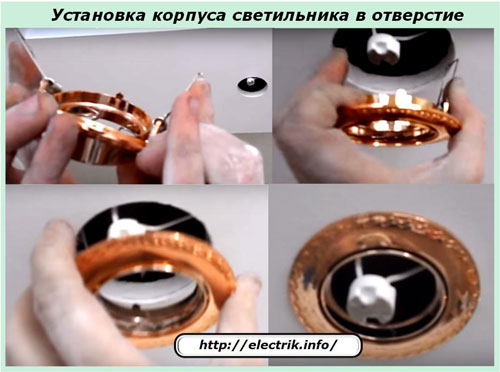
After preparing the hole, the housing is carefully inserted into it to secure the lamp, after compressing the spring-loaded jaws, as shown in the photo below, and then the cartridge connected to the wires is pulled out to install the lamp.
Light fixtures like chandeliers can be mounted on hooks with a swivel mechanism. Such fasteners are conveniently inserted into a pre-prepared hole of a small diameter.
The hook from the bottom is started until the locking tabs completely pass through the surface of the drywall, turning them afterwards to the working position to hold the weight.
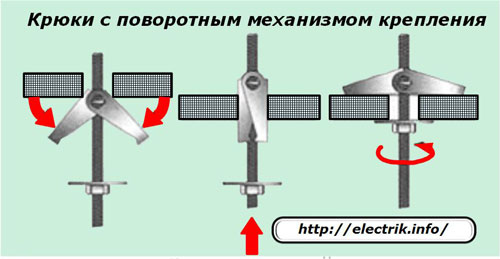
After that, it is enough to screw the stud nut all the way through the lock washer, and screw the suspension ring onto the lower thread, locking it with a lock nut. A light fixture is hung on it.
The final step is to connect the wires and check the operability of the circuit. Many sites urge to do this work on their own, without explaining the danger of making mistakes, the possibility of receiving electrical injuries.
Our tip: trust work with wiring only to trained people with electrical safety qualifications no lower than the third group, or study, master these rules yourself before starting any experiments with current voltage.
See also on our website:
See also at bgv.electricianexp.com
:
